Screenshots and screen recordings are among those irritating computer functions that, though clearly useful, often go unused simply for lack of knowing how.
Modern devices tend to have some built-in tools that can help, and Chromebooks are better than most. But, the features aren’t always intuitive, and they fall short in certain use cases.
This article should help with that. We’re covering three straightforward ways to record on a Chromebook:
- Using the Chromebook keyboard shortcut.
- Using the built-in screen recorder on Chromebook.
- Using a Chrome browser extension to record your screen.
How to screen record on Chromebook (step-by-step)
Option 1: Use Chromebook keyboard shortcuts to screen record
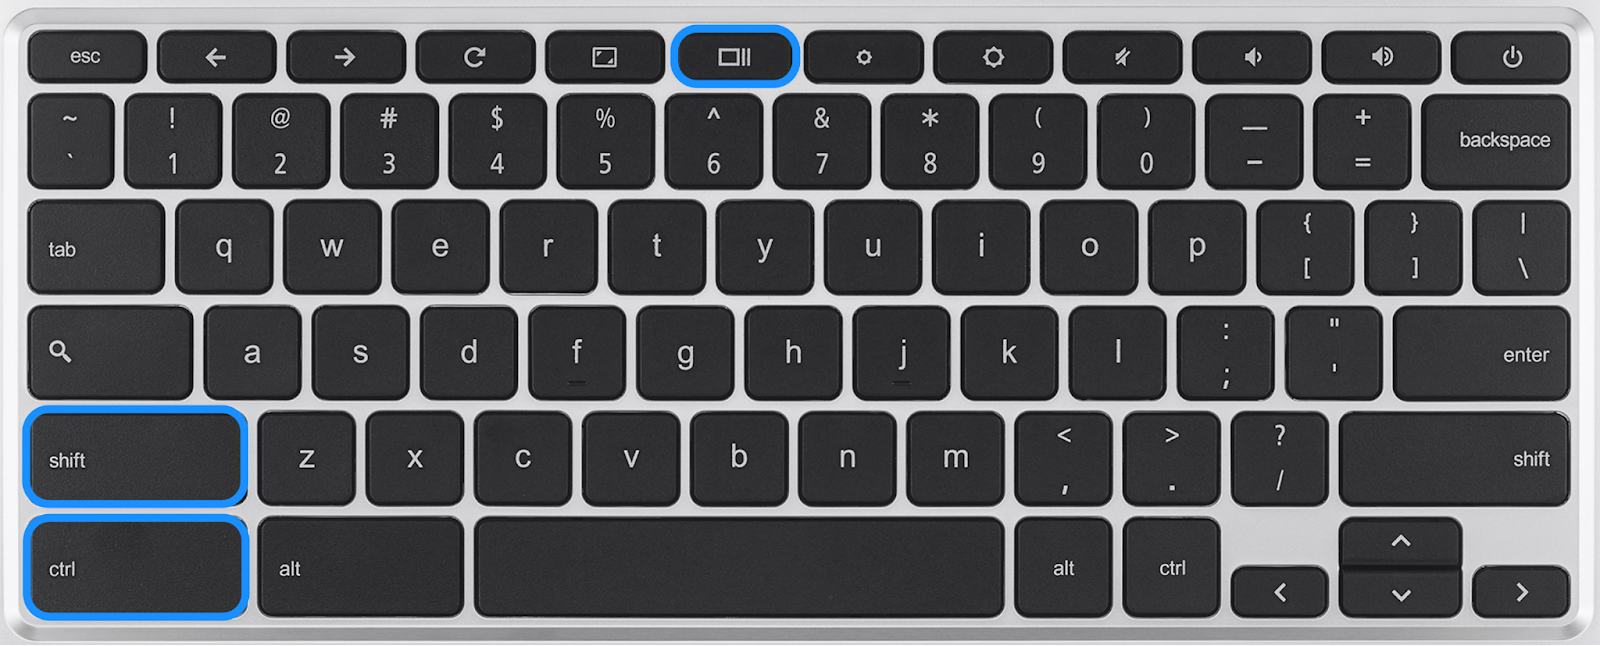
The built-in keyboard shortcuts can do quite a bit to simplify this for you. Just press Shift + Ctrl + Show windows.
Or, depending on your Chromebook model, there may be a dedicated Screenshot key; it looks like a small camera icon. In that case, hit the button to pull up the screen capture menu.
From that menu, choose “screen record” by clicking the button with a video camera icon.

You’ll get three options for how you want to capture the video:
- Full screen to record the entire screen.
- Partial screen to record a portion of the screen.
- Entire window to record the app or browser window you're currently working in.
When you're finished recording, click “Stop recording” at the bottom right.
Your screen recording will be automatically saved in your Downloads folder. But be aware: Chromebooks’ hard drives are comparatively small, and they fill up quickly.
These devices will sometimes delete downloaded files to free up space in an attempt to compensate, and if they do, you’ll lose the recording. If you make a lot of recordings, you may want to consider saving them to an external storage or cloud storage.
Option 2: Use the built-in Chromebook screen recorder
You can also record your screen using the built-in Chromebook screen recorder tool (available on Chrome OS 89 or newer versions). This method offers more recording options and settings than the keyboard shortcut method.
Here's how to use Chromebook's screen recording feature:
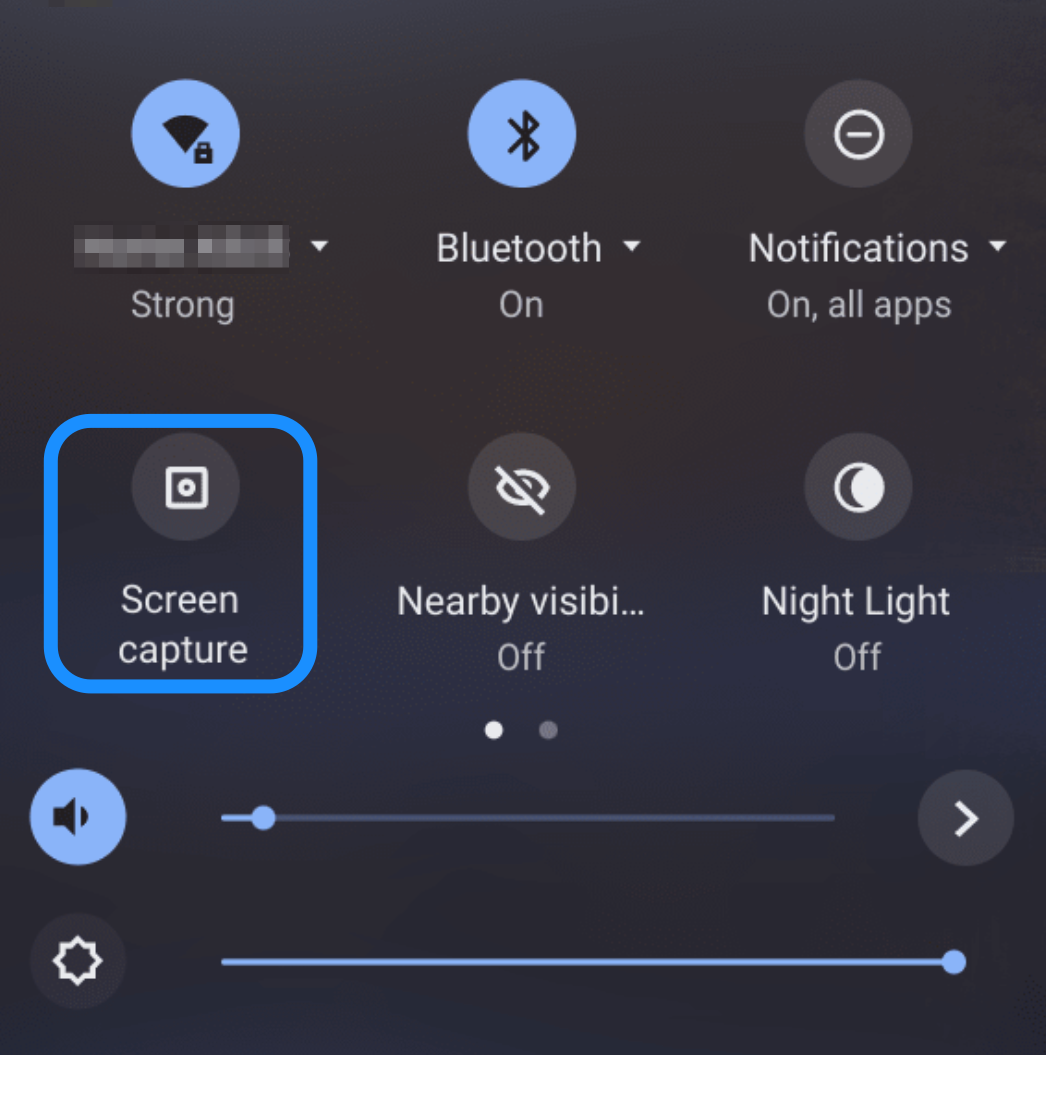
- Click the clock in the quick settings panel on the bottom-right corner of your screen
- Select the Screen Capture button to open the Screen Capture toolbar.
- Choose between the partial screen, full screen, and application window options based on your needs.
- Click Settings (the gear icon), and choose whether you want to record your microphone with the system audio. You can select both to capture your voice narration along with any sounds playing on your Chromebook.
- Click the Record button (video icon) to start the capture.
- When you're finished, click the Stop button to save it.
Option 3: Use a Chromebook extension to screen record
When the shortcut and factory-installed features aren’t enough for your use case, third-party solutions are the next step.
Browser extensions add custom functionality to your core browser. They can let you take notes, block ads, manage passwords, and record your screen with more advanced features than the built-in tools.
There are plenty of reliable browser extensions in the Google Chrome web store for recording your screen on a Chromebook. It’s simply a matter of choosing the one that best matches your needs.
When choosing a browser extension for screen recording, check whether it offers:
- Flexible recording time limits.
- Easy sharing options.
- Watermark-free recordings.
- Voiceover or narration.
- Flexibility to record on any screen size.
- Video editing capabilities.
For this guide, we'll show you how to record your screen using the Loom Chrome Screen Recorder & Screen Capture extension.
Here's how to use Loom's browser extension to screen record on a Chromebook.
- Go to the Loom Screen Recorder & Screen Capture Chrome extension page, and select Add to Chrome.
- Note: You'll need to switch to Google Chrome browser and have a reliable Wi-Fi connection to install extensions and themes.
- Click Add Extension.
- Create a Loom account if you don't have one already.
- Then, click the Extensions tool (puzzle icon) in the top right corner of your browser window.
- Select the pin tool next to the Loom logo icon to pin the Loom extension to your window.
- You can choose to record video with or without audio or record audio only.
- Decide what part of your screen you want to capture — full screen, a specific window, or current Chrome tab — and click Share.
- Click the Start Recording button.
- Click the Stop button to stop the recording.
When you're done, review your recording, save it to your device or Loom account, or share it with your audience.
Other things to know about screen capturing on Chromebook
How to screen record on Chromebook with audio
Struggling to get the audio to do what you want it to? We’ve been there. In this case, you’re likely stumbling over one or more of the following:
- The recording captures audio from the device, such as from a video or application, but not your own narration as you run the capture.
- The capture is recording your voice, but the internal audio from videos and applications is missing.
- The system says it’s recording one or both of the audio sources you want, but it’s silent on the playback.
Admittedly, there are a number of possible causes here, but the two most common are:
- You haven’t toggled the settings to record the audio that’s missing.
- It’s trying to record, but the selected audio input is wrong (e.g., it’s trying to use a hardware mic that’s not connected to the device currently).
Play around with those settings, and odds are you’ll find a fix in a few minutes at most.
How to stop screen recording on Chromebook
Being able to stop the recording promptly is important, especially if you aren’t inclined (or don’t have the necessary tools) to edit out an accidental “outro” you recorded while fumbling for the button.
Here are two things to keep in mind that might help.
First, there will always be a “stop” button adjacent to any “record” button in the user interface (UI) menus. If all else fails, pull up the menu you used to start the recording, and hit the big red square.
Second, most recording tools will add an overlay, or otherwise put some temporary buttons within easy access for just this reason. Even third-party extensions usually do this. You’ll likely see UI elements that will include a stop button. Clicking that should end the capture.
And, ending the recording will typically save the recording automatically, storing it in a default or selected folder.
Where are screen recordings saved on a Chromebook?
The location your recordings are saved in can vary:
- By default on Chromebooks, captures are stored in the Downloads folder. Always check there first.
- Some third-party tools will allow you to customize where recordings are saved, so you can choose the right folder for your needs.
Be warned that storage is limited on these devices; a smaller hard drive is the tradeoff for their small size and portability. So, be sure to back up anything you want to keep before it’s automatically dumped to save space.
Advanced recording controls and troubleshooting
Ok, so you’ve figured out how to make recordings, can navigate to where they’re stored, and have tweaked settings to make sure you’re actually getting what you want in the capture. But, something’s still not quite lining up. What now?
Here are a few actions you can take to troubleshoot any issues you might be experiencing.
Permissions and privacy settings
Chromebooks offer granular privacy settings, allowing you to pick which apps can record your screen and microphone. This is great, at least until default settings you weren’t aware of start interfering with what you’re trying to do.
If you’re having trouble capturing content, you might need to adjust permissions by heading to Settings > Privacy and security > Privacy.
For example, you can manage camera and microphone access, so your screen recorder can capture audio. If screen recording stops working unexpectedly, it may help to reset your browser settings or remove conflicting extensions.
It’s also important to keep your Chromebook up to date, as new software versions often fix bugs. Ensuring your privacy settings are correct and your system is current can resolve most recording errors in a hurry.
Improving recording quality
Some third-party screen recording extensions offer advanced controls like scheduling, partial or full screen capture, and adjustable audio levels. These features let you capture high-resolution tutorials or presentations without extra clutter or background noise.
If you’re still noticing choppy footage or poor quality audio after playing with some of those settings, consider updating your device. Chromebook updates often lead to optimized performance, so if you haven’t run updates in a while, start there.
After that, it’s time to look at the recording hardware. Even an inexpensive microphone or webcam recorder can boost video and audio quality compared to some integrated functionality. Just be aware that Bluetooth can struggle to carry enough data for both output and input simultaneously.
When to use a dedicated screen recording tool
The choice to use a specialized video editor in any use case basically boils down to: Use the built-in solution if it works. Once you find it more frustrating than helpful, it’s probably time to get something more tailored to your needs.
You’ll likely find value in a dedicated capture tool if:
- You constantly find yourself adjusting settings to get the results you need.
- You feel like a critical feature, like being able to trim a video, or an option in the settings isn’t available or is too inconvenient to use properly.
- You record a lot, and some aspects of the tools you currently use drag out the process longer than needed.
- You find yourself thinking “This would be a lot easier if…”
Does any of that sound like you? Then, you should probably start looking at dedicated screen recording or video editing tools.
Record, edit, and share screen recordings with Descript
Sometimes, you want a screen recorder that does it all: records audio and video, generates a transcript, and lets you edit and share your screencast with your audience. That’s where Descript comes in.
Descript is an all-in-one audio and video editor with a full suite of advanced features for creating and producing videos like a pro. It offers features like transcript-based editing, filler word removal, adding captions, and one-take recording. Get high production value with push-button simplicity.
Note: Descript is currently only available for Windows and Mac. Chrome OS users can still access most features using Descript for web, except screen recording at this time.
With Descript's screen recording tool, you can capture the activity on any part of your screen in high-quality resolution. As you record, Descript will generate an instant transcript of your recording, which you can use to edit your video like a doc.
Enhance the recording using Descript's AI features; then, add effects and transitions before sharing the video link with your audience.
The unique text-based editor means you can screen record in one take, deleting bad takes and filler words by simply deleting them from the transcript.
Chromebook screen recording FAQs
How do I screen record with or without audio?
You can screen record with audio on Chromebook using any screen recording tool. Select whether to record your camera or screen. Then, choose your preferred microphone before recording.
For the built-in recorder, click the Settings (gear icon) and enable microphone recording. If you want to record without audio, disable your computer audio; then, record your screen.
How do I stop my screen recording?
Whether you're screen recording in Windows, Mac, or Chromebook, you can stop the recording by selecting the Stop button in the screen capture toolbar.
Where are my Chromebook recordings saved?
By default, Chromebook saves video recordings in the Downloads folder. However, Chromebook hard drives have limited storage capacity, so your device may sometimes delete downloaded files to free up space.
To change where recordings are saved:
- Press Ctrl + Shift + Show windows keys.
- Select Settings > Select folder.
- Save to an external drive or cloud storage, like Google Drive, to ensure you don't lose your recordings.
You can also organize your recordings into folders based on projects or dates to make them easier to find later.
What’s the file format of my recording?
By default, Chromebook saves video recordings as WEBM files. You can convert them to MP4 files for easier sharing and compatibility with more devices and platforms.
Which Chromebook screen recording method is best?
You can screen record on Chromebook using the built-in screen capture tool, keyboard shortcuts, or browser extensions depending on your needs. The built-in tool works well for basic recordings, while extensions offer more features for frequent recording.
If you want more advanced screen recording and video editing features, use Descript. The fully-powered audio and video editor comes with a screen recording tool that captures any part of your screen in high-quality resolution. Then, you can add transitions, effects, music, animation, and titles, before exporting or publishing your video to YouTube, Wistia, or podcast hosting platforms.
Why can't I record my Chromebook screen even after granting permissions?
Sometimes a misconfigured browser extension or outdated OS can block screen recording on your Chromebook. Try resetting your browser to default settings or updating your device to fix hidden conflicts.
Also, ensure your privacy settings are configured, so all relevant apps have camera and microphone access.
Can I schedule a screen recording on Chromebook?
Some extensions allow you to set a timer or schedule recordings, so you can capture content automatically. Though there isn’t a native timer in the built-in Chromebook recorder, you can explore third-party tools that support this feature.
By pairing these tools with an external microphone, you can produce high-quality videos with clear audio.