Making an educational video that actually engages people—and doesn’t just lull them to sleep—is no small feat.
It takes a real combo of empathy and creativity: you need to know exactly who you’re teaching, figure out the best way to keep them awake (and maybe even entertained), then shape all that into a script that flows. Oh, and you’ll also need to edit it so each moment is as painless (read: valuable) as possible.
If you want your educational videos to get through to people, you're at the right place. In this guide, you’ll learn eight steps for creating engaging educational videos, along with best practices and examples for inspiration.
What are educational videos?
Educational videos teach viewers about a particular topic, concept, or skill. These videos provide comprehensive information to help viewers understand a subject and gain expertise.
Educational videos are also widely recognized for improving comprehension and retention. As one resource puts it, “Educational videos are an effective way of learning a concept or skill. It has shown to improve comprehension and boost retention.” If you’re pressed for time or design isn’t your strong suit, you can even start with free educational video templates to get a head start on structure and visuals.
Brands can create different kinds of educational video content like:
- How-to instructional videos: Teach customers how to use a product or solve a specific problem while plugging their product as the solution.
- Explainer videos: Explain topics related to their product/service/industry.
- Tutorial videos: Educate their customers about the different features and functionalities of a product.
- Training videos: Teach employees different aspects of their roles and the company’s processes.
- Documentary videos: Explore a subject or issue related to their product/service/industry.
As one expert puts it, “While instructional, how-to, and training videos are all types of videos that can be considered 'educational,' they’re usually more focused on teaching a skill or skillset.”source So consider where your video falls on the spectrum—purely skills-based or more broadly informative—when crafting your content.
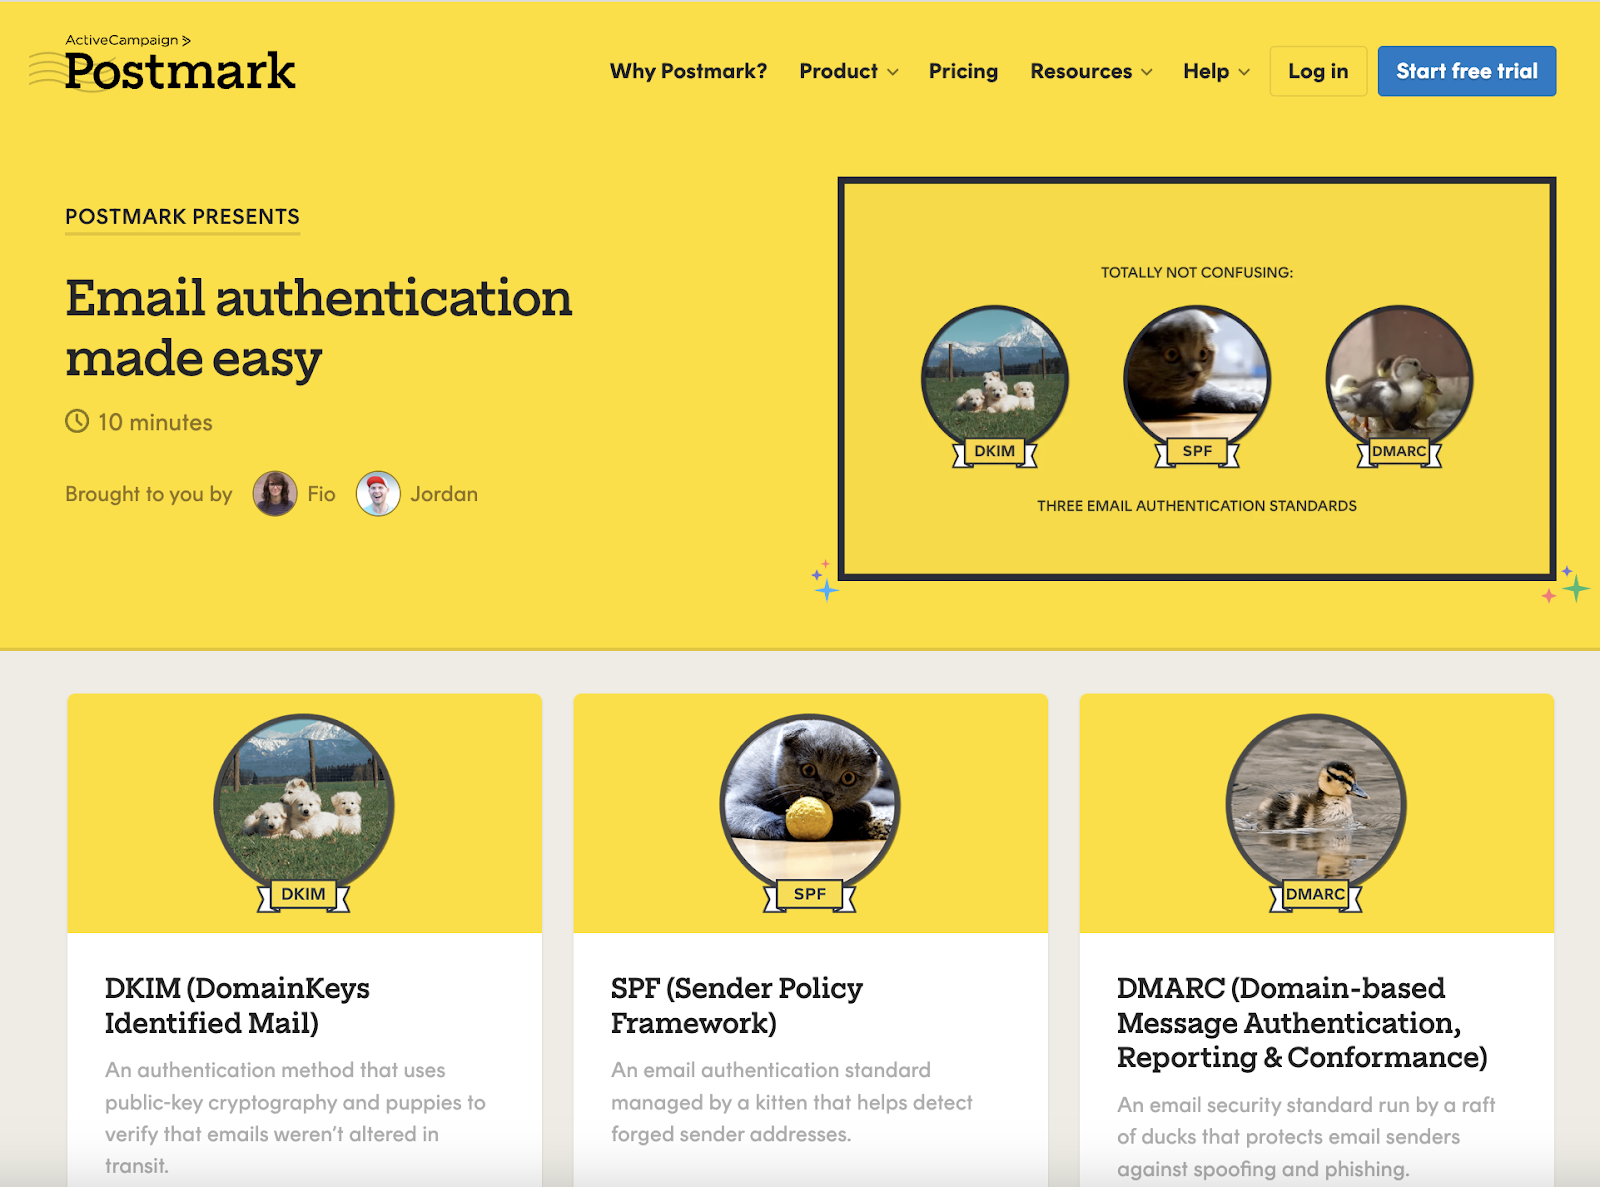
Brands can also create an educational video series or online course to dive into a specific subject. Consider the series on email authentication from Postmark:
 |
The more insightful, valuable and engaging educational videos are, the more you will position your company as a leader in its industry.
8 steps for making a great educational video
- Define your purpose and target audience
- Choose a topic
- Develop your content
- Draft a video script
- Gather your equipment
- Record your video
- Edit and polish your video
- Publish your video
Step 1. Define your purpose and target audience
Before you dive into the recording part, it’s important to define the purpose and target audience. Defining the purpose of an educational video can help you figure out the best learning path and video structure.
To define your purpose, ask questions like:
- Why are we creating these videos? Do we want this to be an educational video that’s solely focused on teaching our audience a specific subject/topic to build brand awareness? Or are we looking to use this video for lead generation/conversions?
- Does the topic require a practical demonstration? If yes, what’s the best way to go about it?
- What’s the best educational video format for this topic?
- What’s the best video theme to implement: presenter-led, screencast, motion graphics, whiteboard animation?
Understanding who your viewers are can help you gain insights into the way they think, what influences their purchasing decisions, and what keeps them engaged.
To know your audience, ask questions like:
- Who are we teaching: potential and/or existing customers? What are their target demographics?
- What’s the one big reason they might be watching this video? Are they looking to purchase? Or maybe they just want to learn something? What’s the best way to get as many people as possible to take some kind of action while/after watching this video?
- What influences their purchasing decisions: data, stories, examples?
If you answer these questions, you will be able to decide what type of interactive video to create, what theme to implement, and how to convert them into paying customers.
Step 2. Choose a topic
Choose a topic that aligns with your brand’s expertise and passion. Teaching a subject you’re knowledgeable and enthusiastic about makes the content more engaging and authentic. Conduct a quick survey, check online forums, or analyze search trends to see what people are curious about or struggling with.
Say you're the head of content for a software brand specializing in productivity tools. Your audience primarily consists of professionals and businesses looking to streamline their workflows.
Through customer feedback and online research, you discover there's a growing interest in automating routine tasks to save time and be more efficient. However, there's a noticeable gap in understanding: most people don’t know how to automate their work effectively.
To address this, you decide to create a video series titled "Mastering Automation: Transforming Your Workflow with [Your Software Brand]". The first episode could focus on "Automating Email Management for Better Productivity." Instead of just a tutorial, you plan to incorporate case studies from real customers who have successfully used your software to automate their email tasks.
Step 3. Develop your content
In this step, you lay the groundwork for a successful video. Identify credible sources of information for your video. This may include academic journals, industry reports, expert interviews, or even an interview with a product manager.
It’s important to get different viewpoints and approaches to the topic. It helps give viewers a well-rounded understanding and can address many queries at once.
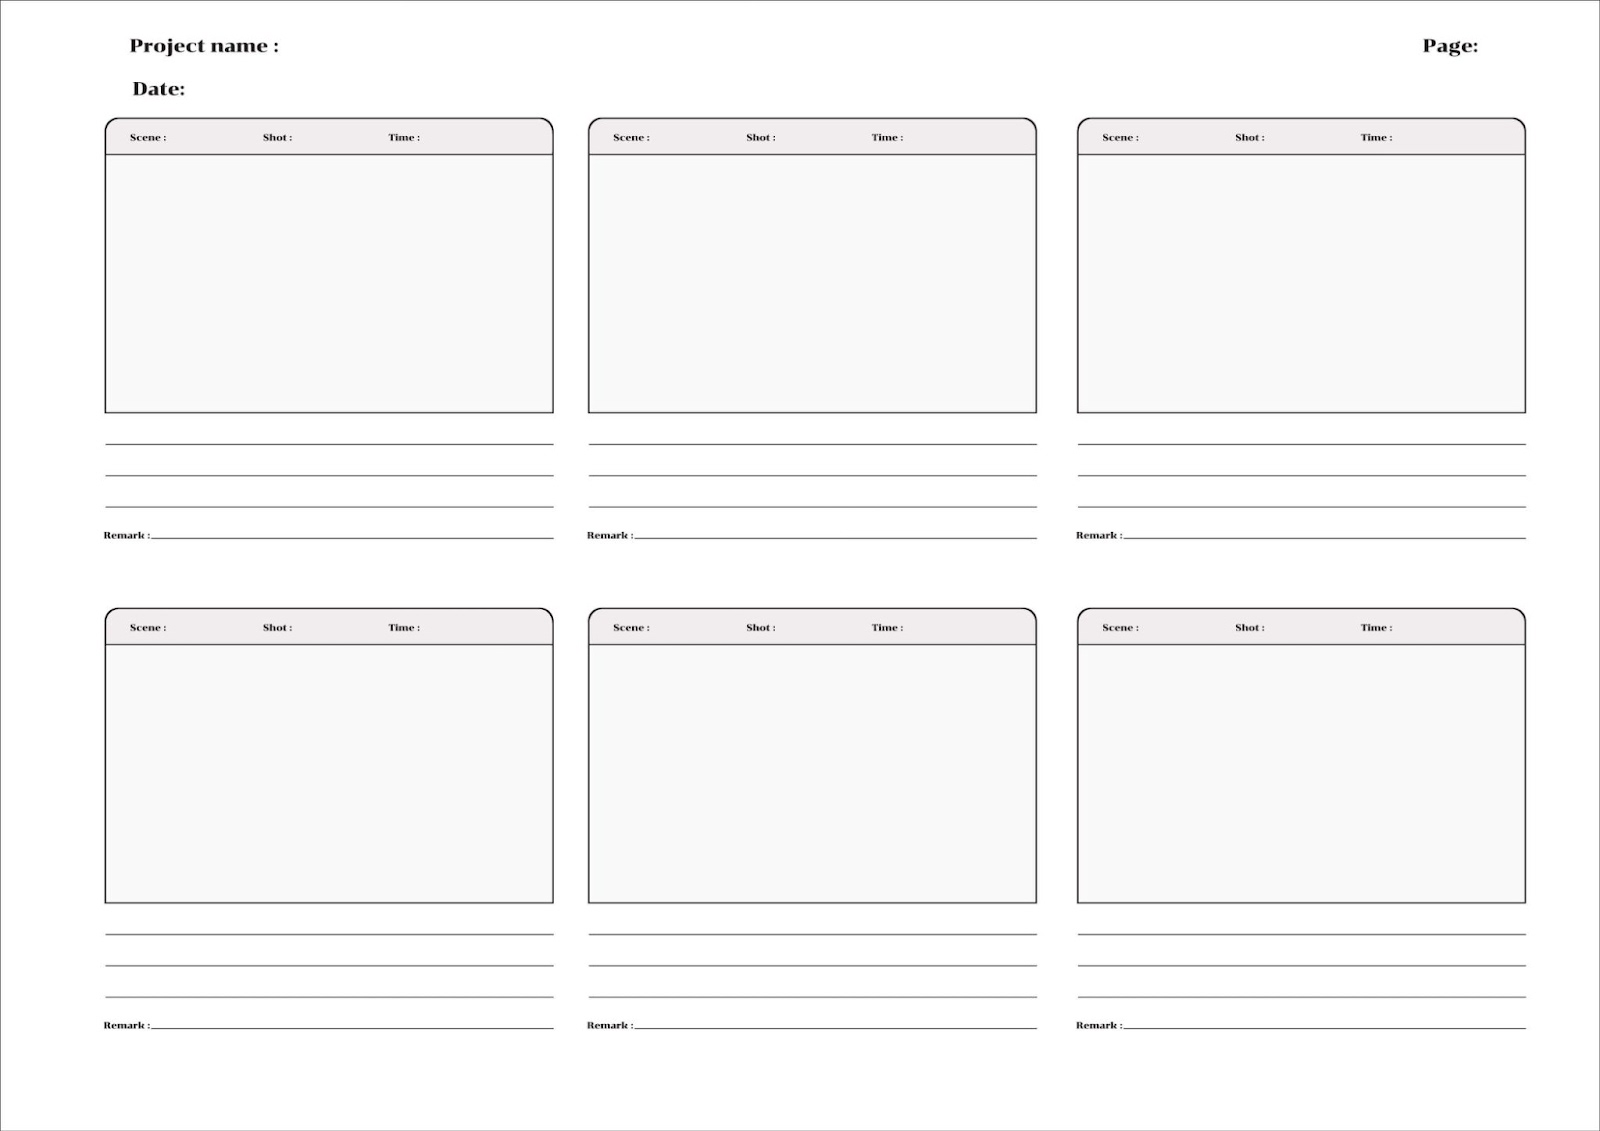
Once you’ve got all your info, create a storyboard. A storyboard is a visual representation of how your video will unfold, shot by shot. It's particularly useful for planning visual elements like animations, graphics, or on-screen text. Use the storyboard as a template for your own planning purposes.
 |
Step 4. Draft a video script
A video script serves as a blueprint for your video.
The script isn't meant to be followed exactly, but it can help you build a framework that ensures all important points are covered and the video stays focused on your learning objectives.
Lizi Gigauri, Junior Marketing Coordinator at Alphamoon with several years of video marketing experience, knows the importance of sticking to a rough video script template. “Having a video script is important as it provides structure to your video and highlights the key point you want to emphasize. But adhering too rigidly to it can have some consequences. What if you end up forgetting your lines? Or sounding robotic or unnatural?”
Write a script that clearly conveys your information in an engaging way. The script should be tailored to your audience's understanding level and interest, and include an introduction, main body content, and a conclusion or call to action.
Step 5. Gather your equipment
Before you start recording, you’ll need to get the right video equipment.
Depending on your budget, this can range from a smartphone with a high-quality camera to professional-grade video cameras. You'll also need good lighting. You can use softboxes, ring lights, or LED panels, depending on your filming environment.
Invest in a quality microphone to ensure high-fidelity audio. Clip-on lavalier mics are great for speaking directly to the camera, while shotgun mics work well for capturing ambient sounds.
When it comes to software, it’s best to get a tool where you can record and edit in the same place. With Descript, you can record video and audio, record your screen, generate transcripts, add titles, shapes, and sound effects, and access AI tools to speed up your workflow. Pricing starts at $12 per month.
Overall, determine your budget beforehand and choose the best equipment within your financial constraints. Consider the scale and complexity of your videos. A simple setup might suffice for talking-head educational videos, while more complex projects might require advanced equipment and a production crew.
Step 6. Record your video
The video production process heavily depends on your video format and technique. For instance, if it’s a how-to screencast, you just need to start recording your screen and demonstrate the steps. If you’re making an animated video, you may need to hand off your script to a talented animator and voiceover actor.
For this walkthrough, let’s say you’re creating a talking-head video. To start, choose a quiet, well-lit location. If you're filming indoors, ensure the room has good acoustics and minimal echo.
Use a tripod or a stable surface to position your camera. Make sure the frame is well-composed, focused on the subject (presumably, you), and free of distracting backgrounds.
When you’re ready, start recording your video in Descript. This will save you a lot of time because you can also edit videos inside the platform. Win-win.
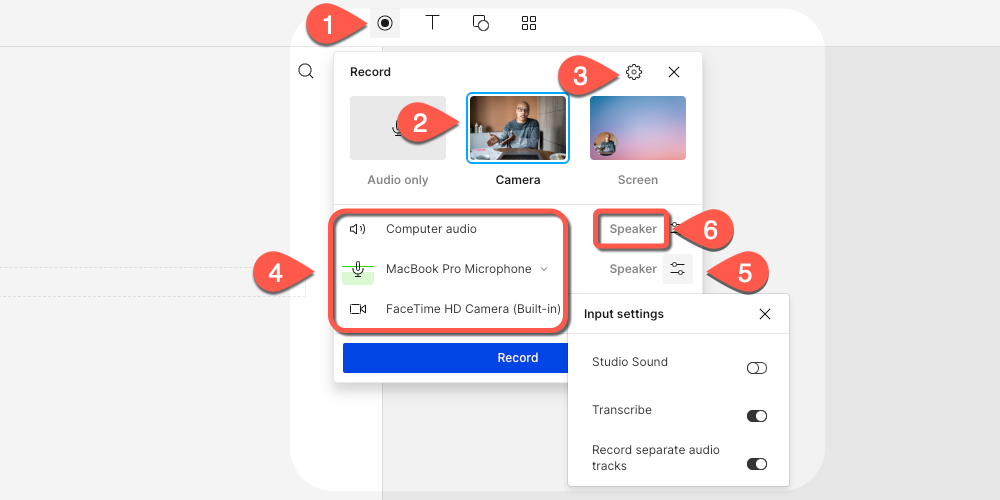
Here’s how to record in Descript:
- Click the Record panel at the top of your editor.
- Select Camera for live-action footage, or Screen for screen recording with a webcam.
- Click Settings and make adjustments to your recording settings as needed.
- Choose your audio inputs.
- Click Additional settings and choose to add Studio Sound, transcribe, or record separate audio tracks.
- Add speaker labels by typing them into the text box next to your inputs.
 |
Then, hit the Record button, and you’re ready to roll.
When recording, practice speaking clearly and with enthusiasm—your viewers will feel it when you’re excited. Don’t hesitate to do multiple takes. You can easily remove and mix footage with Descript’s text-based video editor in post-production.
💡 TIP: Adjust the camera settings for optimal video quality. This includes resolution (1080p or 4K), frame rate (24fps for a cinematic look, or 30fps/60fps for smoother motion), and white balance.
Step 7. Edit and polish your video
Now, your footage is ready to edit. Video editing may seem daunting after recording, but with Descript’s text-based editing, it’s really simple.
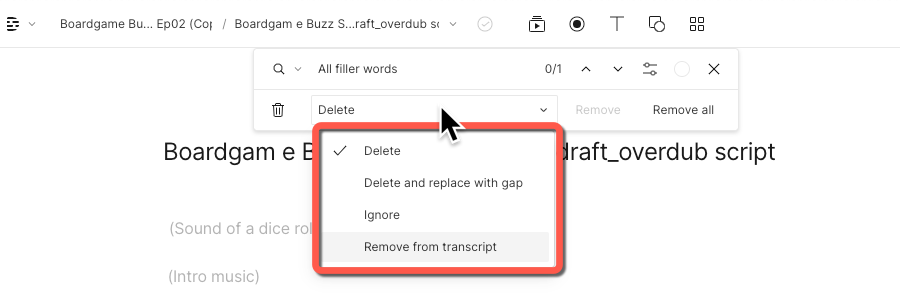
The first step is to organize and assemble your clips. Remove any unnecessary parts, such as long pauses, errors, or redundant segments. The goal is to keep the video engaging and to the point. You can remove filler words with Descript in seconds.
From the Action bar, choose Remove filler words, then select which words you’d like to delete.
 |
Next, you’ll want to add transitions to make sure each scene flows smoothly into the next. Then, adjust the color and lighting of your footage to ensure it's consistent across the entire video.
After getting the video a good place, there are few more edits to make:
- Add background music and effects.
- Remove background noise and enhance your audio with Studio Sound.
- Turn on Eye Contact to ensure you’re looking directly into the camera in every take.
- Add titles, headings, and other text to highlight key points.
- Add subtitles and captions to make your content more accessible.
- Record additional voiceover and fix speaking mistakes with AI Voices.
⭐ Bonus: Invite your team to collaborate and leave feedback on the video. Collaborators can correct your transcript, edit content, and export the video once it's approved.
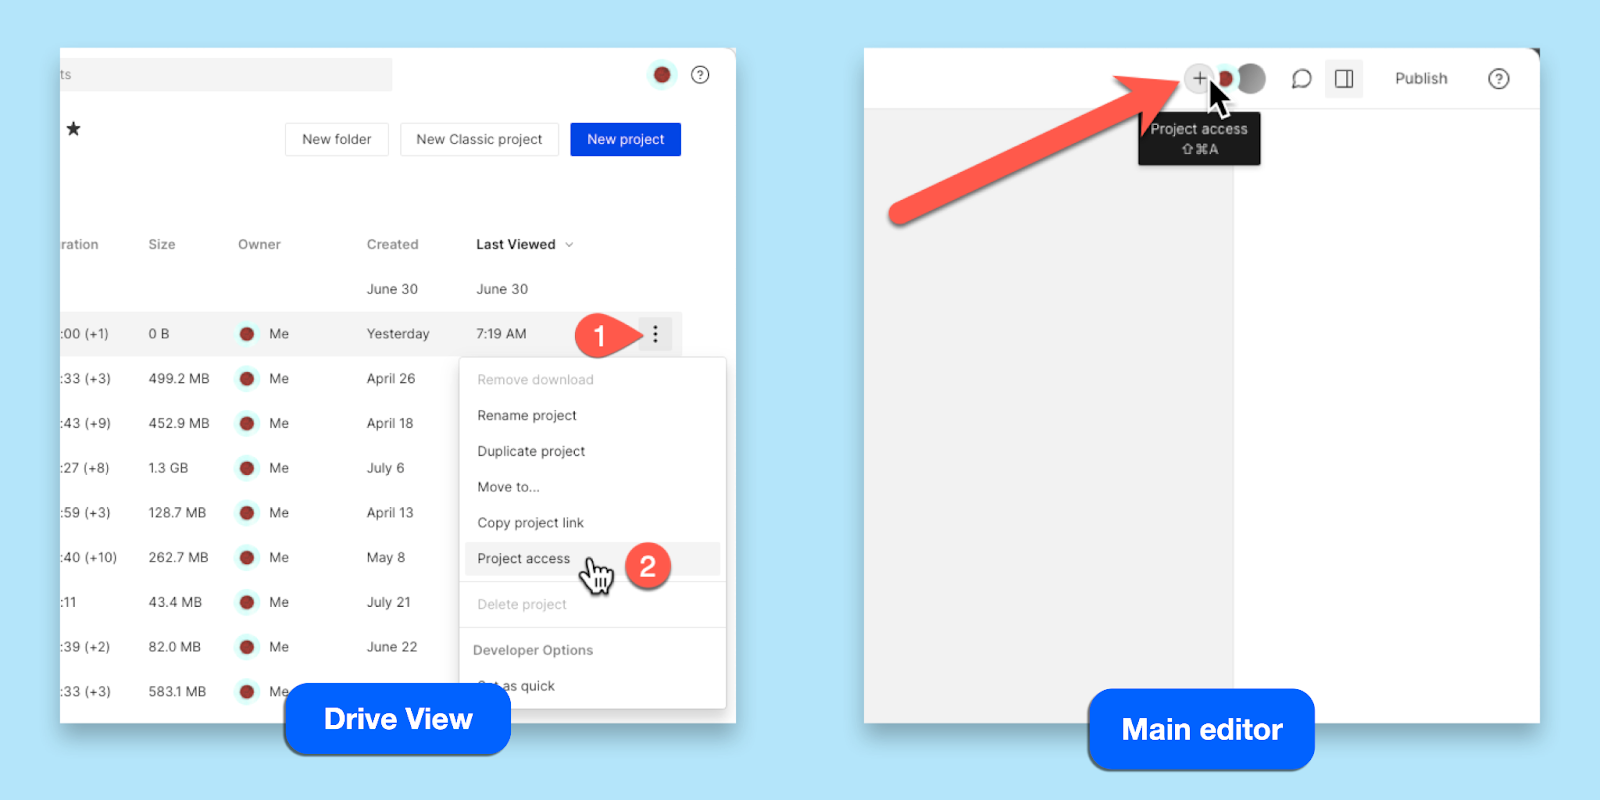 |
🤖 Learn: 10 best AI video generators for beginners, creators, and businesses
Step 8. Publish your video
Ok, last but not least, it’s time to get this educational video live for the world to see. There are two common publishing options in Descript: YouTube and Wistia.
Uploading a YouTube video is simple. From your editor:
- Select Publish
- Open the Publish tab
- Select YouTube from the dropdown menu.
- Customize your video settings (title, description, category, tags, access), then click Publish.
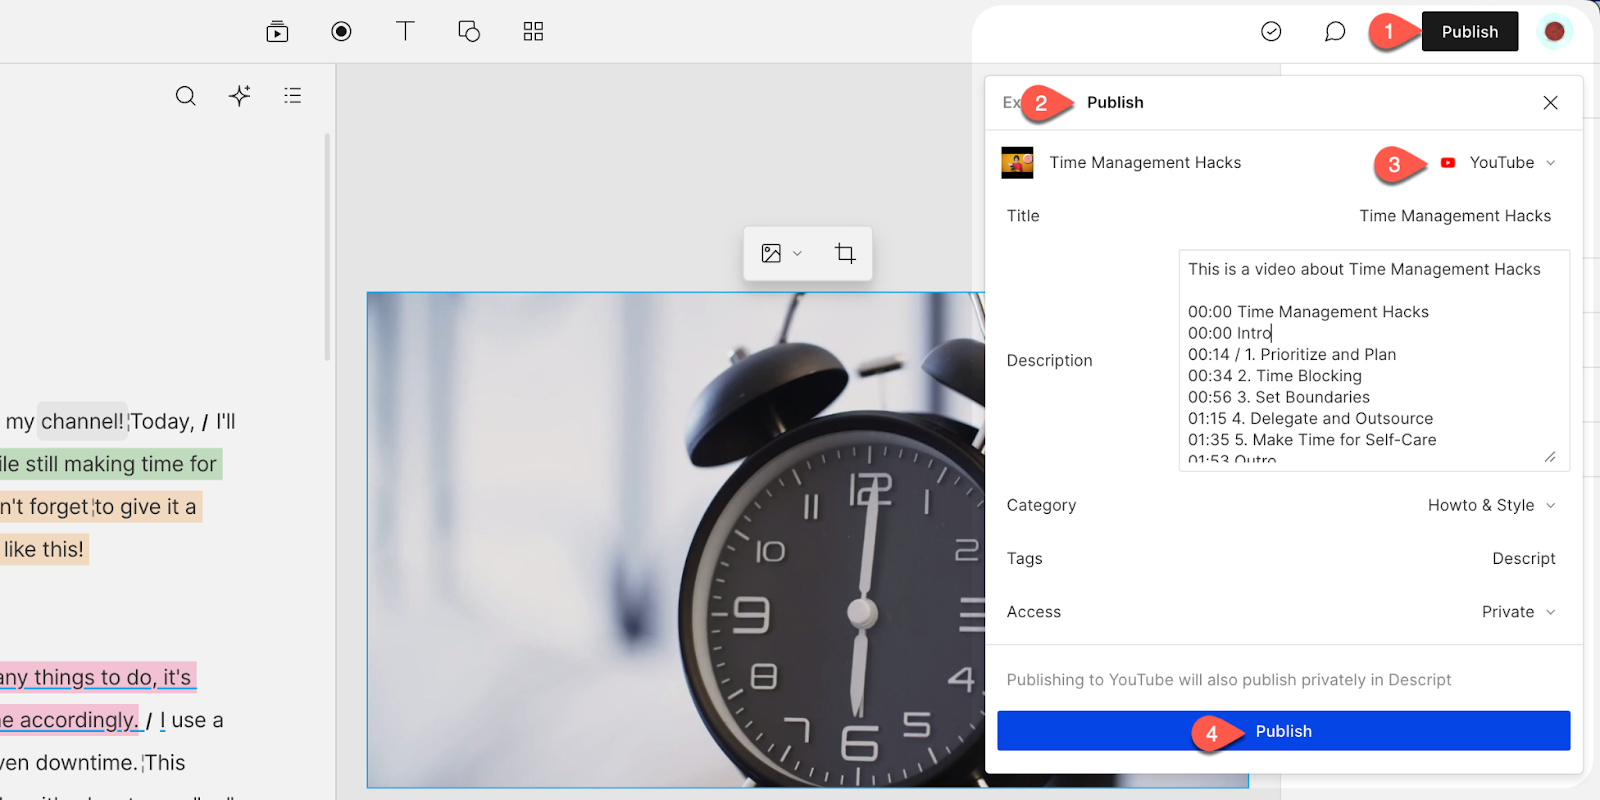 |
If you’d rather publish to Wistia, you’ll follow the same process by selecting Wistia in the dropdown menu. Once your video is exported to your Wistia account, you can embed it anywhere you host learning content.
💡 TIP: Use Descript’s Find Good Clips to find the best video clips for social media to promote your new explainer video.
Educational video best practices
Focus on the hook
To grab people’s attention at the outset, you need to make your hook engaging.
You can do this by starting your video with a question, fact, quote, or joke.
You can also start with a cold open—a scriptwriting technique that starts the video in the middle of the action and makes viewers want to keep watching to find out what happens next.
🎥 Hone your skills: How to go viral on YouTube: 12 tips to boost your chances
Add a touch of humor
When we reached out to Campbell Tourgis, Executive VP & Chief Operating Officer at Wainbee with 20+ years of experience creating elearning videos, for his thoughts on how to spice up educational videos, he focused on humor.
He says “In serious subjects, a well-placed joke or light-hearted moment can make complex topics more relatable and break the monotony. Think of it as a way to create a positive and enjoyable learning environment. Not only can humor make educational videos more engaging, but it also transforms them into memorable lessons.”
However, humor should support the educational goals, not overshadow them. Going overboard risks diluting the seriousness of the content. The trick is to sprinkle in humor thoughtfully and ensure it fits the context and audience.
Keep your videos short
The length of your videos can directly impact whether your audience sticks around or leaves. According to Wistia’s 2023 State of Video Report, here are the average engagement rate according to video lengths:
You can clearly see that shorter videos usually get more engagement.
Erica Mac Donald, the CEO and Founder at Engaging New Media, explains, “Keep your videos short and focused on one learning goal. Don’t bombard your viewers with irrelevant information.”
“Your viewers’ attention span and retention will decrease as the video length increases. Therefore, it’s important to avoid unnecessary details and distractions and deliver the most important information in a concise and clear way. That’s how you can increase your customer/employee/student engagement.”
But at the same time, make sure you’re not sacrificing the quality or completeness of your content for the sake of brevity. While you should try to keep your videos short, try to strike a balance between conciseness and usefulness.
Practice your speaking
Using a conversational tone and speaking with enthusiasm will engage your learners and make them feel as if they’re having a dialogue with you. Use questions, stories, quizzes, and humor to keep your videos engaging.
Invest in storytelling
It's human nature to love a good story. When you convey a compelling and relatable story, you can trigger your viewers' emotions and make them feel invested. Your educational video will become even more engaging and memorable as a result.
3 best educational video examples to inspire yours
Alongside putting together a step-by-step guide and best practices, we wanted to make sure you’ve everything in place to create valuable and effective educational videos. So, we’ve put together some of the best educational video examples you can look at for inspiration:
Semrush’s “What is Semrush? Digital Marketing Tool EXPLAINED”
Semrush is an all-in-one digital marketing platform with more than 50 tools to assist you across different aspects of digital marketing. When you offer over 50 tools, creating an educational video that explains what your product is all about can be a bit tricky. After all, you don’t want to bombard your audience with too much information all at once.
This is a great example of how to create an educational video for a comprehensive platform like Semrush. Rather than bomboarding their viewers with dozens of tools and feature mentions, Semrush demonstrated how their platform can help their audience with key pain points:
- Fix technical website issues
- Gain insights into competitors’ marketing strategies.
- Optimize website content.
- Improve backlink profile.
- Track marketing progress.
Postmark email authentication series
As you can tell, Descript has a whole lot of video editing features we need to explain to users. That’s why our video marketing strategy is focused on explainer and tutorial videos like the one above, which has helped grow our YouTube channel to over 30,000 followers.
Throughout this video, Ramdy guides viewers on how they can repurpose their existing video content for social media, something creators and marketers regularly struggle with.
In the video, he presents Descript's features front and center, showing off how viewers can create social clips in minutes. This not only helps us reach more prospects who are searching for related queries on YouTube, but also current users who want to learn how they can use Descript more effectively.
Postmark Email Authentication Series
 |
Imagine covering the entire history of human civilization in just one video. Not possible, right? Similarly, it’s not possible to teach email authentication in one video.
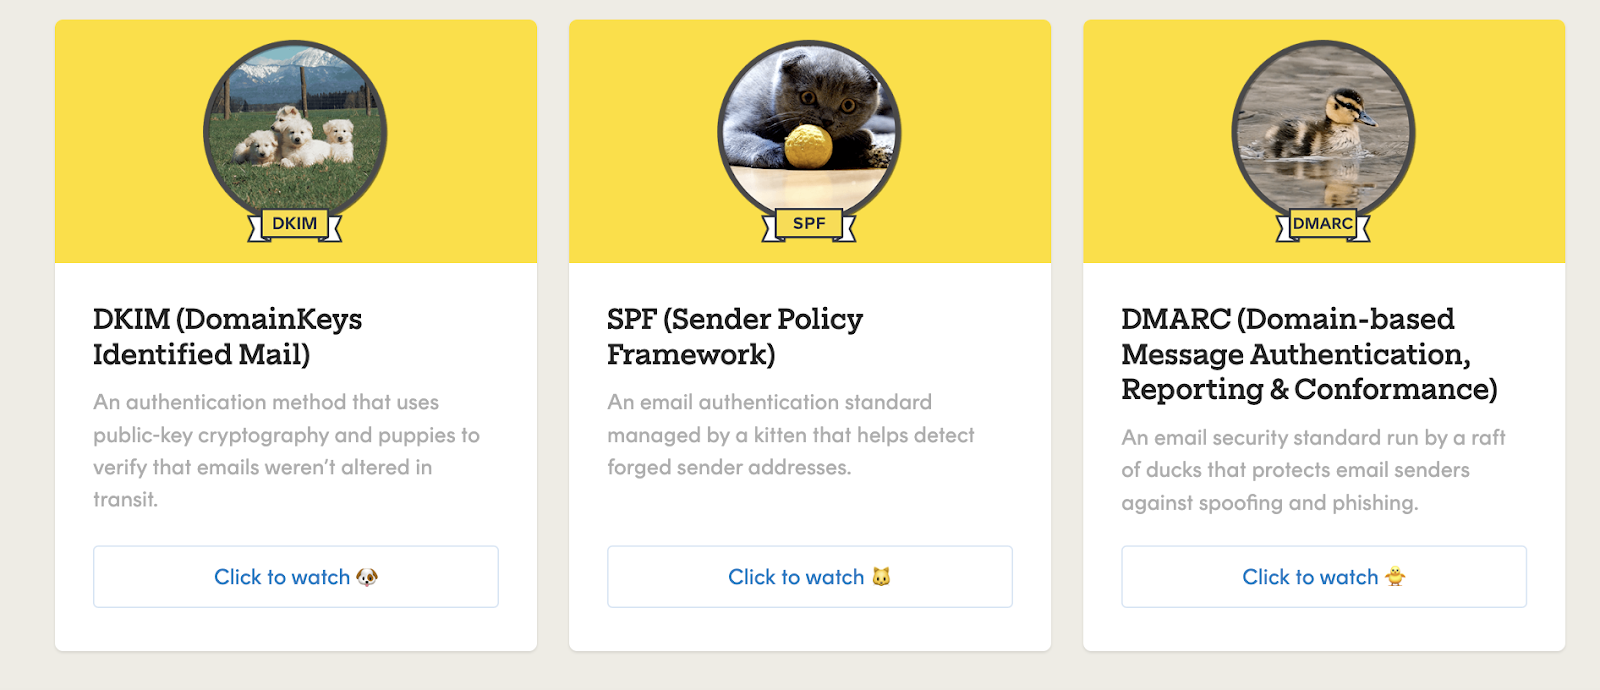
That’s the reason dr.fio, former Brand & Editorial Lead at Postmark, created an online video series on email authentication during her time at the company. This series covers different email authentication standards:
- DKIM (DomainKeys Identified Mail)
- SPF (Sender Policy Framework)
- DMARC (Domain-based Message Authentication, Reporting & Conformance).
These video lessons do a great job at explaining these complex email authentication standards in a simple and straightforward manner.
The marketing team at Postmark has also done a great job at infusing a perfect balance of storytelling, humor and value into the mix. That makes their video lectures on email authentication engaging and insightful at the same time.
Create educational videos with Descript
Descript makes video creation a breeze, whether you’re a content creator, educator, or marketing team. Use the video maker to record your footage, then edit everything in the same dashboard to create engaging videos that make an impact.
Hundreds of companies are already using Descript to create world-class educational videos. See how it can work for your brand with a product tour.
Frequently asked questions
How do I make a simple educational video?
Start by choosing a clear learning goal. Write a short script or outline to stay focused. Gather any images or slides you might need, then record your screen or camera using user-friendly software like Descript. Edit out long pauses or mistakes, and add captions or visuals to keep it engaging. Keep the video short and highlight your main points so viewers can easily follow along.
How do I make an educational video effective?
Focus on a single concept or skill per video, and use real examples to keep things concrete. Start with a hook—like a question or quick story—to grab attention. Define clear objectives, then stick to concise explanations. Add captions or on-screen text for clarity, and include a quick summary or call to action at the end so learners know what to do next.
Which software can I use to create educational videos?
Many tools exist for making videos, but Descript is designed for hassle-free editing and transcription. It lets you record, trim awkward pauses, remove filler words, and add captions or images—all in one place. Choose whichever tool feels easiest for you, but pick one that helps you record, edit, add text, and share without a complicated process.
Is there a free option for creating educational videos?
Yes. Descript offers a free plan that includes basic editing, screen recording, and transcription, though exports will carry a watermark and are limited to 720p resolution. If you need more features, such as higher-resolution exports or advanced editing, you can upgrade to a paid plan.