People would rather watch a tutorial video than wade through documentation or figure things out by trial and error. Whether it's troubleshooting a product, creating macrame plant holders, or editing videos by editing text, video tutorials deliver clarity when it matters most.
Good tutorials both show and tell—giving viewers exactly what they need to succeed. They save your audience from frustration and spare you from repeating the same instructions for the thousandth time. Everyone wins.
The numbers back this up. Research found that half of YouTube users visit specifically to learn something new. That percentage has likely increased—just look at how "how to" searches dominate today's online landscape.
If you find yourself teaching the same process repeatedly, need to onboard users to your product efficiently, or want to share your expertise without scheduling endless calls, it's time to create a tutorial video. Here's how to make one that actually delivers results.
1. Choose the right tutorial video format
Answering the right question using the wrong format can result in a tutorial video that wastes both your time and your audience's. Understanding what makes an effective tutorial video is crucial for teaching any concept clearly and efficiently.
Choosing a format that efficiently transfers knowledge from your head to your viewer's is more important than production value. The best instructional videos focus on clarity and purpose rather than fancy effects.
Tutorials are inherently transactional: The audience has a question or goal in mind, and they want a quick but complete solution. The rest is just window dressing.
Take this simple tutorial on how to tie a tie, which is practically ancient in internet time. It can still go toe-to-toe with any newer content made with more expensive gear—simply because it wastes no time in delivering on its promise.
There's no long-winded preamble about the creator's tie-tying credentials, no unnecessary effects. It just shows you how to tie a tie, quick and easy, in one take. This is the essence of what makes tutorial videos effective - they deliver exactly what the viewer needs.
To help you find the best way to package your tutorial video idea, here are some popular approaches you can consider with examples from different industries. Whether you're creating content for marketing, education, or personal projects, these formats will help you teach effectively.
Types of tutorial videos and when to make them
Tutorial videos for straightforward tasks
When the best answer to a question is “just do exactly as I do”, recording yourself performing a task as you narrate what you're doing is all your audience needs.
Instructional videos are ideal for topics like "how to bake a vanilla sponge cake" or "how to do a proper pushup" where you need the audience to follow your method exactly as prescribed. These step-by-step tutorials work well when demonstrating physical tasks with visual components.
Simplicity and clarity go further than fancy effects and expensive gear.
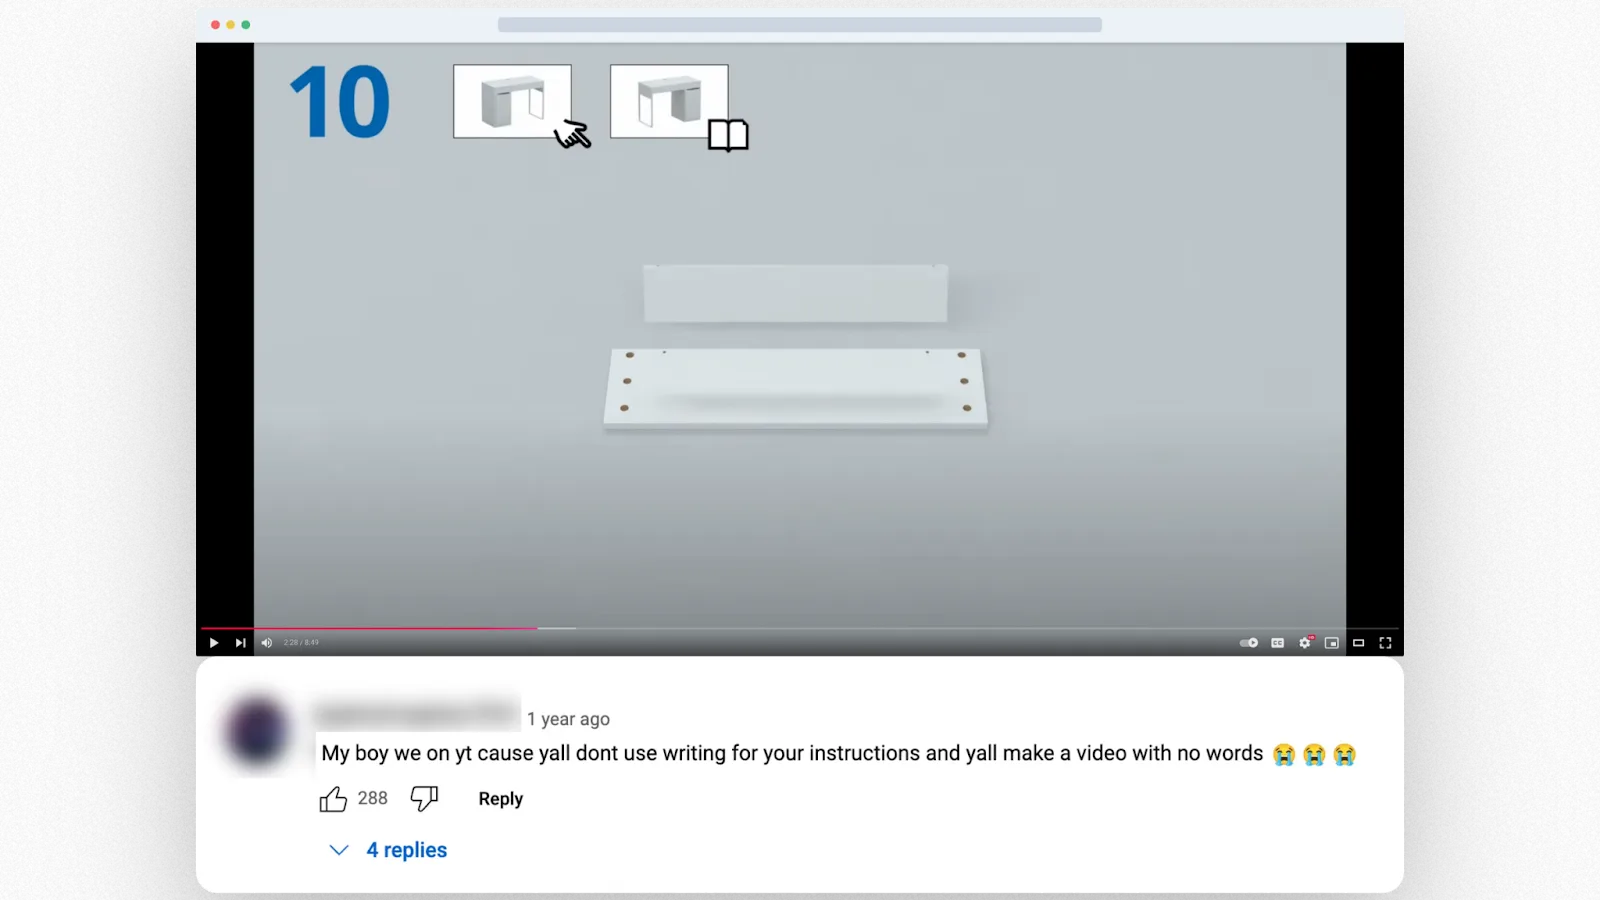
Take this YouTube video by Original Furniture Reviews on how to assemble the Micke desk from IKEA.
With minimal post-production, it's far more helpful than IKEA's own assembly video, which is essentially an animated version of the physical manual that includes no text or narration to instruct viewers.
Tutorial videos for complex step-by-step projects
Sometimes what you want to teach—like starting a podcast or becoming a mime—isn't as simple as following along with what you do. In these scenarios you're guiding the viewer through a set of steps; they make their own decisions at each step, based on their context. This is where a comprehensive tutorial video becomes essential.
These are step-by-step guides. Since each step can turn into a mini tutorial, these videos tend to run longer; sometimes a lot longer, like this 1-hour guide to setting up a Shopify store.
Each step is introduced with a transition slide and chapter label to help viewers navigate the video and revisit it as they chip away at their project.
Tutorial video listicles for learning skills
Tutorials don't always need to be structured as a series of linear steps leading to a specific result, like a new ecommerce website or a fully-assembled piece of furniture.
They can also help an audience develop a skill—like learning online marketing to grow their ecommerce business or woodworking to make their own furniture.
By drawing on your experience to curate practical tips and advice, you can help your audience go from beginner to intermediate, or intermediate to expert. Tutorial videos in this format build skills progressively rather than completing a single task.
For example, if someone who knows knows how to make videos but wants to make better videos, a roundup of tips like this one can offer a lot of value.
Screen recording tutorial videos
When your audience just wants to know where to click and what to type to get something done, a simple screen recording showing you doing it yourself can often be turned into an effective tutorial in under an hour.
These tutorials are perfect for explaining how to do anything on a computer, like setting up a printer or using a particular software product or app. Screen recording tutorials are especially effective for software demonstrations and digital workflows.
Just because they don't take a lot of effort to make doesn't mean they can't pack a lot of value, like these 1-minute tutorials by PiXimperfect on how to do really specific jobs in Photoshop.
Troubleshooting tutorial videos
What if you know the problem you want to solve for viewers but don't know the exact cause or conditions necessary to provide the right answer?
Maybe they want to know how to fix a leaky faucet (is it a compression or ball faucet?), or figure out why their internet keeps disconnecting (is it a wired or wireless connection?). These troubleshooting tutorial videos need to address multiple scenarios.
One approach is to create an instructional video for each scenario and its solution, hoping your viewers can self-select the tutorial that applies to them.
But for people who don't know what they don't know, you can cover multiple scenarios in one video and use a series of diagnostic questions to help the most relevant solution for them by process of elimination.
A good example is this video about fixing a hole in drywall, where the best method changes depending on the size and state of the damage.
2. Plan and script your tutorial video
Once you've decided on the best format for the tutorial video you want to create, you might be tempted to start shooting it. But planning is essential for creating effective instructional videos that truly teach your audience.
Before you do, you can save yourself a ton of effort and create a better video by starting with a shot list and script that might look something like this:
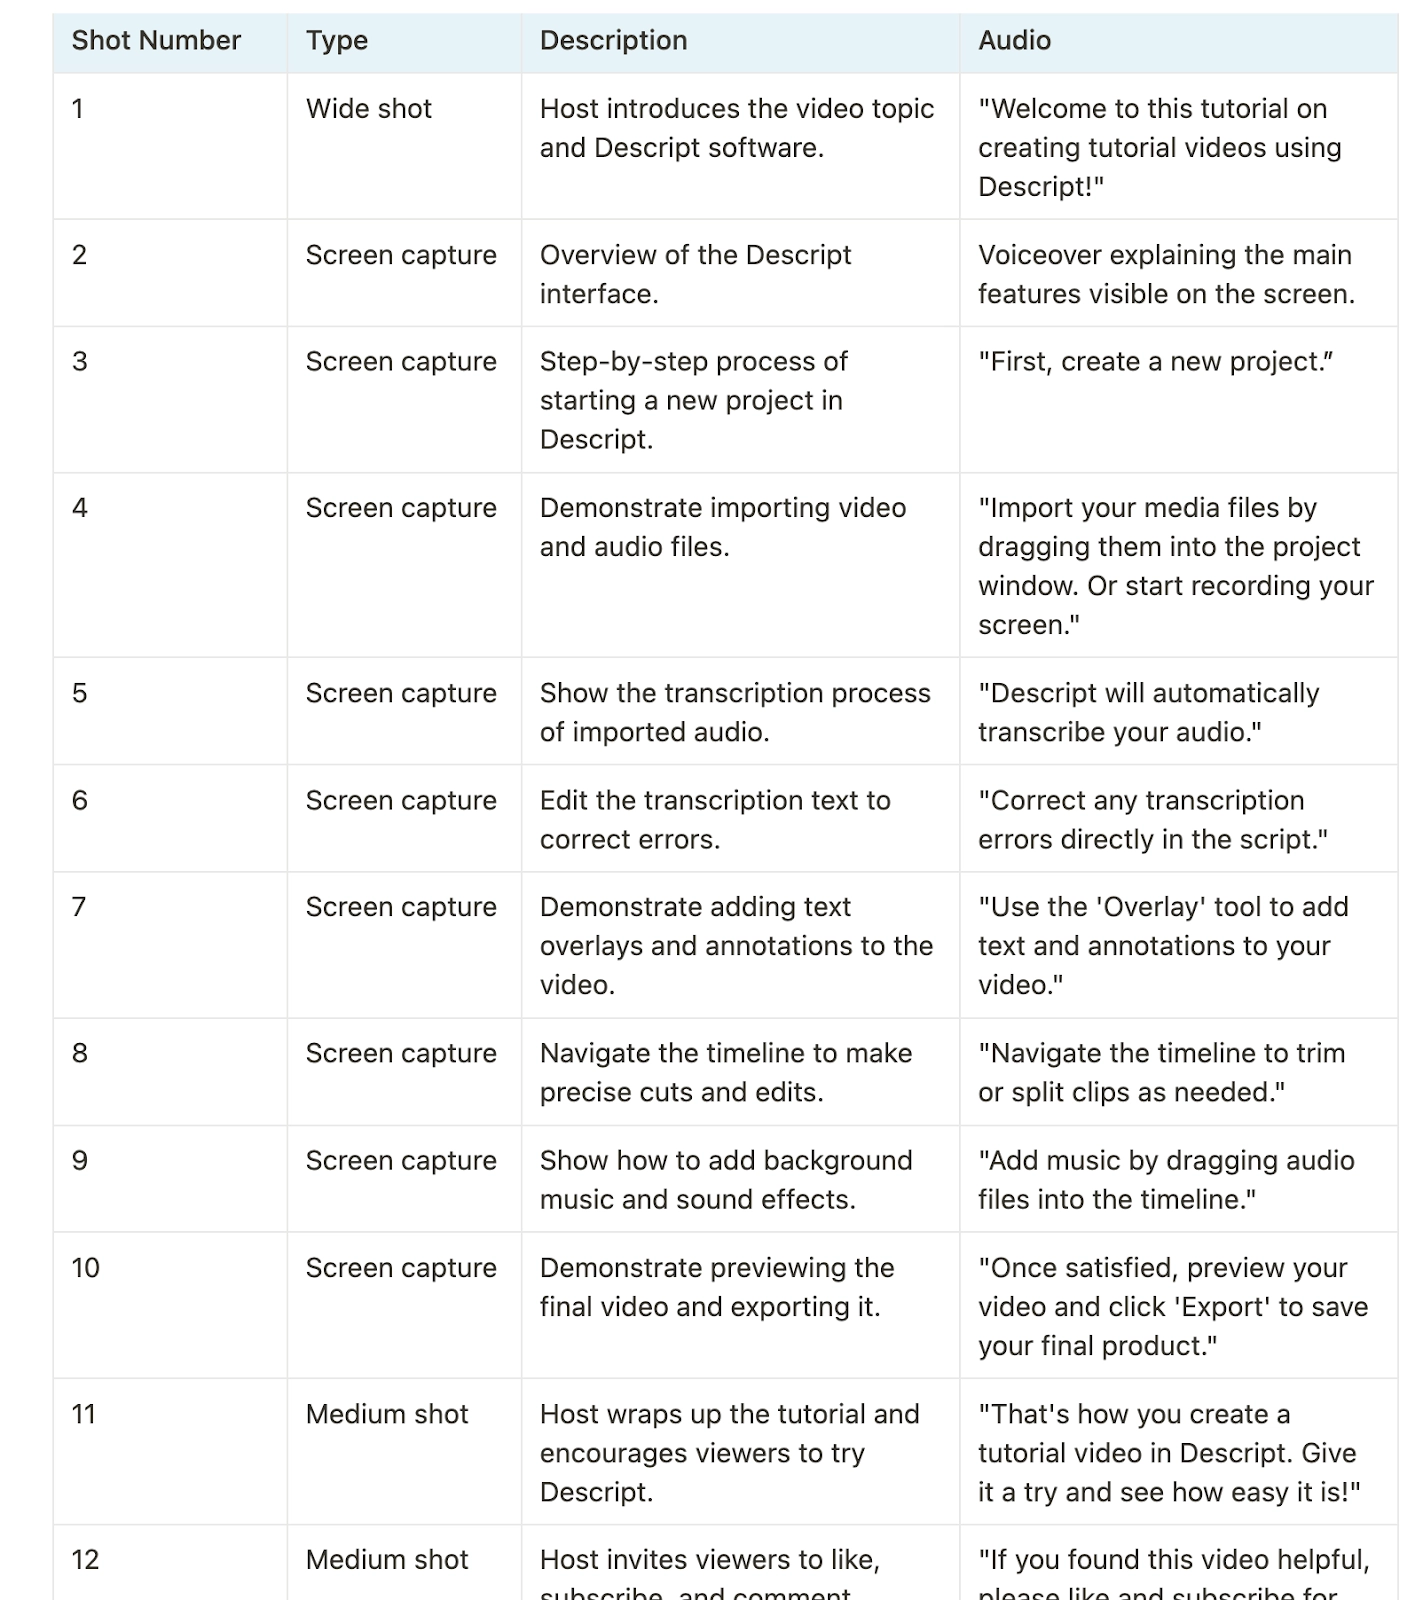
If you're making your tutorial video in Descript, you can do all your pre-production planning using Write mode. Draft your script, then organize it into scenes and add basic visuals or even just text that tells what will be on screen. Use comments to add notes and directions for yourself or whoever you're collaborating with. Descript's AI features like Underlord can help streamline this planning process.
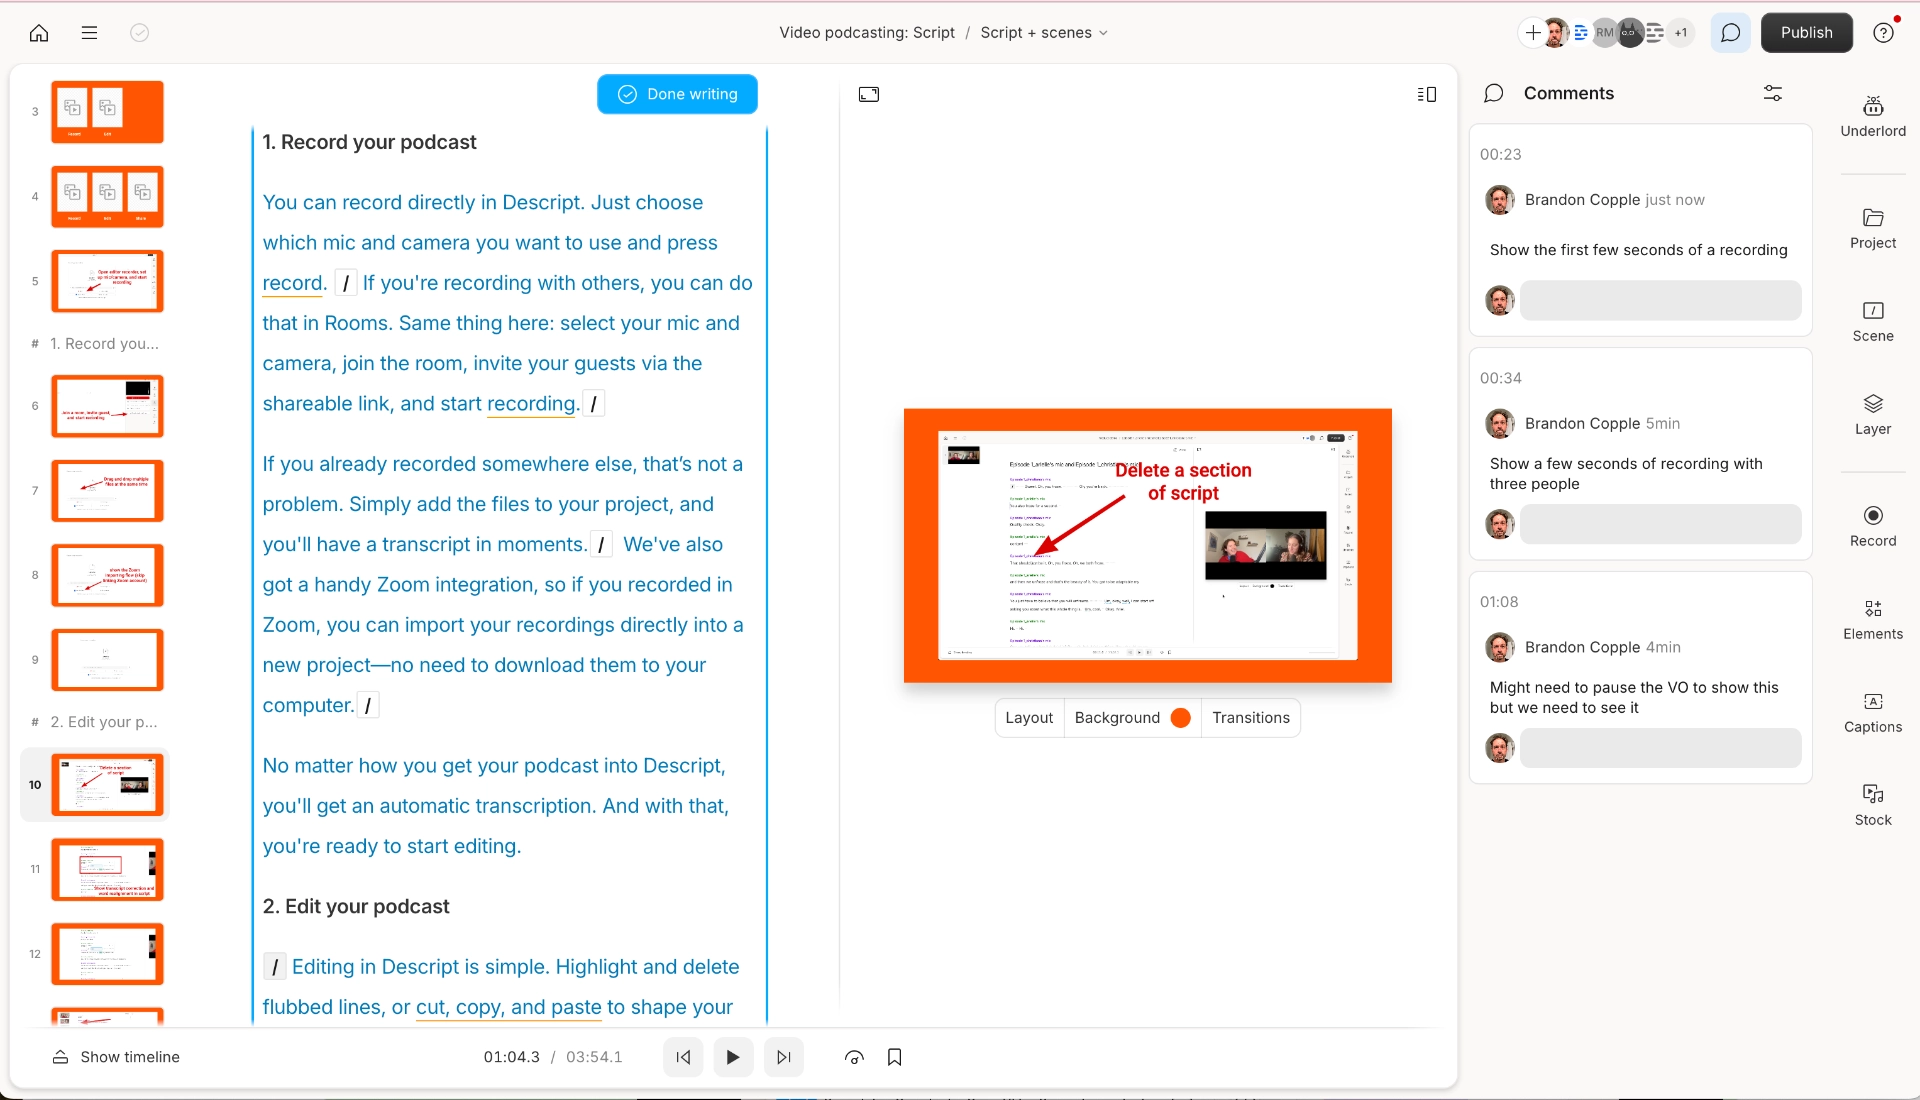
Tip: One way to hook viewers is to quickly tease the final product in your intro before you jump into the steps to get there.
3. Record your tutorial video
Depending on the kind of tutorial you're creating, you might use a mix of on-camera shots, screen recordings, and B-roll footage.
Unless you're creating content for a brand where more polish is expected, you won't be needing expensive equipment for most tutorial videos. The value of a tutorial video is measured in how helpful it is, not how likely it is to win an Oscar. Many successful tutorial creators produce content without appearing on camera at all.
A decent webcam or smartphone camera, with a phone or laptop mic, are generally good enough, especially with AI to help enhance audio quality and other aspects in post. In 2025, even mid-range equipment can produce professional-looking tutorial videos with the right software.
As you record, capture more than you think you need and record multiple takes. It's easier to cut, stitch, and add B-roll when you have extra footage than it is to go back and re-record—especially if you'll be editing in Descript.
If you're using Descript, the built-in recorder lets you record your screen, camera, and mic anywhere in your project at any time.
4. Edit your tutorial video
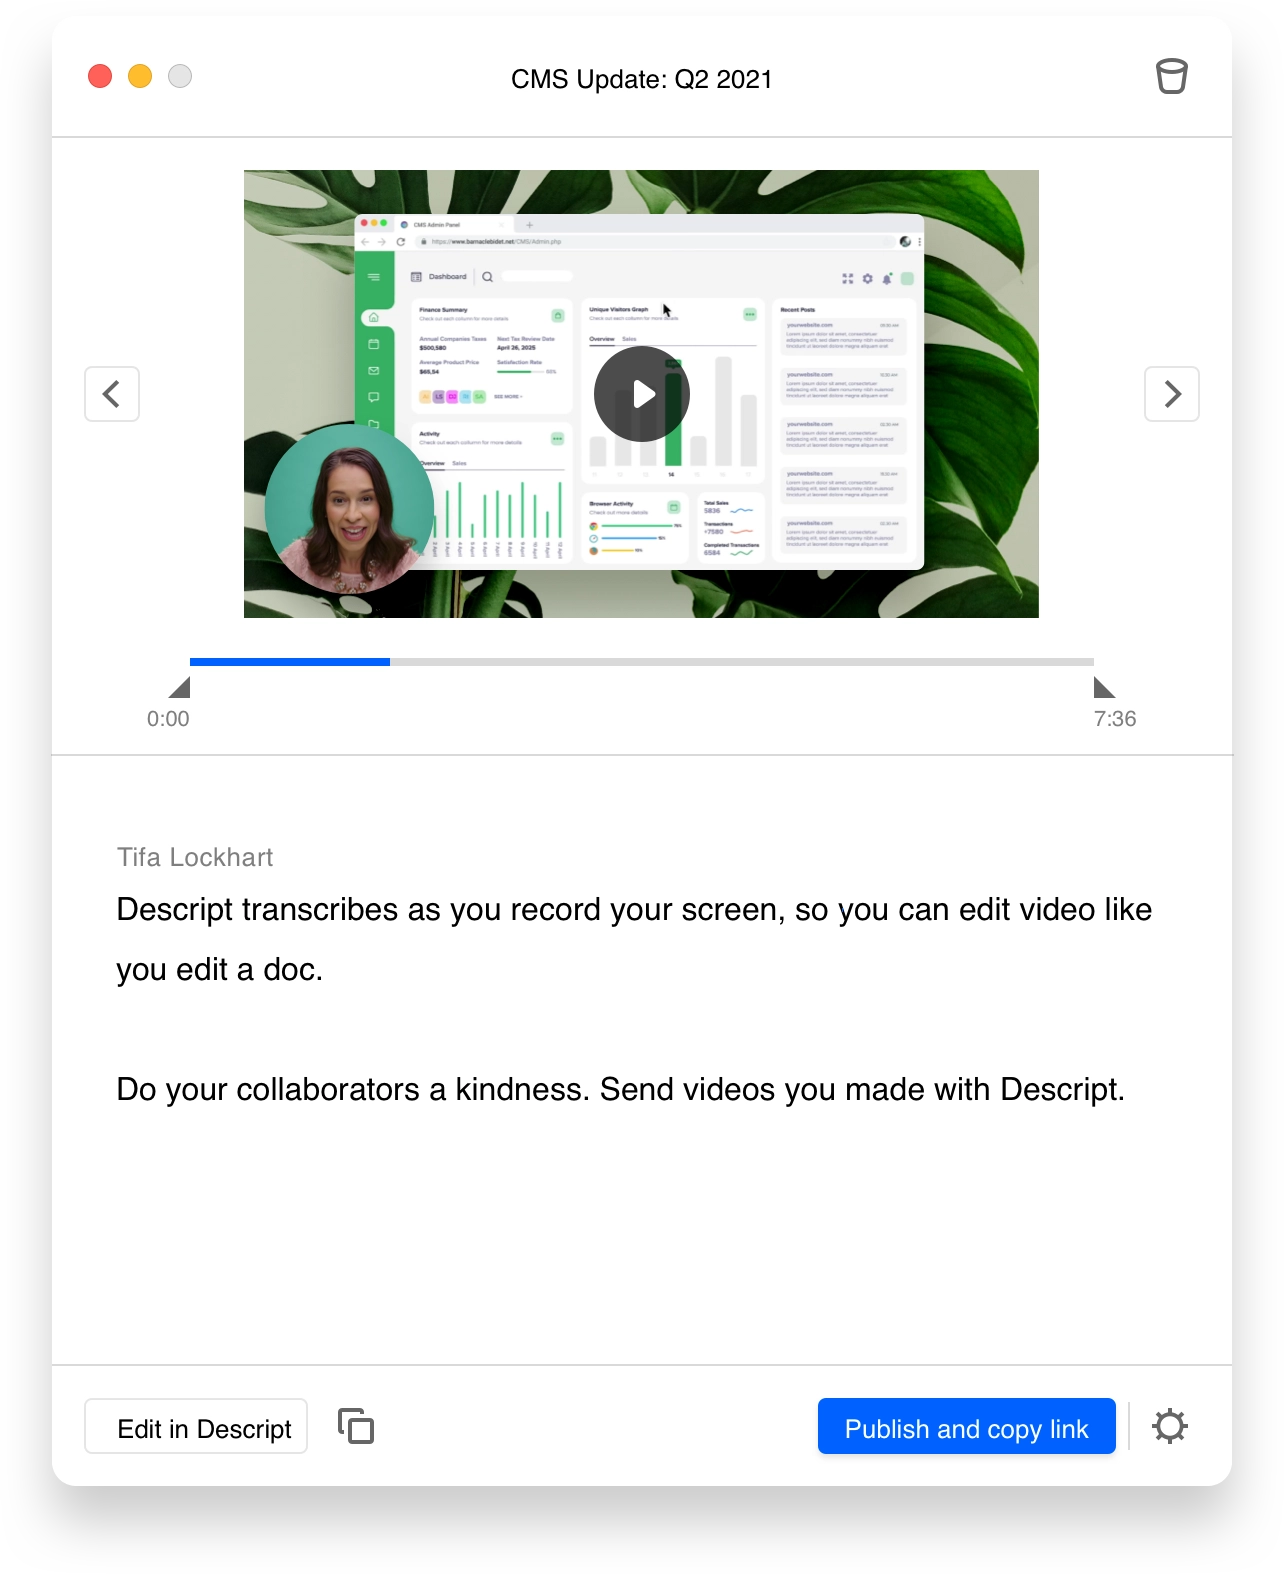
With your raw files recorded and ready, it's time to edit it into a rough cut. You can save hours here by using a text-based editor like Descript to edit your video like a doc, cutting, trimming, highlighting, and rearranging the auto-generated transcript to make changes to your video. This approach makes creating tutorial videos significantly faster than traditional video editing methods.
Just drop all your files into your project and start editing from the transcript.
Many online video editors have specific features that are perfect for tutorials since they help you direct attention where you want:
- Title slides introduce a clear break between steps or topics— perfect for long-form how-to guides.
- Annotations use text or graphics to emphasize key points and add supporting details.
- Arrows point viewer's to specific points on screen.
- Zoom and pan enlarges an area of the video and/or moves the video frame across the screen to magnify important details or follow the action
- Blur hides sensitive information like logos or customer info, especially when you're recording software products or personal devices
- Voiceovers let your record your own voice or use your script to generate AI speech
- Captions display animated text throughout your video to reinforce spoken words or key phrases
- Transitions smoothly shift between scenes, maintaining viewer interest and mark the next step or tip in your tutorial
Learn more about how to use animations in Descript in the help center.
5. Get your tutorial video ready to publish
When you're ready to launch your video tutorial, you can upload it to your video hosting platform of choice. If you want to make it easy to find and share, YouTube is probably where you'll want it to live. If you want more control over who sees it, Vimeo might be your choice. If you're embedding it on your own websites, you'll want Wistia or something like it. The right platform can significantly impact your tutorial video's reach and effectiveness.
If you made it in Descript, you can publish it directly to supported platforms like YouTube and Wistia, or generate a shareable web link you can embed or share anywhere.
But before you publish your video, there are some small things you can do that can pay off in big ways later.
Create engaging titles and thumbnails for tutorials
With tutorial videos, a title, description, and thumbnail do more than just attract clicks. They help your intended audience sift through the many options online to find the solution that's most relevant to them. This SEO optimization is crucial for instructional videos to reach the right viewers.
The right audience is more important than the size of the audience so consider who your tutorial is really for and work that angle into your copy:
- Do they want to solve a problem as quickly as possible? Emphasize the time it takes to learn through your tutorial.
- Are they frustrated by surface-level tutorials? Emphasize the depth you go into or the experience you bring.
- Is the topic overwhelming to newcomers or for an under-served audience? Emphasize that yours is for beginners or call out that audience explicitly.
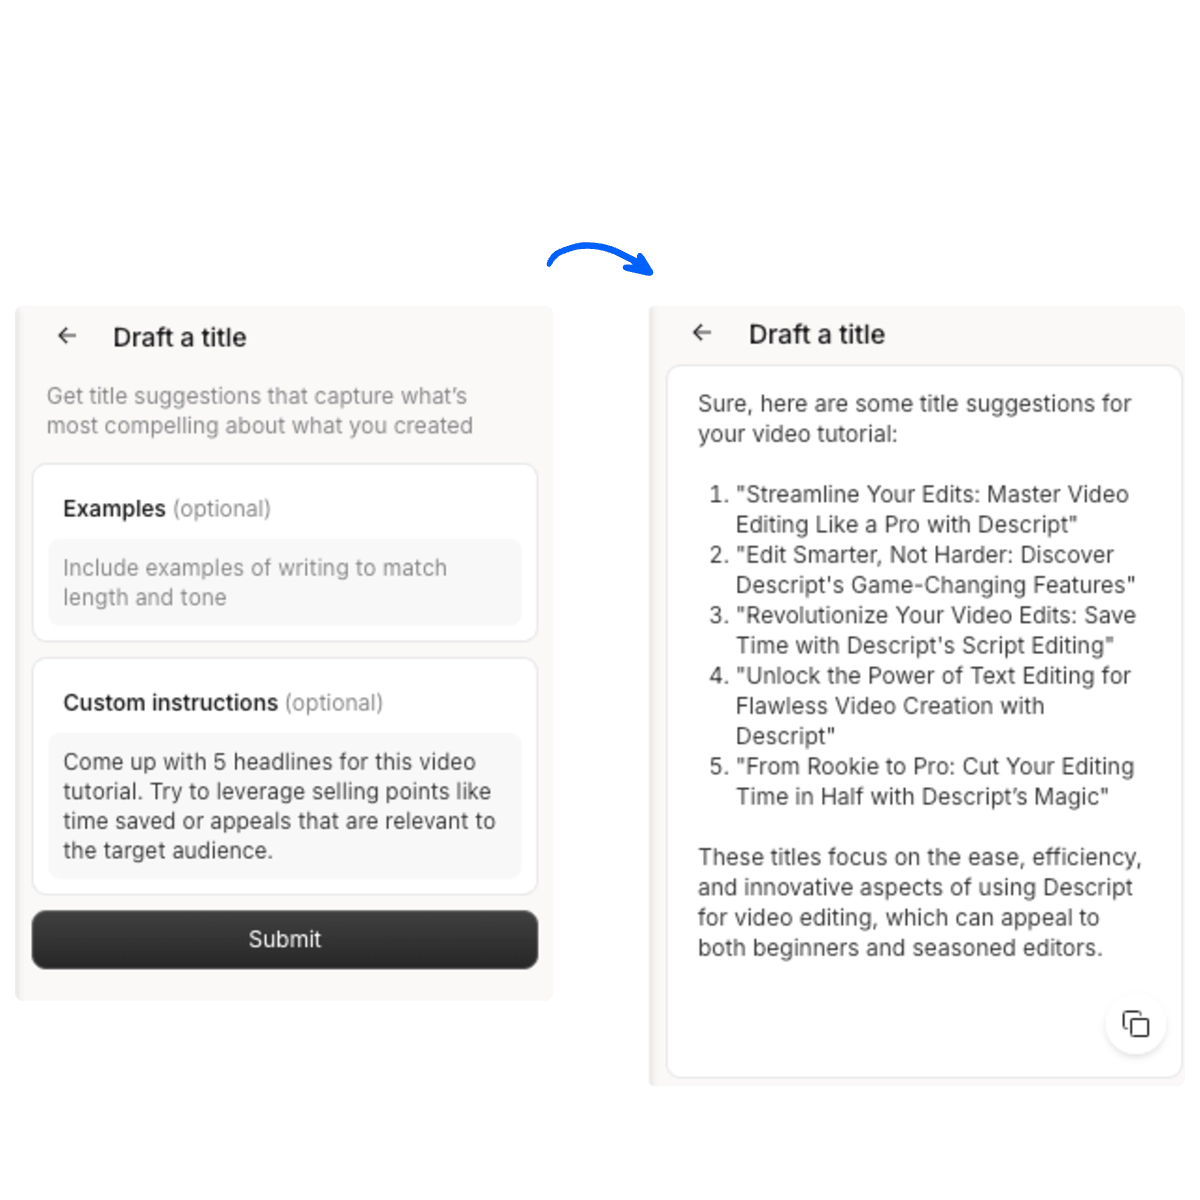
If you created your video in Descript, you can use Underlord to generate titles and descriptions to get you started.
Future-proof your tutorial videos
“For software tutorials, I use Descript to save time and future-proof against product updates by cloning my voice so I can easily make any changes to the voiceover and script. I also use scenes in Descript to replace sections of the tutorial with any new UI updates.”
—Josh Gonsalves, Founder & Director at LeadTube
Chances are this won't be the only tutorial you ever make. And if it's a tutorial for a software product that's prone to frequent updates, it might only last a few weeks before it becomes outdated. Creating a reusable tutorial video workflow will save you significant time in the long run.
This is where present-you can make things easier for future-you.
Templates and reusable assets can save you hours of laying out elements, fine-tuning transitions, and customizing fonts and colors.
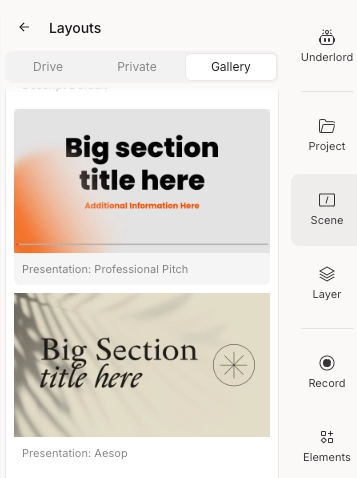
Descript lets you turn individual scenes into templates you can apply to future videos. You can have distinct templates for your intro, screen recordings, title slides, on-camera footage, and any other scenes that are likely to come up in future tutorials.
You can also update individual scenes in your video using AI speech generation instead of rerecording. Descript's Regenerate uses voice cloning to turn your updated script into speech that sounds like you and blends in with the rest of your video. This is particularly valuable for tutorial videos that need frequent updates as software or processes change.
Tip: If you publish your video as a web link using Descript, any updates you make to the underlying project will be pushed live everywhere it's embedded.
Add chapter labels to tutorial videos
Skimming a video just isn't as easy as a written tutorial. This is why adding navigation elements to your instructional videos is essential for user experience.
That's why modern video players like YouTube and Descript have incorporated chapter markers.
Clearly labeled chapters can make the steps or tips outlined in your video easier for viewers to navigate and skip ahead or return to the parts they want.
Unless your video is only a couple minutes, adding chapters can only help.
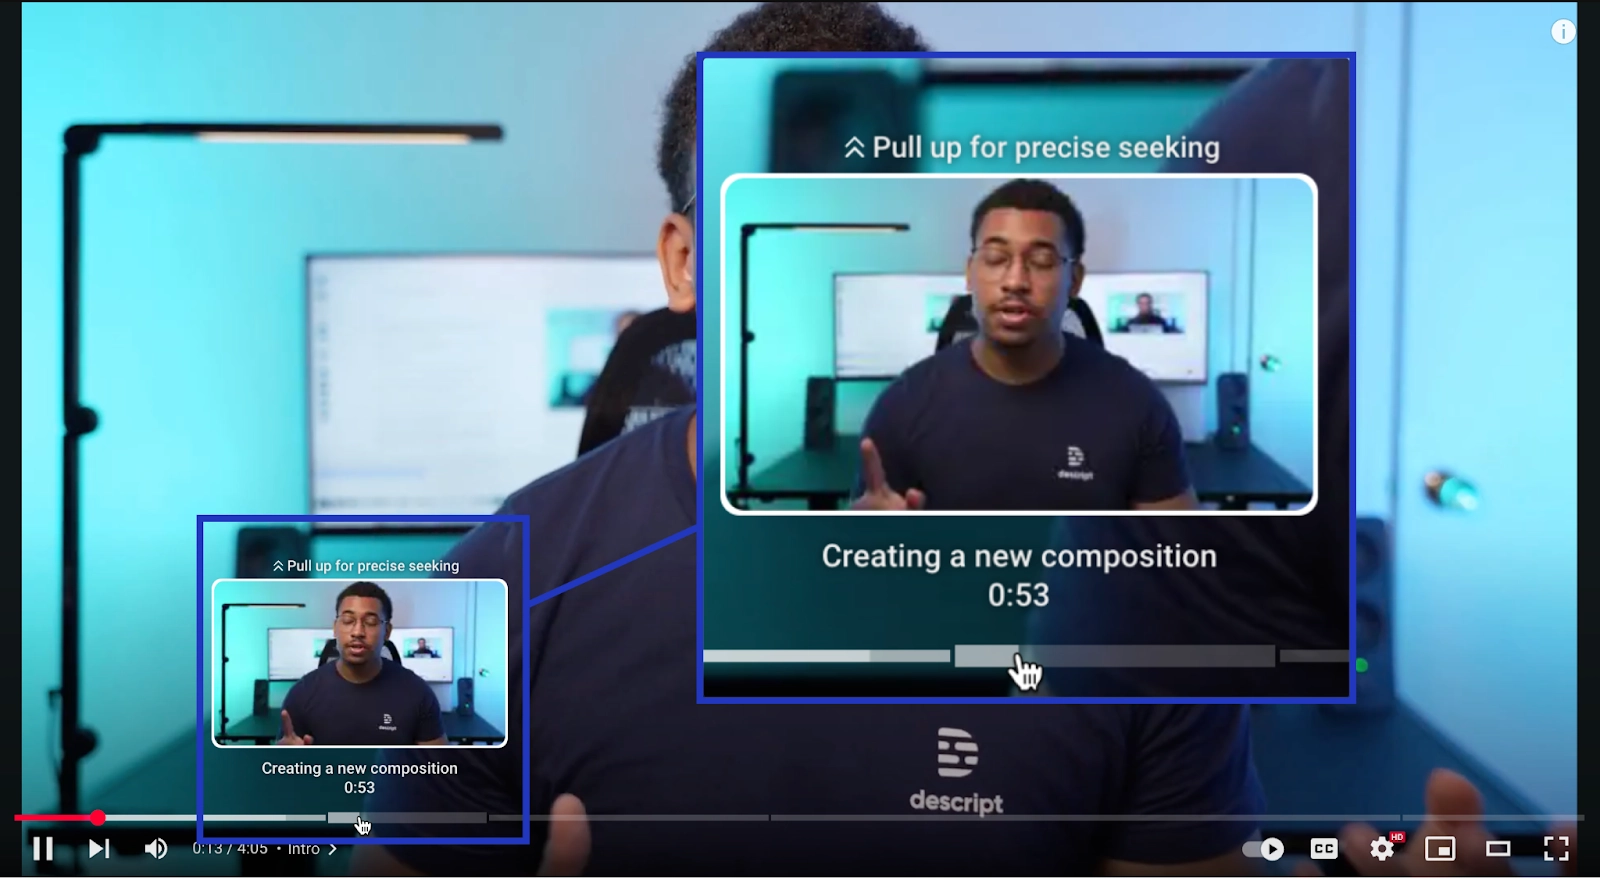
Tip: You can use Underlord in Descript to automatically mark and label chapters in your video. Just tell it the number of chapters you want.
How AI tools streamline your tutorial workflow
When it comes to creating tutorials quickly, AI-powered editing software can drastically reduce the time it takes to cut, trim, and arrange footage, letting you focus on content quality instead of tedious tasks [HubSpot research]. Using AI-based scripting tools can simplify the writing process by recommending relevant talking points based on your target topic or audience [HubSpot research]. For creators who prefer not to speak on camera, AI voice generation can deliver a professional-sounding narration while preserving a consistent brand voice [HubSpot research]. You can also streamline post-production as AI tools can flag pacing issues or viewer drop-off points, helping you refine tricky sections for better viewer engagement. Finally, real-time analytics fueled by AI can highlight which parts of your tutorial resonate most, so you can continually optimize future videos with minimal guesswork.
Creating effective tutorial videos
When it comes to video tutorials, higher production values don't always equate to higher value. That's a good thing for you and the internet at large since it means anyone who knows something can teach it to everyone else. What is a tutorial video at its core? It's simply knowledge transfer in visual form.
It also makes creating video tutorials fast and affordable.
The easier it is to make a helpful tutorial, the more tutorials you can make, and the more people you can help at the end of the day.
FAQs
Do I need expensive equipment to create a high-quality tutorial video?
The short answer is no—most tutorial creators achieve great results with just a basic camera or even a smartphone [HubSpot guide]. A solid microphone does help improve voiceover clarity, but you can also rely on AI voice generation to align with your brand’s tone if you prefer a faceless approach [HubSpot research]. Many modern AI editing tools also reduce the need for powerful hardware, so a decent computer with enough RAM is often sufficient.
What is the best way to make my tutorial video accessible to all viewers?
Start by enabling captions for those with hearing impairments, and ensure your onscreen visuals have clear color contrast for easy readability [HubSpot resource]. Whenever possible, provide audio descriptions or extra voiceover details for visually impaired viewers, helping them follow along with important on-screen actions. Aim to host your video on a platform that supports customizable captions or transcripts, so viewers can tailor the experience to their needs [HubSpot video marketing]. Finally, keep your tutorial’s layout simple, avoiding clutter so viewers can focus on each step without unnecessary distractions.


