Microsoft Teams is a collaboration tool that helps people from different locations work together. It includes features like chat, video calls, and various collaboration tools, like file sharing and messaging.
But if you’re setting up regular planning meetings to talk about timelines, milestones, and strategies, arranging a time when everyone is on duty and available to meet is virtually impossible.
Fortunately, recording Teams meetings allows people to catch up on discussions at a time that suits them, giving businesses and their people greater flexibility. But how easy is it to record a Teams meetings? And do you need special video recording software?
This step-by-step guide explains five easy ways to make a Microsoft Teams recording, no matter which device you use.
Can you record a Teams meeting?
Yes, you can record a Microsoft Teams meeting, but the process changes slightly depending on your Teams version and device. The recording captures audio, video, and screen-sharing activity to be securely shared across your organization.
Because Microsoft Teams is designed to be user-friendly, the recording feature is straightforward. Still, there are some basics to keep in mind when recording a video or Teams meeting.
Who can record a Teams meeting?
The person scheduling and organizing the Teams meeting usually has the default ability to record. The capacity to record audio and meetings may also be controlled by settings and permissions managed by your organization's IT admin.
In Microsoft Teams, recording a meeting is available to users with the necessary permissions. Regardless, it’s important to be upfront about when you are recording a meeting. Being transparent about aspects like privacy and security builds trust in the workplace. When employees are confident about their privacy, morale and job satisfaction go up.
Plus, following privacy rules is essential for obeying the law and creating a safe setting. Strict data protection laws, such as GDPR in the EU or CCPA in the US, make sure responsible handling of personal information, preventing legal issues and instilling confidence.
5 ways to record Teams meetings
Microsoft Teams is designed to be accessible on various devices, including computers (Windows and Mac), smartphones (iOS and Android), and web browsers.
To record a Teams meeting, visit the Microsoft Teams website and sign up for free. The free version has unlimited group meetings for up to one hour, with up to 100 meeting participants.
Alternatively, Microsoft has three business plans to choose from, each tailored to meet your specific needs and includes other applications, such as PowerPoint, OneDrive and Excel.
If you already have a Microsoft account, you can log in then:
- In Windows, click Start, then Microsoft Teams
- On Mac, go to the Applications folder and click Microsoft Teams
- On the web, go to Microsoft Teams
When prompted, click Continue when you see the Welcome To Teams message.
1. How to record a Microsoft Teams meeting with the built-in option (Windows)
If you’re using Windows, recording a Teams meeting is straightforward. You don’t need any additional add-ons or extensions to record a session.
The recording saves audio, video, and screen sharing for secure sharing within your organization. However, it won't capture whiteboards and notes or include embedded videos or animations in PowerPoint Live presentations.
Step 1: Start or join a Teams Meeting
Begin by starting a new Teams meeting or joining an existing one. There are many ways to do that, either by an app or the web, by invitation link, from your calendar, or by channel.
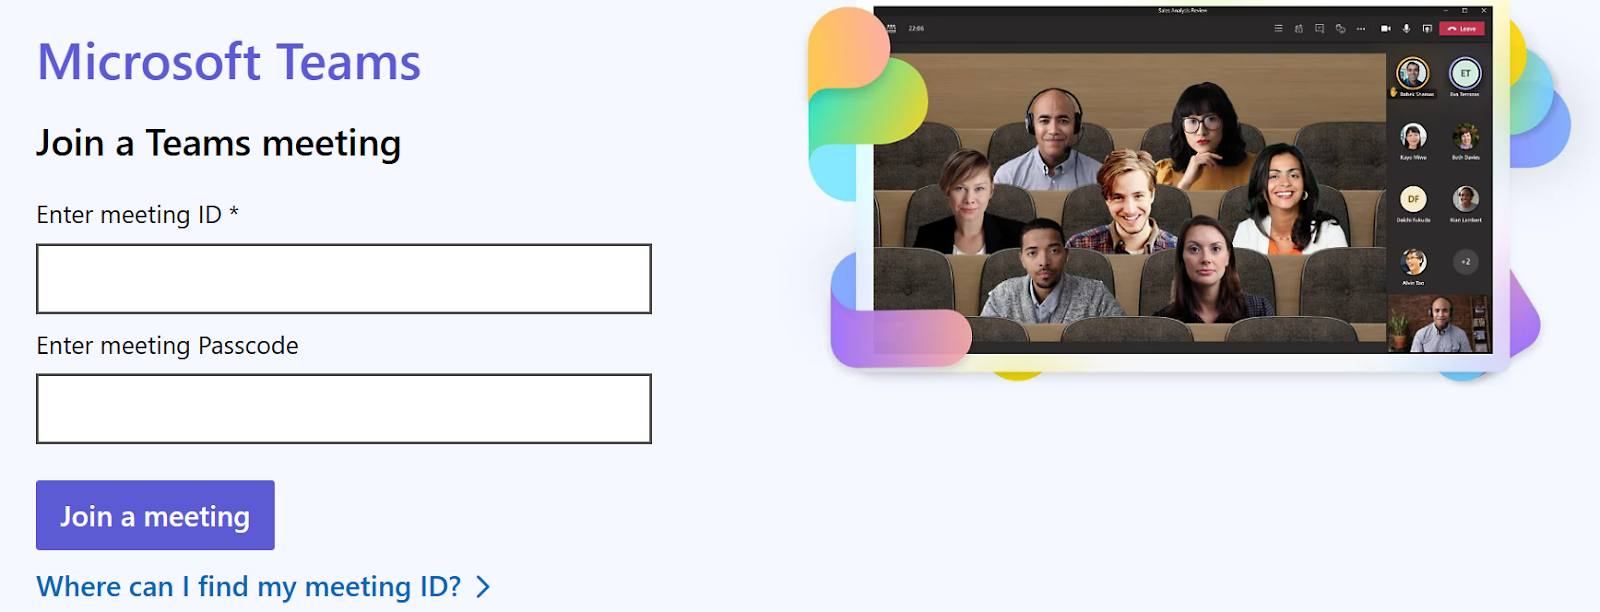
If you can't use the app or the web, some meetings let you call in using a phone number. Just enter the phone number and conference ID the organizer sent to access the session.
Step 2: Start recording
Once you’re in the Teams meeting, go to the controls by selecting the “More actions” ellipsis (three dots) and click on it. In the menu that appears, select "Start recording." This will also turn on live transcriptions.
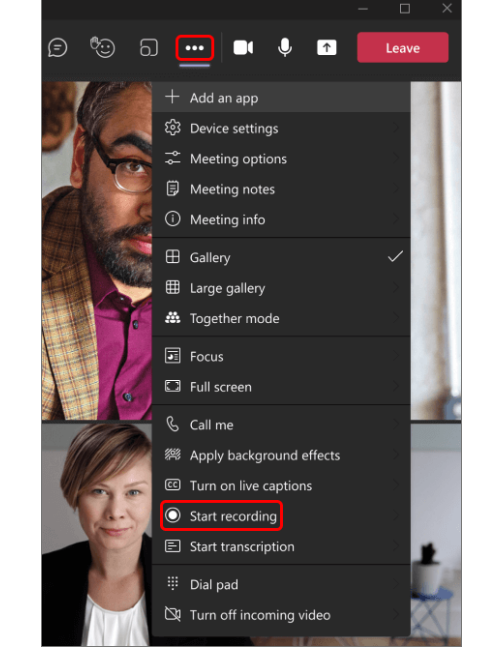
Step 3: Notification to participants
As soon as the recording begins, everyone receives a notification. The video is instantly stored in the cloud, specifically in Microsoft Streams. This allows you and the participants to access it immediately after, regardless of location.
Step 4: Stop recording
At the end of the Teams meeting, stop recording by going back to the "More actions" menu and selecting "Stop recording." Ending the meeting also stops the recording.
2. How to record a Microsoft Teams on Mac
Use the built-in tool QuickTime to record Microsoft Teams meetings on your Mac.
Step 1: Start or join a Teams Meeting
Just like joining a Teams meeting on Windows, find the meeting in your Teams calendar. Click "Join" to enter the meeting. Alternatively, you'll receive a notification to join if someone initiates the meeting.
To join using an ID, navigate to your Teams Calendar, choose "Join with an ID," then enter the meeting ID and passcode.
Step 2. Start recording
Once you have clicked “Join”, open QuickTime Player. On the top, select File and click New Screen Recording.
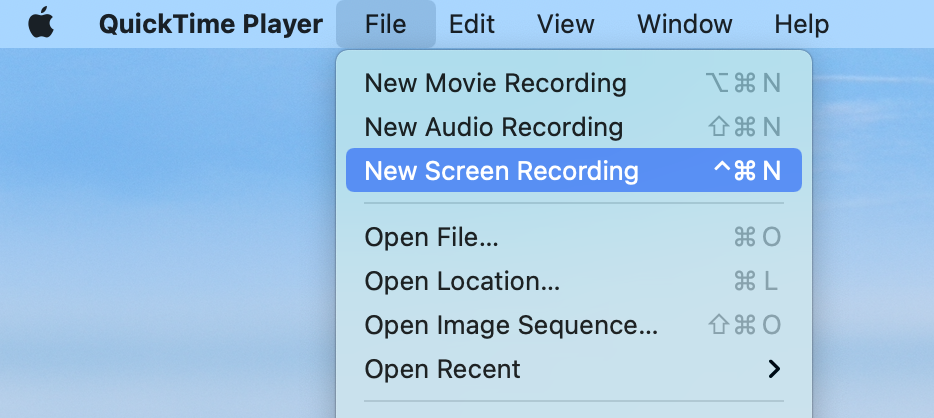
Click the drop-down menu next to the “Record” button and select your microphone. Click the “Record” button to begin recording your screen.
Step 3. Inform participants
QuickTime Player itself does not provide a built-in feature to notify participants when a recording starts or stops. In this case, let everyone know that you’re recording the session. Talk to everyone before recording, and get their okay, especially if you're recording things they might want to keep private.
Step 4. Stop recording
To stop the recording, press Command + Control + Esc on your keyboard or click the “Stop” button in the QuickTime Player app by clicking the square circle icon at the top of your screen. The recorded meeting will pop up and you can click on the session to play it instantly.
3. How to record a Teams meeting on mobile (iPhone and Android)
If the internet is slow or not reliable in certain places, using a phone to record a video or Teams meeting might be a better choice than depending on features that need a fast and stable internet connection.
To access and record a Teams meeting on a mobile, download and install the Microsoft Teams app from the App or Google Play Store.
Step 1. Start or join a Teams Meeting
If you already have a Microsoft account, sign in or register for a new account. If prompted, allow the app to use your mic and camera.
Either find the meeting you want to record in the calendar at the bottom of the screen, or start an instant meeting by clicking “Meet” in the top right corner.
Choose Join as a guest or depending on your preference, type your name and tap Join meeting.
Step 2. Start recording
Similar to recording a Teams meeting on a desktop, go to the meeting controls by selecting “More actions” ellipsis (three dots) and click on it. In the menu that appears, select "Start recording.”
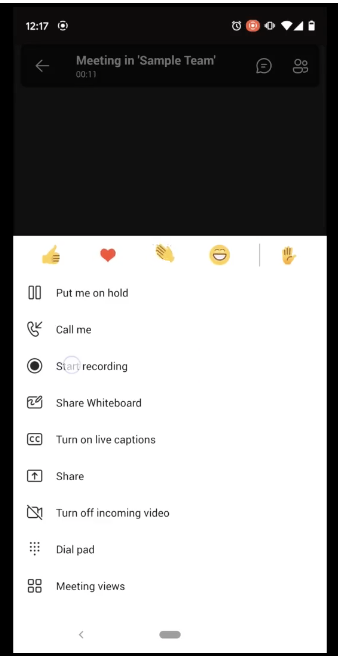
Step 3. Inform participants
Teams display a noticeable icon in the meeting window or control bar to let participants know that the meeting is being recorded.
Step 4. Stop recording
To finish the recording, return to the "More actions" menu and choose "Stop recording." Alternatively, stopping the meeting halts the recording as well.
The recorded video can be saved to your device or a cloud storage service, depending on your preferences and the app’s capabilities.
4. How to record a Microsoft Teams meeting with Descript
Descript is the best all-purpose video recording software and a complete tool for editing videos and audio. It comes with features like screen recording, transcription, publishing, and exporting for online meetings. You can use its online screen recorder to record videos on a computer, and then edit, save, export, and publish—all in one place.
So while Microsoft Teams has basic recording features, it may not have all the options you want in a recording tool—for example, recording whiteboards and making you look and sound your best.
Start by signing up for a free or paid subscription (depending on your needs) by visiting Descript.com.
Step 1. Start or join a Teams Meeting
Join the Teams meeting by clicking on your email invitation, Teams calendar, meeting room, or as a Guest (if you don’t have an existing Teams account).
Step 2. Choose recording preferences
There are two ways you can record Teams meetings using Descript: audio-only recording or screen recording. As a third-party tool, you can screen record on Windows or Mac with Descript.
Step 3. Start recording
To use Descript, choose Quick Recorder from your Windows system tray or Mac menu bar. This allows you to record quickly without the need to find additional apps on your desktop or mobile device.
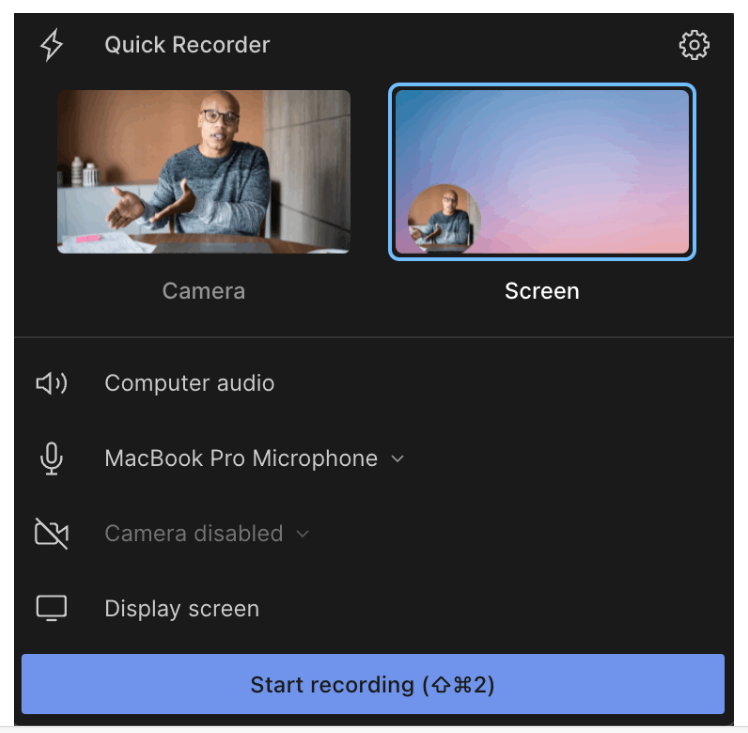
Alternatively, Click settings, then “Start/stop recording”.
Step 4. Edit recording
Descript’s screen recording software makes capturing Teams meetings easy, with the added benefit of a backspace key feature for quick edits.
As you’re recording your screen, Descript creates an instant transcript from it, so you can polish the audio and video later. With a single click, you can remove filler words like "um," "uh," and "like.” You can also add titles, overlays, transitions, music, and effects with our full suite of video editing tools.
With Studio Sound, you can even clean up your audio and make it sound super professional, even if it was recorded on your mom’s couch at 11 PM.
Want to dive deeper into Descript’s recording and editing tools?
5. How to record a Microsoft Teams meeting with OBS Studio
To record and save your Microsoft Teams meetings, you can use OBS. OBS is a free, open-source, and cross-platform application for screencasting and streaming.
Download and install OBS Studio. Then launch the software on your desktop or mobile device.
Step 1: Join the Teams meeting
Create a New Scene by clicking on the "+" icon in the "Scenes" box. Next, add a Display Capture Source by clicking on the "+" icon in the "Sources" box and choose "Display Capture." Select the display or screen where your Microsoft Teams meeting will be.
You can resize or crop the display capture to focus on the Microsoft Teams meeting window.
Step 2: Record the meeting
The OBS controls panel allows you to start recording. Click on the "Start Recording" button in OBS Studio when you're ready to begin recording the Teams meeting.
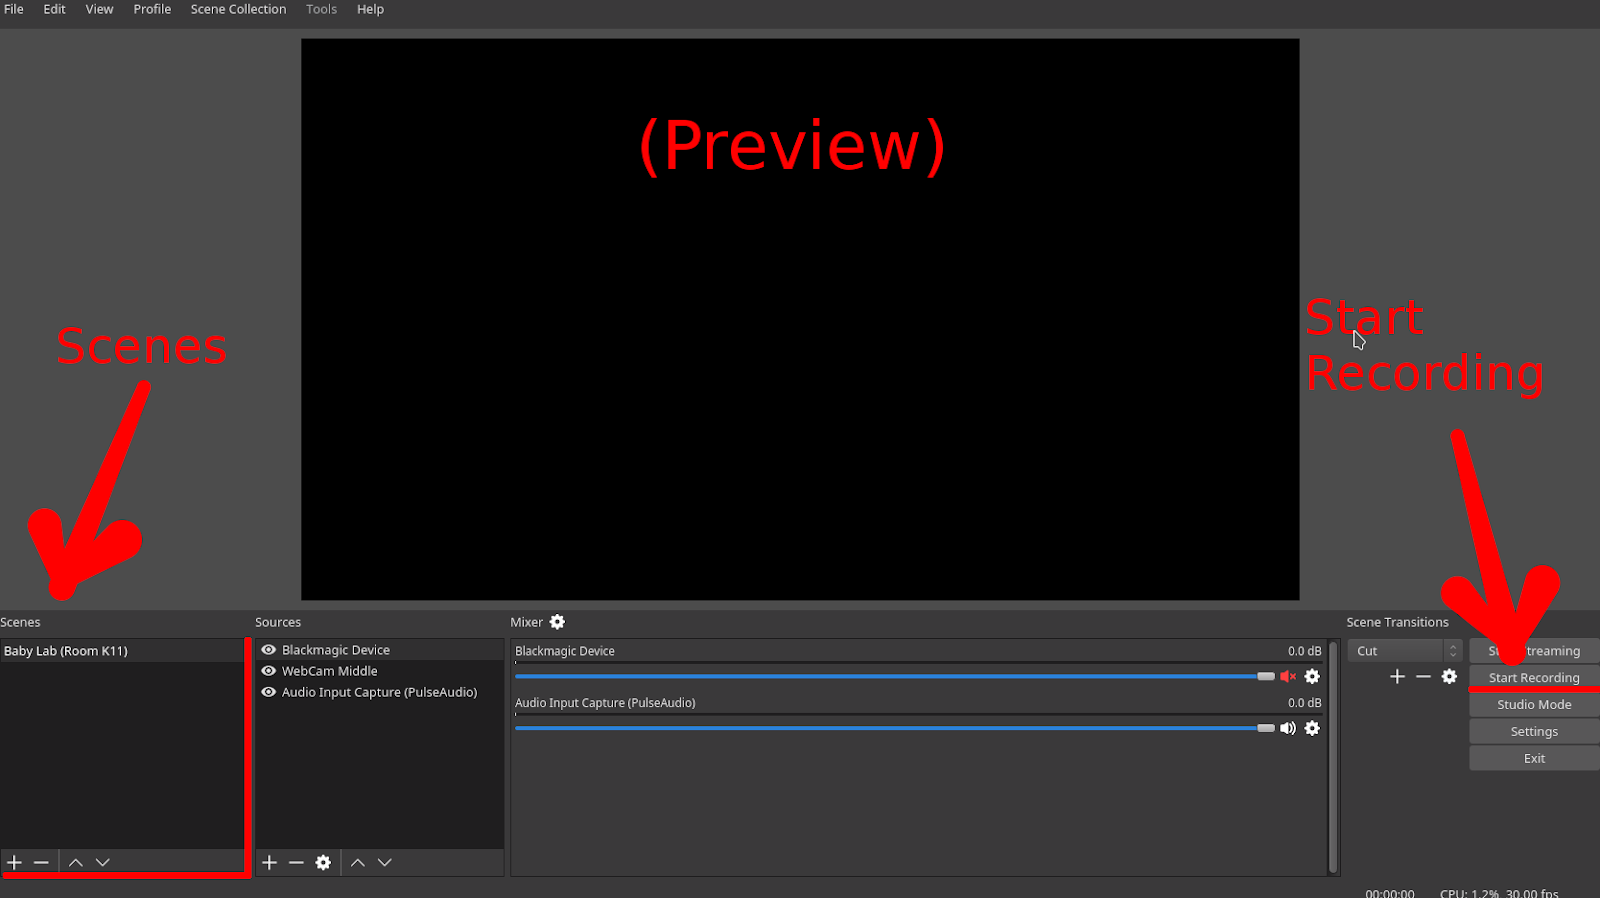
Click on the "Stop Recording" button when the Teams meeting ends.
Step 3: Access the recording
OBS Studio will save the recording to the specified location on your computer. Send the recording to keep team members informed and view the session they missed.
Thousands of video creators already rely on Descript for high quality screen capture and video editing. If you’re ready to join them, take a tour of Descript today.
Teams meeting recording FAQs
Why can't I record my Teams meeting?
Find out if you have the necessary permissions to record meetings. The meeting organizer may have disabled recording for the session. Confirm with the organizer or check the meeting settings for any specific restrictions, then check for any technical issues with your device's camera, microphone, or internet connection, which can affect the recording feature.
Why is my recording option not available in Teams?
After the meeting ends, the recording is processed, and a link to the recording is usually made available. This link can be found in the meeting chat, in the Teams "Recordings" tab, or in a shared location like SharePoint or OneDrive.
What’s the best way to record Microsoft Teams meetings?
The standard way to record Microsoft Teams meetings involves using the built-in recording feature. However, apps like Descript can record Teams sessions and give you additional functionality, such as transcribing as you record a screen and fixing audio mistakes by typing.
Do you need consent to record a Teams meeting?
Yes, obtaining consent before recording a Microsoft Teams meeting is generally advisable and often legally required. Recording without everyone's agreement may break privacy laws.


