
Background noise can be super annoying to listeners and cause a bunch of headaches in post-production. But you probably know that, either because you just recorded something with really bad background noise or you’re worried you will. Either way you asked Google how to reduce background noise, and here we are. Welcome!
First of all, we have to tell you that if you use Descript, background noise is much less of a concern when you’re recording. Descript’s Studio Sound feature will take pretty much any recording, whether it was shouted into your laptop or captured on a decent mic in a noisy space, and make it sound like it was recorded in a professional podcasting studio.
But even with the miracle of Studio Sound, it’s still helpful for you to learn how to reduce background noise on mics when you’re recording. You’ll get better audio quality and thank yourself when you sit down to edit.
How to reduce background noise while recording
The best way to get rid of background sounds is to block them out during the recording process. Noise cancellation software can help you in post-production, but nothing beats a clean, noise-free recording to start with. Here are nine ways to use your audio hardware and sound recording skills to produce noise-free audio:
Get close to the mic
The pros in the podcasting business describe a recording done with the speaker talking right into the mic as one with a “high speech-to-noise ratio.”
To achieve this ratio for your own podcasts, place podcast mics near each speaker’s mouth—ideally about a palm’s length away. If the speaker is too far from the mic, you’ll need to boost the mic’s sensitivity, which, as a consequence, boosts noise levels as well. A mic that’s less sensitive, on the other hand, is less likely to pick up background noises or amplify unwanted line noise.
Of course, a mic that’s up close will pick up some extra sounds from your mouth, too. Which is why you should…
Use pop filters to block out plosives
A pop filter is a thin membrane of fabric that blocks the popping sounds created by certain consonants (specifically, plosives, like the “p” sound). These gusts of air become a lot more apparent when you’re close to the microphone. Clip a pop filter to your mic stand so it hovers right between you and your mic.
Find a sturdy mic stand
You might not have to look far to find the source of those annoying rumbles and creaks—they might be coming from your rusty old mic stand.
Use well-maintained mic stands and swap out your old ones if they start making noise. You can also use a shock mount mic clip (particularly for condenser microphones), which lets your mic hover just off the stand, eliminating certain creaky sounds that might happen without a clip.
Opt for dynamic mics in noisy environments
Use dynamic mics in noisy environments
Use clean electrical sources
Electrical circuits can cause narrowband noise (a hum) in your audio recordings. This often happens in buildings with outdated wiring or poor grounding, where strange wiring paths can produce ground loop antennas.
If your audio gear shares a power socket with high-powered lights—especially those with dimmer switches—this can also create a hum. You can address it by using a power conditioner, which is an electrical box designed to remove the alternating current ground loops that lead to narrowband noise.
Simply put, if you hear that low, constant buzzing, look at your electrical sources first.
Record in the quietest room in your house
No one said noise suppression for microphones has to be high-tech. Sometimes the best technique is the most obvious one: Record in the quietest space you can find.
For many people, this might be a clothes closet, since the hanging clothing naturally absorbs sound. If you’re recording in a normal room—which may be more comfortable for podcasts with multiple hosts—you can achieve ambient noise reduction by closing doors and windows (extra points if they have curtains you can close). Carpeted rooms also absorb more noise than rooms with hard floors.
Check your plugs
In many cases, the culprit behind unwanted headphone noise is a bad plug connection. Check all headphone jacks and make sure that the plugs are pushed in all the way. Then, do the same with your mic inputs.
Watch your gain levels
Your audio signal may pass through multiple gain stages, i.e. places where extra power is added to the signal to make it louder. When you add too much gain to a signal, particularly near the top of your signal path, you can distort it. If your audio tracks sound noisy and distorted, turn down the volume (particularly on your preamp if you’re using one).
Turn on Studio Sound before recording
As noted, Studio Sound makes flawed recordings sound like they were made in a studio. It takes a single click to do what would otherwise take several steps (and some expertise) in a traditional DAW.
Once Descript does its work, your final product will be a mix of the original recording and the cleaned-up AI version.
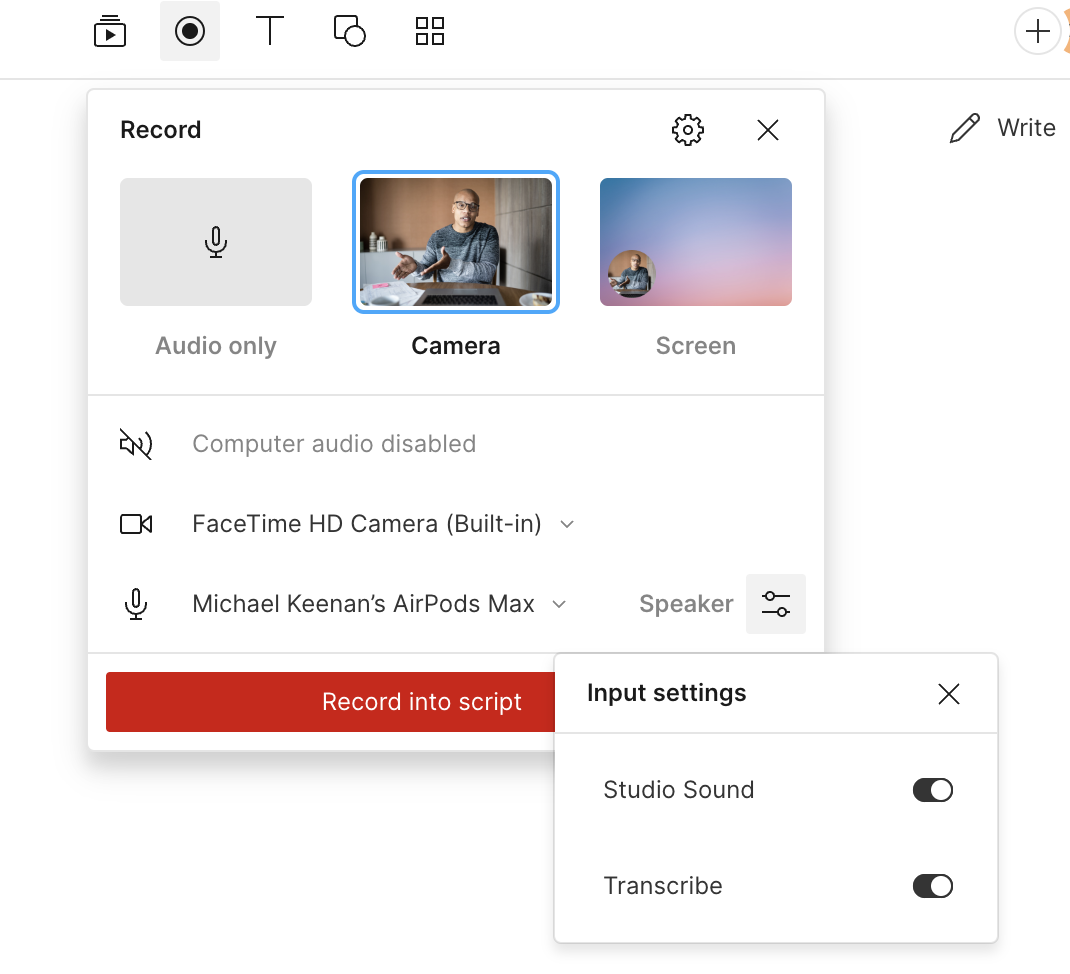
You can turn Studio Sound on when setting up your recording. Select the Additional settings icon, then enable the Studio Sound setting, as seen below.
How to reduce background noise after recording
Reduce background noise on a Mac
If you’re using an OSX system, go to the Sound section of your System Preferences. There, you can adjust the input level on your computer’s audio devices. Older Macs have a checkbox for “ambient noise reduction,” but this feature was discontinued on newer models with Apple Silicon chips (like the M1 chip).
Reduce background noise on a Windows computer
The Windows operating system has built-in tools to help you whittle away background noise. Find them in the Hardware and Sound section of your computer’s control panel.
Once there, click on the Recording tab, select your recording device, and then click the device’s Levels tab. You can then reduce the “boost" that Windows gives to your mic. Depending on your machine, you may also see an Enhancements tab, where you can tick a box for “noise suppression.”
Using Descript
Reduce background noise with Descript
After recording your audio in Descript, you can remove unwanted background noise in minutes. Select your script from your Timeline or Canvas. You’ll know it’s selected when you see Script at the top left sidebar.
To address heavy reverb, you can also look for specialized AI-based features or tools specifically built to remove echo. They analyze your audio in real time and filter out the reflective frequencies that cause that hollow effect in large or untreated rooms.
Then, turn on Studio Sound from the Audio effects section in the sidebar.
Upon enabling Studio Sound, a message appears to tell you that the file is being applied. This may take several minutes, depending on its size.
Using background noise reduction software
If you’re recording directly to your computer, you can use software specifically designed to remove background noise while you record.
Krisp and DeNoise are two such programs. They feature tools like acoustic echo cancellation (to remove obnoxious echoes on video calls) and voice cancellation (to block out all audio sounds except the primary speaker’s voice)—particularly helpful when recording audio from a video chat. They can also work in real-time, so you can reduce unwanted noise and maintain clarity during live calls or spontaneous mobile recordings.
Use background noise reduction software
Use background noise removal tools in your DAW
Use manual audio filters
You don’t need a preset microphone background noise filter. Applying high-pass filters and low-pass filters to certain audio tracks can reduce many of the ambient sounds that turn up as background noise. A high-pass filter allows high frequencies to pass through, but filters out frequencies below a certain threshold (which you set in your DAW software).
Use a high-pass filter (also known as a low-cut filter) to cut low rumbling sounds. On the other hand, a low-pass filter (also called a high-cut filter) lets low frequencies through while filtering out frequencies above a given threshold. These can be useful for removing high, ambient hums.
🧠 Learn: How to fix bad audio quality in a video
4 types of background noise
To fully understand how to get rid of background noise on mics, it helps to know the four main types of noise that can diminish the sound quality of your recordings:
- Broadband noise. Broadband noise occurs over a wide range of frequencies. When these frequencies produce noise all at once, it creates the familiar hissing and buzzing sound commonly known as background noise.
- Narrowband noise. Compared to broadband noise, narrowband noise occurs over a much smaller range of frequencies. Electrical circuits can cause narrowband noise that creates a hum in your audio recordings. You can often trace narrowband noise to a poorly grounded mic cable or an instrument’s pickups.
- Impulse noise. Audio engineers group the clicks and pops you hear on certain audio recordings into a broad category called impulse noise. These include plosives from consonant sounds like “p” and the loud crackle that happens when you plug in an audio cable.
- Irregular noise. True to its name, irregular noise occurs on an irregular basis. Examples include rain, wind, thunder, traffic, and ambient conversations—sounds that come and go depending on the recording environment.
The best tools to reduce background noise
Look, sometimes your audio file is going to have background noise, especially if you’re recording at home. Maybe you left the air conditioner running or the window open, so you’re hearing wind noise.
Luckily, tools like Descript make it so easy to remove noise, you really don’t have to stress when recording. With noise reduction effects like Studio Sound, you can get clean audio for podcasts in seconds.
Descript is more than just a background noise removal tool, however. It’s a complete audio and video editing suite that lets you:
- Add background music and professional voiceovers to your audio files
- Transcribe as you talk, so you can clean up podcast audio in real-time
- Automatically remove filler words like “um” and “like”
- Upload custom sound effects to customize your project.
- Record remotely in 4K (perfect for having guests on your show)
Thousands of popular podcasts like Planet Money and Freakonomics Radio use Descript to produce their shows. Want to join them? See how Descript can improve your podcast workflow.
Frequently asked questions
How do I remove background noise in Descript?
You can remove background noise by enabling Studio Sound. After importing your audio or video clip into Descript, select it on the Timeline or Canvas, then turn on Studio Sound in the Audio effects pane. Descript’s AI will automatically reduce unwanted noise and enhance speech clarity.
Does Studio Sound remove all types of background noise automatically?
Studio Sound uses machine learning to reduce most common ambient noises—like hums, room echoes, or traffic sounds—while amplifying voices. Some unusual or very loud noises may still require manual edits or additional effects (e.g., High-pass filter, Hum Reduction) in the Layer panel.
Can I remove background noise from my Zoom or phone call recordings in Descript?
Yes. Import your recorded calls—whether from Zoom, phone, or another platform—into Descript as you would any media file. Then apply Studio Sound or use audio enhancement tools like Speech Isolation or Hum Reduction to clean up background noise.
Do I need special hardware to get good noise reduction results in Descript?
No. Descript’s noise reduction features work on recordings made with common microphones or built-in laptop mics. However, starting with a decent mic and a relatively quiet environment can often yield better results and require less cleanup later.