Manual transcription is a slog. It's not just time-consuming—it’s also mind-numbingly boring.
You're tethered to your audio, rewinding and fast-forwarding as you painstakingly type out each word, wondering, “Wait, what did they say? Can they talk a little slower? How many times can I type [unintelligible] before the whole thing is useless?”
If you've ever found yourself in this scenario, our condolences. To quote our favorite infomercials, there’s got to be a better way!
That's why we've crafted this guide—to show you how to transcribe audio files in a way that's both efficient and painless.
What is an audio transcription?
Audio transcription is the process of transforming audio or video files into text format. Whether it's a recorded meeting, an interview, a podcast episode, or even a court hearing, audio transcription makes the information accessible and easy to analyze.
Things like webinars, business calls, research notes, films, and anything else containing spoken words are prime candidates for text transcription. By converting audio into text, you're not just storing information—you're making it infinitely more usable and shareable.
4 ways to convert audio to text
So you’ve got an audio file and you need it in text format. Many content creators face this challenge. Here’s how to tackle it head on:
Manual transcription: The hands-on method
Manual transcription means you listen to the audio recording and type out what you hear, word for word. It's as straightforward and time-consuming as it sounds.
Pros:
- You control the accuracy.
- No need for specialized software.
- Allows for nuance in punctuation and editing.
Cons:
- Adds hours to your workflow
- Requires a lot of audio playback.
- Requires intense focus.
- Resource intensive.
Automatic transcription software: speed and efficiency
Automatic transcription software uses algorithms to convert spoken words into written text. It's the tech-savvy way to get things done. It’s a convenient solution for journalists, medical professionals, content creators, and anyone else needing quick, accurate transcriptions.
Pros:
- Quick turnaround.
- Cost-effective.
- High accuracy for clear audio.
Cons:
- Struggles with accents and background noise.
- Often requires a subscription or per-minute fee.
- Depending on software quality, it can produce errors.
Human transcription services: the expert's choice
Human transcription services involve sending your audio files to a company where transcriptionists produce them for you. These professionals manually transcribe the audio, accounting for nuances, accents, and context. Law and medicine industries often use human transcription services for times when accuracy is of the utmost importance.
Pros:
- Extremely accurate.
- Can handle complex audio files.
Cons:
- Expensive.
- Longer wait times.
- Additional logistics to work through with third-party teams.
Voice-to-text mobile apps: transcription in your pocket
Voice-to-text mobile apps on iOS and Android use your phone's built-in capabilities to transcribe audio. These apps offer the convenience of converting spoken words into text without extra equipment. It's transcription at your fingertips, literally.
Pros:
- Convenient for quick tasks.
- No additional cost.
- Great for on-the-go content creation.
Cons:
- Limited in features.
- May lack accuracy.
- Quality may not be the best.
Each of the four methods has its own advantages and drawbacks. But if speed and efficiency are what you're after, automatic transcription software often takes the cake.
How to transcribe audio to text: A step-by-step guide
As we’ve stressed, audio transcription can be a dull, time-consuming task. But with the right tool, it can be as simple as uploading your audio file and grabbing another cup of coffee.
Here's a step-by-step guide to get you started. Either read along or watch our in-depth tutorial below:
1. Choose transcription software or service
First things first, choose a transcription tool that best suits your needs.
Whether you're looking for an automated software solution, a dedicated mobile app, or human transcription services, it's essential to consider factors like:
- Accuracy: The tool’s precision in transcribing audio, capturing jargon, and ensuring quality outputs.
- Speed: The turnaround time for a transcription can vary from a few seconds to a few days.
- Cost: Weigh the tool’s price against its benefits.
- Ease of use: A user-friendly interface makes the transcription process smooth and efficient.
Your choice will influence the quality and efficiency of the output. For this tutorial, we'll use Descript's transcription software, because in our totally biased opinion, it’s the best tool out there.
2. Prepare your audio file
Before you upload anything, check the clarity and quality of your audio file. Clear, crisp audio with minimal background noise and interruption enhances the accuracy of the transcription, regardless of whether you're using automated software or human services.
If you're a podcaster with multiple hosts, for example, ensure each voice is clear and distinguishable.
3. Upload or import your audio
Open Descript and click New project in the upper right corner.

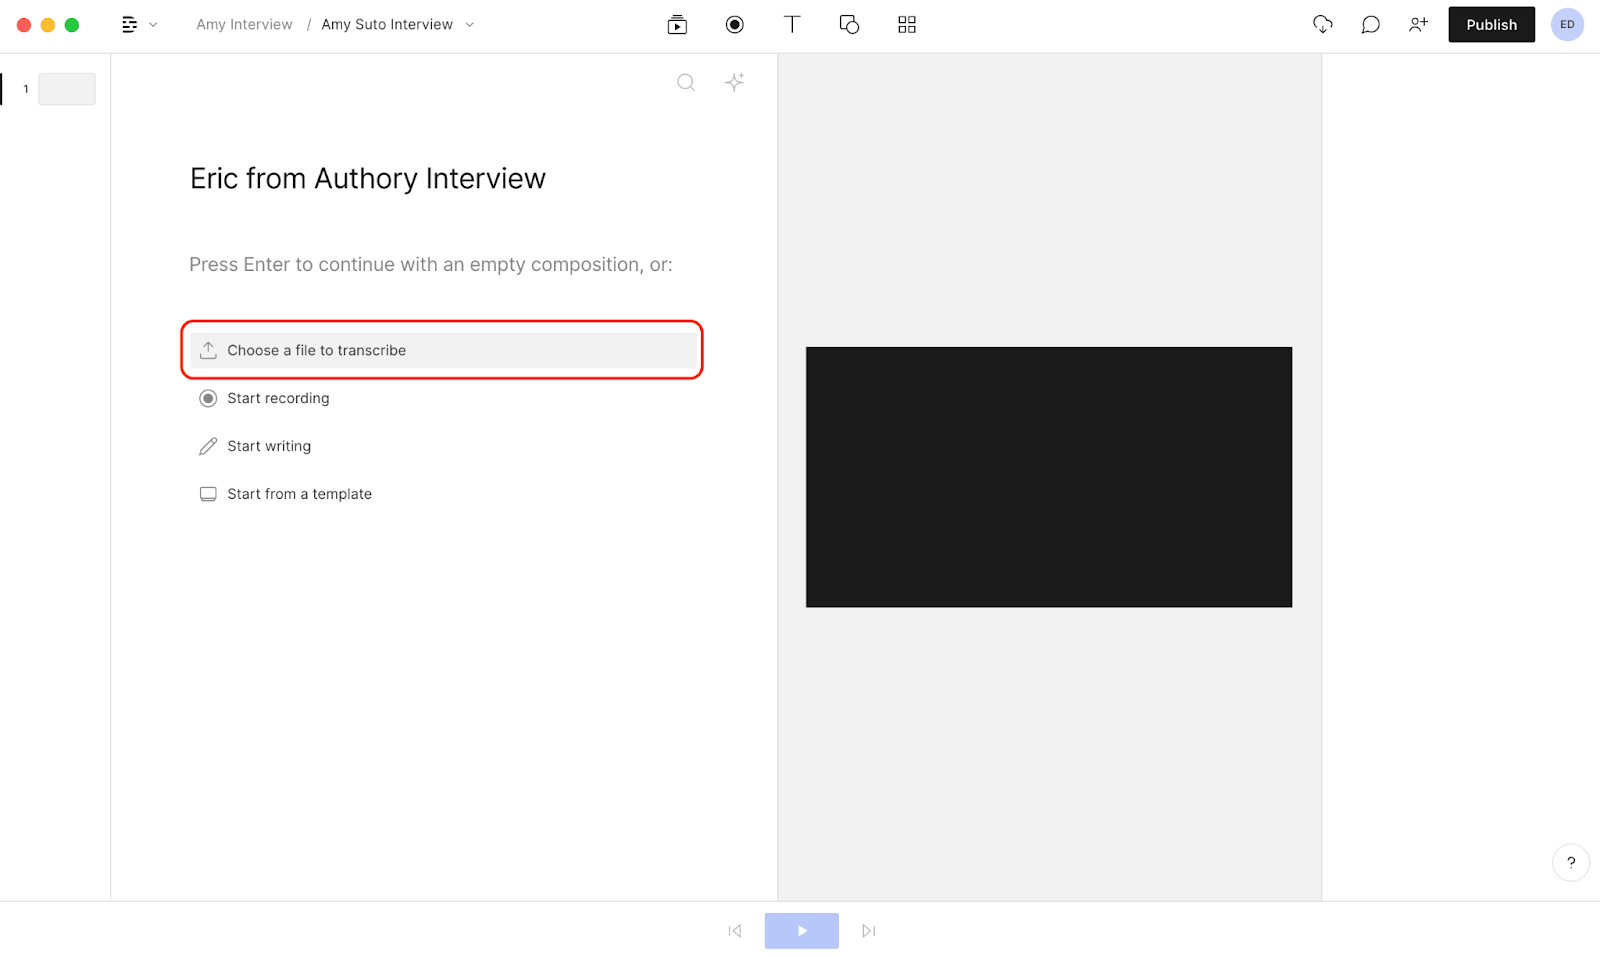
Then, name your project and click Choose a file to transcribe.

Choose the file from your computer. After selecting open, Descript will automatically transcribe your audio or video file.
4. Configure settings
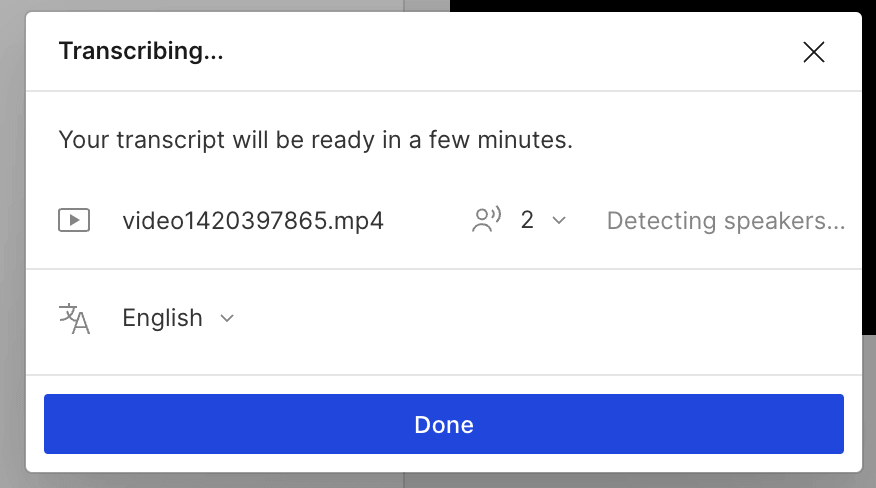
Next, identify the speakers in your file. Select two from the dropdown menu if it’s just you and another person.

Descript will play you a short clip from your file, and you'll type in the speaker's name. Then click Add “Name” as speaker.
5. Start the transcription
Once you've configured the settings, Descript will proceed with the transcription. It's usually quick, but the time can vary depending on the length of your audio file.

6. Review and edit the transcript
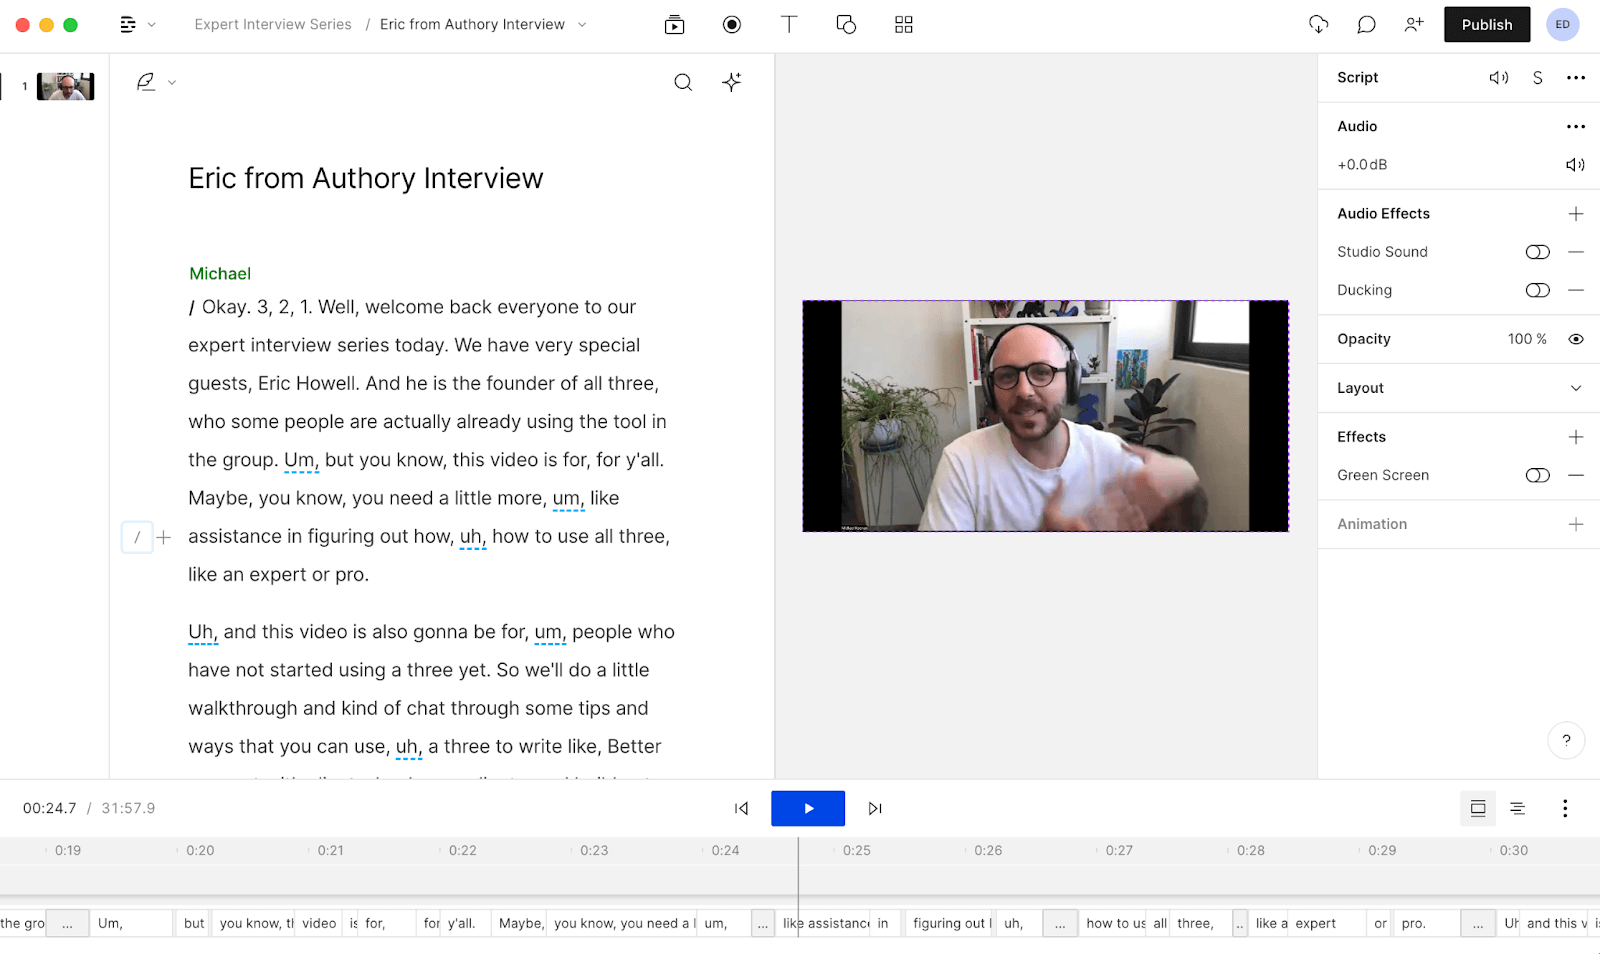
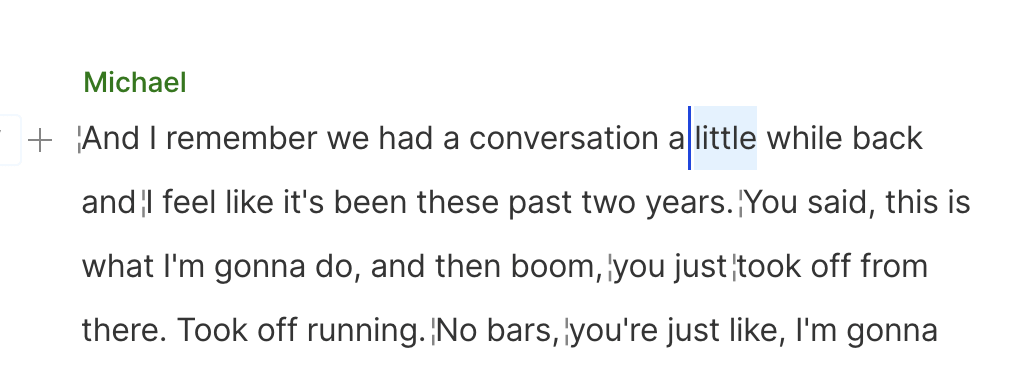
Once it’s complete, review the transcription for any errors. This is the most time-consuming part, but luckily, Descript has keyboard shortcuts that will let you correct words and punctuation quickly.

You can also choose to automatically correct any mistakes made by the AI. You can find that tool in the upper right corner of your transcript.

With Descript, you can:
- Remove long periods of silence from your recording. Decide how many seconds of silence you’ll tolerate, then reduce any excess accordingly.
- Remove filler words like "you know," "well," or "um," as well as unnecessary repetitions.
- Automatically highlight potential recording errors for you to proofread and review.
7. Export or save the transcript

Once you’re satisfied with the transcript, you can export it in formats like PDF, HTML, or Word. And then you’re done! Congrats, you've just transcribed your audio file and saved a bunch of time.
5 tips and best practices to transcribe audio
Transcribing audio is an important skill. Make sure you follow these five essential tips and best practices to make sure you're doing it right.
1. Use high-quality audio
The more precise the audio, the better the transcription. Always record your audio in a quiet environment with minimal background noise. For example, if you're recording an interview, use a dedicated microphone rather than relying on your laptop’s built-in mic.
However, if you find yourself in a pinch and have no other alternative, Descript’s Studio Sound can remove any background noise after the fact.
2. Choose the right transcription software or service
Not all transcription tools are created equal. Pick one that aligns with your needs, goals, and quality standards. A human transcription service might be your best bet if you're after accuracy at any cost.
If speed and control are your priority, use automatic transcription software like Descript. The app produces an up to 95% accurate transcript, and editing the other 5% is quick and straightforward.
3. Transcribe in sections
Don't try to tackle the whole audio file in one go. Break it down into manageable sections if you’re transcribing it manually. This makes the task less overwhelming and allows you to focus on smaller parts to maintain accuracy.
If you have an hour-long lecture, consider transcribing it in 10-minute intervals. But if you’d like to go the automated route, tools like Descript take care of that for you.
4. Use timestamps
The timestamp isn't just for reference, it's for clarity, too. Insert timestamps regularly or during key moments. This allows you to cross-reference the text and audio later on. In an interview, for instance, you might add a timestamp whenever a new question is asked or when a third speaker talks.
5. Use transcription templates
Why start from scratch when you don't have to? Use a template to maintain a consistent format across all your transcriptions.
Some elements you can standardize are:
- Font type and size: Decide all transcriptions must be in Times New Roman size 12 font, for example.
- Paragraph lengths: Keeping paragraphs no more than 3 sentences max makes the content easier to digest.
- Inaudible and crosstalk tags: Highlight unclear audio portions or instances when multiple speakers overlap.
- Sounds: You might add notations that convey non-verbal auditory context, like [laughter] or [door slams].
Overall, a template speeds up the process and makes the final text easier to read and analyze.
Best apps for audio transcription
The good news is that you have plenty of options for transcribing audio. To help, here are four top-notch apps and software for audio transcription, complete with pros, cons, pricing, and limitations.
1. Descript
Descript does more than only transcribe audio files. It also makes your audio sound clean and beautiful compared to other apps. Descript automates transcription for you and makes its editing process a breeze. You can easily set timestamps and match your transcription with audio or visual content.
Get started with Descript for free.
Pricing: Starts at $16/month for the basic plan.
Limitations: The free plan has a cap on transcription hours.
Pros:
- High accuracy and minimal errors.
- User-friendly editing dashboard and tools.
- Offers automatic audio transcription features.
- Supports more than 23 languages, from English to Croatian
Cons:
- Limited free plan.
2. Otter.ai
Otter.ai was originally created just to do transcriptions, but now it's turned into a work meeting notes transcriber. It's great for plugging into your Zoom meetings or any other group meetings needing summaries and a transcript.
Pricing: Free Basic plan available. The next tier up starts at $10 per user per month.
Limitations: The free plan offers 300 minutes of transcription per month.
Pros:
- Real-time transcription.
- Generous free plan.
- Collaboration features.
Cons:
- Less accurate with background noise.
- No human transcription option.
- Its main function is transcription, not an all-in-one workflow tool.
3. Dragon Anywhere
Dragon Anywhere is a mobile app that makes it easy to create documents with speech-to-text functionality. Its “voice typing” style makes it ideal for on-the-go text document creation, formatting, and editing—no need for Microsoft Word to create clean documents.
Pricing: After your 7-day free trial, the monthly subscription starts at $15.
Limitations: No free plan available.
Pros:
- Extremely accurate.
- Customizable voice commands.
- Works well for professionals.
Cons:
- Expensive.
- Requires training the software to your voice.
4. Amazon Transcribe
Amazon Transcribe is a highly accurate speech transcription tool that’s great for meetings, creating custom models for accuracy, and ensuring the privacy of sensitive information. It’s geared for enterprise teams with more demanding security needs.
Pricing: Get 60 minutes a month of speech-to-text for a year. Then the first 250,000 minutes start at $0.024 each.
Limitations: Not as user-friendly for those without technical skills.
Pros:
- Highly scalable.
- Good for bulk transcriptions.
- Supports multiple languages.
Cons:
- Pay-as-you-go pricing can add up.
- Geared more toward developers.
Your transcription experience hinges on the tool you pick, so it's essential to vet each tool, ensuring it aligns with your text file needs and budget. For example, if you need hours of audio transcribed, a free option with limited monthly minutes isn't going to cut it.
Transcribe your audio in seconds with Descript
Descript is your go-to transcription tool for converting audio files to text in real time. It has free transcription options, supports multiple file formats like WAV and MP4, and offers quick turnaround times. Whether you're dealing with podcasts, phone calls, or video content, Descript's automatic transcription software ensures accurate transcripts, even with background noise.
Compatible with Windows and Mac, Descript helps streamline your workflow. You can upload audio or video files and enjoy features like timestamps, subtitles, and speech recognition. Export your transcripts as a Word document, sync to Google Docs or OneDrive, or publish in HTML for a blog post.
Want to speed up your audio transcription process without sacrificing quality? Try Descript today.
Audio transcription FAQs
What is the easiest way to transcribe an audio file?
The easiest way to transcribe an audio file is by using automatic transcription software like Descript or Otter.ai.
How can I transcribe an audio file for free?
You can transcribe an audio file for free using the free plans offered by transcription services like Descript or manually transcribing it yourself.
How do I transcribe an mp3 audio file?
To transcribe an MP3 audio file, you can either upload it to a transcription service that supports MP3 formats or transcribe it manually.


