August 1, 2023

How to enhance video quality using these expert tips

We’ll show you what you can do to improve your videos using expert tips and the best video enhancer tools available on the market today.
August 1, 2023

How to enhance video quality using these expert tips

We’ll show you what you can do to improve your videos using expert tips and the best video enhancer tools available on the market today.
August 1, 2023
Vanessa Hojda
In this article
Start editing audio & video
This makes the editing process so much faster. I wish I knew about Descript a year ago.
Matt D., Copywriter
Sign up

What type of content do you primarily create?

Videos
Podcasts
Social media clips
Transcriptions
Start editing audio & video
This makes the editing process so much faster. I wish I knew about Descript a year ago.
Matt D., Copywriter
Sign up

What type of content do you primarily create?

Videos
Podcasts
Social media clips
Transcriptions

In movies, visual style and spectacle can captivate the audience as much as the story and characters. Online audiences are no different. And you — the creator of the videos they watch — need to keep up with those expectations by maintaining great video quality — at the very least.

Consider the fact that one report found that 36% of consumers feel production value is “somewhat important,” while 28% feel it’s “essential.” Enhancing the visual quality of your online videos is table stakes these days.

You don’t need to be a Nolan or a Spielberg to know how to visually elevate your videos. In fact, you can apply easy and accessible best practices, no matter what your budget is. In this article, we’ll show you what you can do to improve your videos using expert tips and the best video enhancer tools available on the market today.

Table of contents:

  1. How to enhance video quality with Descript
  2. Top tools for enhancing video quality
  3. Tips for enhancing video quality
  4. Video editing enhancement FAQ

How to enhance video quality with Descript

Descript is a powerful video editing tool that can simplify the way you create your videos. Below, we’ll walk you through how you can use it to add visual flare and quality to your videos. But first, get yourself signed up so you can follow along and play around with the easy-to-use features on the platform.

Step 1: Import your video

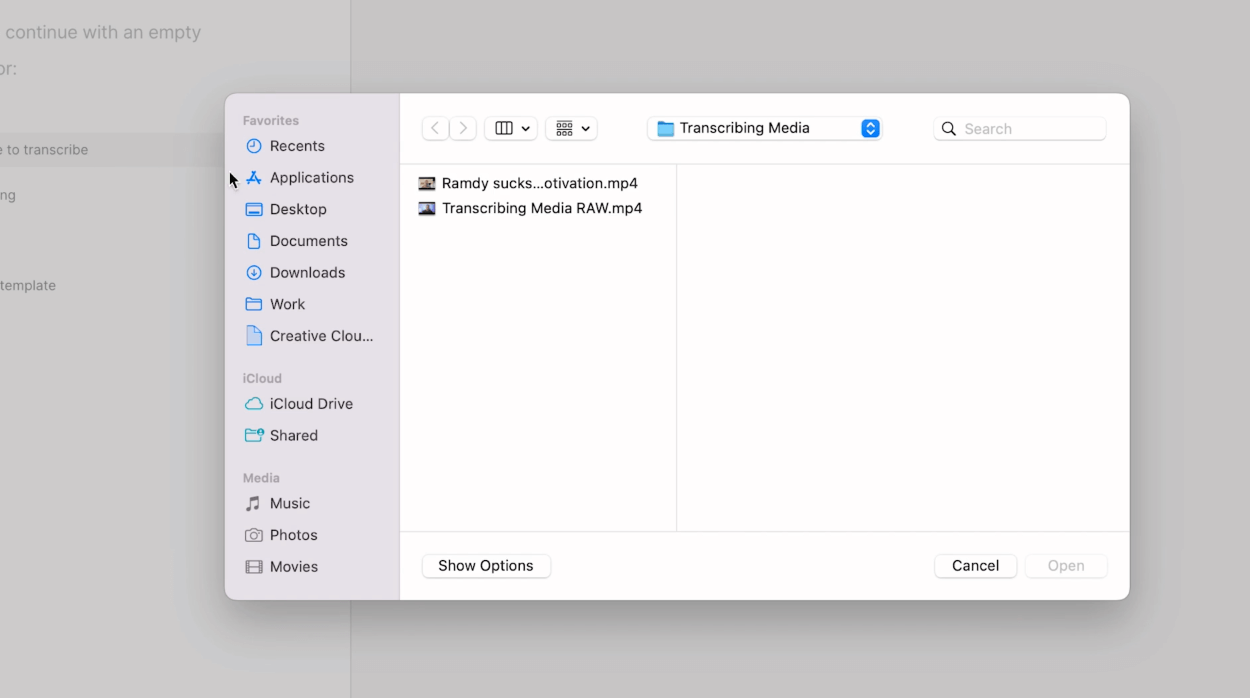
Importing a video file from computer to Descript

You can seamlessly import your video files to Descript whether you’re working with raw footage or existing video files. Descript supports a wide range of video formats — MP4, MPEG, MOV, and Apple ProRes, specifically — making it easy to bring your content into the platform.

Step 2: Transcribe and edit your text

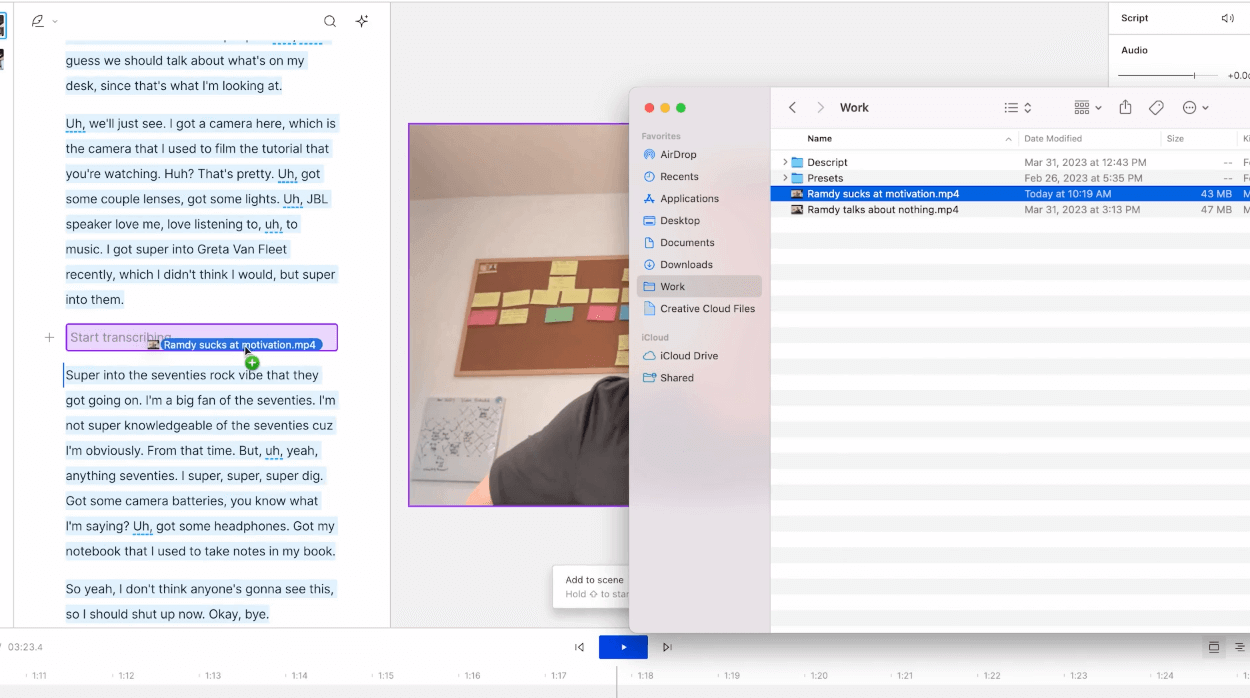
Editing a video file via text through Descript

Descript’s widely loved transcription feature automatically transcribes your video audio into editable text. This transcription becomes the foundation for precise video editing. You can easily make text-based edits, such as removing filler words, correcting mistakes, or rearranging sentences, and the edits will translate into your footage. 

Step 3: Edit and adjust the video clips

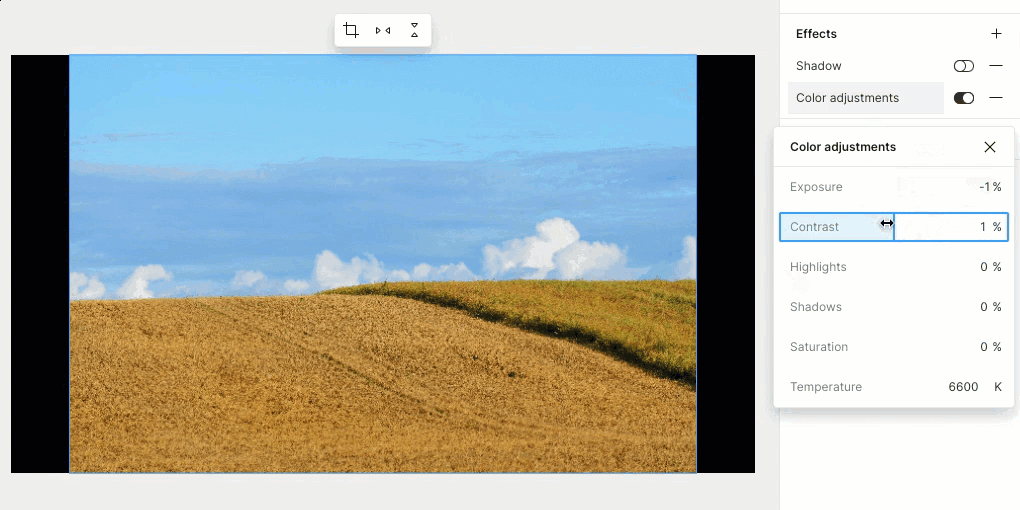
Editing video clips in Descript

Descript goes beyond audio editing, giving you a full suite of visual editing tools to enhance the quality of your videos. You can:

  • Trim and cut video segments
  • Apply transitions between scenes
  • Add captions or subtitles to improve accessibility
  • Use advanced color correction and grading features to adjust the brightness, contrast, and color balance of your footage

Step 4: Export and share

Once you’ve perfected everything using Descript’s editing tools, it’s time to export and share your video. While Descript only exports videos to MP4, there are numerous ways to customize your audio and video settings in the export menu. You can adjust the audio bitrate, normalize volume, or increase the dimensions of your video from 720p to 4K.

Descript also offers other output options, like publishing as a standalone page, audio, GIF, text, or subtitle file. You can also export your Timeline to continue editing in most major audio and video editing tools, or publish directly to any of its integrated publishing and distribution platforms (including YouTube).

Top tools for enhancing video quality

There are plenty of video enhancer tools to choose from — all varying in complexity, price and best use case. Below, we’ll show you five of the best tools for improving video quality.

1. Descript

Descript’s video editing software makes it easy to polish your videos before going live.

Descript has everything you need for enhancing the quality of your videos. We covered some of the features above, but here are a few more reasons to use our tool to bring your videos to the next level.

Pros and cons of using Descript

Descript’s AI-powered interface makes enhancing video quality an intuitive process. Here are a few pros of using Descript:

  • Accessible and user-friendly interface. Descript’s interface is designed with your experience in mind, making it accessible and easy to navigate for both beginners and experienced users. Its intuitive design allows for a seamless editing workflow.
  • Integrated video and audio editing: Descript offers a seamless integration of video editor and audio editor within a single platform. This integration lets you make synchronized edits to both the visual and audio components of your videos.
  • Intelligent video editing capabilities: Overdub allows you to generate synthetic voices based on your own recorded voice, which can be useful for voice overs or fixing narration. Its face detection and tracking technology also enables you to make precise edits based on facial expressions or gestures in the video. 

Still, there may be some downsides depending on your expertise level and needs. Here are a few cons of using Descript:

  • Limited advanced video editing features compared to professional-grade video editing software. While Descript offers essential video editing functionalities, it may not have the same extensive range of features as dedicated video editing software.
  • Requires an internet connection for full functionality. Descript operates as a cloud-based platform, which means that an internet connection is necessary to access and use its features. 

Descript pricing plans

For more details on what each plan includes, see the pricing page.

2. Adobe Premiere Pro

Adobe Premiere Pro is a professional-grade video editing software used by video professionals across a wide range of expertise levels. It allows for easy import options, intuitive organization, and a wide range of footage editing tools. Key features for enhancing video quality include advanced color correction and grading tools, support for various video formats, and seamless integration with other Adobe Creative Cloud applications.

Pros and cons of using Premiere Pro

In terms of being a video quality enhancer, Premiere Pro is the best fit for those who need professional-level capabilities. Here are some of the advantages it offers:

  • Advanced color correction and grading. Adobe Premiere Pro supports various color grading workflows, including the use of LUTs (look-up tables) for cinematic effects. Additionally, Premiere Pro’s compatibility with high dynamic range (HDR) and wide color gamut (WCG) footage preserves more detail in highlights and shadows, a must for professional and cinematographic projects.
  • Supports high-quality video formats. Whether it’s footage captured in 4K, 6K, or even higher resolutions, Premiere Pro can handle it, allowing editors to work with raw, uncompressed, or compressed files seamlessly. By retaining original visual fidelity, creators have the freedom to explore the full potential of their footage without compromise.

Depending on how much time, money and resources you have to learn a professional video editing tool like Premiere Pro, the software might not be right for you. Here are some drawbacks:

  • Steeper learning curve. While Adobe Premiere Pro offers powerful tools for enhancing video quality, mastering these advanced features can be challenging, especially for beginners. Users may need to invest time in learning the software thoroughly before being able to unlock a good range of video enhancement features and tools.
  • Resource-intensive processing. Working with high-resolution video files and applying intensive effects may require a computer with substantial processing power and RAM.
  • Subscription-based pricing model. Adobe Premiere Pro has no free option and follows a subscription-based pricing model, which means users need to pay regular fees to access the software. This pricing structure might not be suitable for all budgets, particularly for independent content creators or hobbyists who may prefer a one-time purchase option.

Adobe Premiere Pro pricing plans

Please note that the actual pricing may vary based on region and specific subscription options. For detailed pricing information and available plans, visit Adobe’s official website.

3. Final Cut Pro

Final Cut Pro, developed by Apple, is professional video editing software with an advanced suite of tools and features for improving video quality. It’s commonly used by filmmakers, content creators, and video enthusiasts due to its user-friendly interface and powerful features.

Pros and cons of using Final Cut Pro

Much like Premiere Pro, Final Cut Pro is a tool that offers a wide range of advanced tools and features. Here are some of the advantages of using it for elevating the quality of your videos:

  • Advanced color grading. Final Cut Pro’s precise color grading tools empower editors to fine-tune the visual aesthetics of their footage, resulting in cinematic looks and a polished final result.
  • HDR support. With support for high dynamic range (HDR) content, Final Cut Pro gives video professional and exceptional detail and contrast.
  • Large video effects library. WIth its vast library of video effects, filters, and transitions, users can add professional touches and stylize the footage.

Now, onto the cons and disadvantages of using Final Cut Pro for enhancing video quality:

  • Exclusive to macOS. Final Cut Pro’s availability being limited to macOS restricts accessibility for Windows and other operating system users. On top of that, Final Cut Pro is optimized for Apple hardware, and users might need high-performance Mac systems to fully utilize its capabilities, which could be a cost factor for some editors.
  • Steep learning curve for users migrating from other tools. Users transitioning from other video editing software may experience a steeper learning curve while adapting to Final Cut Pro’s interface and features.
  • Initial one-time purchase cost. The one-time purchase model for Final Cut Pro, though competitive, may be considered a drawback for users that are used to subscription-based pricing.

Final Cut Pro pricing plans

Final Cut Pro is available as a one-time $299 purchase on the Mac App Store.

4. DaVinci Resolve

DaVinci Resolve, developed by Australian company Blackmagic Design, offers a comprehensive range of tools for image editing, incorporating visual effects, motion graphics, and audio processing features. It’s widely used by Hollywood professionals working in film editing, television show production, and commercials.

Pros and cons of using DaVinci Resolve

DaVinci Resolve is another advanced, professional-grade tool used for video editing. Here’s how it stands apart from its competitors:

  1. Fusion visual effects integration. DaVinci Resolve seamlessly integrates with Fusion, a powerful node-based visual effects compositing software. This integration allows editors to easily create and apply complex visual effects, motion graphics, and compositing elements directly within the editing timeline.
  2. Fairlight audio integration. DaVinci Resolve comes with Fairlight, a professional audio post-production toolset, enabling users to perform sophisticated audio editing, mixing, and mastering tasks. This feature gives video creators high-quality sound design and seamless synchronization between video and audio elements, resulting in a more immersive and polished final product.

And here are some disadvantages of using DaVinci Resolve:

  • Steep learning curve. The interface may be overwhelming for newcomers, especially for those who only need a tool for improving the visual quality of their videos.
  • Demanding hardware requirements. Optimal performance of DaVinci Resolve may require demanding hardware specifications, which could be a consideration for users with less powerful systems.
  • Real-time playback limitations. Complex projects with numerous visual effects and layers may experience limitations in real-time playback.

DaVinci Resolve pricing plans

Tips for enhancing video quality

We’ve worked with thousands of experienced video experts and creators and learned a few tips and tricks that help them bring the quality of their videos from bleh to whoa.

Here are a few easy, cheap, and (relatively) time-efficient tips and best practices you can use to improve the quality of your next video project.

1. Fine-tune the brightness and contrast

Brightness and contrast in video refer to the control of light intensity and the distinction between the darkest and brightest areas of your footage. When the brightness and contrast of your settings are off, your viewers may miss important details or experience a loss of immersion.

Below, we’ll walk you through some tips and best practices for adjusting brightness and contrast effectively.

  • Experiment with exposure to strike the right balance. Overexposure can result in loss of highlights, making bright areas appear washed out and lacking in detail. Conversely, underexposure can lead to shadows with little visibility, making the video look murky. Play around with these settings to get a feel for what “balance” is.
  • Think about contrast as a way to add depth. Properly adjusting contrast can add depth and richness to your video. A well-balanced contrast setting allows for clear distinctions between light and dark areas, making your content more dynamic and engaging. High contrast can make colors pop and add visual impact, while low contrast can create a softer and more subtle mood.
  • Check your video on different screens and devices. Brightness and contrast settings can appear differently based on the device and environment your video is playing in. When editing, consider the target platform, such as mobile devices, computer screens, or television, and ensure the brightness and contrast are adjusted to suit where the video will play.

With Descript, you can use the real-time preview feature that allows you to see the impact of brightness and contrast adjustments instantly, enabling you to fine-tune these settings with precision, in real-time.

2. Adjust the color saturation

Color saturation in video refers to the intensity or richness of colors present in the footage. It affects the richness, vibrancy, and visual impact of the colors. Color saturation can be the key setting that enhances the quality of a video by highlighting your message or brand, taking attention away from something, or conveying a feeling.

Here are some best practices for when it’s time to edit the color saturation on your videos:

  • Use color saturation to convey emotions. For example, you can use bright saturation to evoke joy and excitement. Conversely, in a melancholic scene, desaturate the colors slightly to evoke a sense of nostalgia or drama. Remember, subtlety is key to creating a compelling visual impact.
  • Saturate (and desaturate) per scene, not the entire video. Each scene in your video may require different levels of color saturation to maintain a consistent visual tone. Pay attention to lighting conditions, the mood of the scene, and the overall aesthetics. By adjusting saturation per scene rather than treating your video as a whole, you can get a more cohesive look throughout your video.
  • Experiment with color palettes. To better understand the impact that color saturation has on your videos, test different palettes on your color saturation slider. Try desaturating specific colors while maintaining the vibrancy of others to see how it alters the video’s mood and visual dynamics. 

3. Play with noise and grain

Noise — not to be confused with background noise — refers to random variations in brightness or color that create unwanted artifacts on your video, while grain is a fuzzy texture caused by film or sensor imperfections. When not addressed, noise and film grain can distract your viewers, reduce the sharpness of your footage, and reduce the overall professional look of your video. 

To effectively reduce noise and grain and achieve visually appealing results, here are three best practices to follow:

  • Use proper lighting and exposure when filming. Well-lit footage captured under optimal lighting conditions minimizes the noise and grain present in your video. Use diffused lighting sources and avoid underexposure or overexposure to capture clean and high-quality footage. Descript’s video editing platform offers features like brightness and exposure adjustments, allowing you to fine-tune the lighting and exposure levels to reduce noise and grain effectively.
  • Reduce noise selectively. Instead of applying noise reduction uniformly across the entire video, consider selectively reducing noise in specific areas that are more prone to noise or grain, such as shadows or dark regions. Descript offers advanced noise reduction features that enable you to target and reduce noise in specific frequency ranges or areas, preserving more details and avoiding the over-smoothing effect that can compromise image quality.
  • Quality denoising filters. Use high-quality denoising filters during post-production to effectively reduce noise and grain without sacrificing important visual details. Descript provides access to professional-grade denoising filters that employ advanced algorithms to intelligently analyze and suppress noise, ensuring optimal noise reduction while preserving the sharpness and clarity of your video.

4. Experiment with blur and sharpness

Blur refers to reducing the clarity and sharpness of an image, while sharpness enhances fine details in the footage. Adjusting blur and sharpness allows you to guide the viewer’s attention to specific subjects or elements within the frame. A well-placed blur can draw focus to the central character in an interview, while sharpness can highlight intricate textures in product shots, elevating the overall visual impact.

  • Play with the depth of field. Use selective blur to enhance the depth of field in shots, providing a cinematic look that separates subjects from the background and brings focus to the foreground (a.k.a. a Bokeh effect).
  • Use depth staging. To create a sense of depth and dimensionality, apply blur to the background layers while keeping the foreground sharp. This technique is particularly useful in interviews or dialogue scenes, where the main subject stands out against a slightly softened backdrop, drawing the viewer’s attention to the conversation’s emotional content.
  • Use blur to highlight text on your video. You can incorporate blurry video to draw attention to on-screen text, titles, or graphics. Gradually increase sharpness on these elements, ensuring they stand out clearly against the background and support the video’s messaging and branding.

Descript’s video editing tools include a blur tool and a zoom blur. You can apply both of these effects to a visual layer from the Properties Panel.

5. Optimize your compression settings

Video compression refers to the process of reducing a video file’s size while preserving its visual integrity (no visible pixels) and audio integrity. During compression, redundant data is removed from the video file, resulting in reduced file size. However, if compression is set too high or the wrong settings are used, it can lead to a low-quality video really quickly: visible artifacts, blurriness, and a loss of detail will diminish the overall video quality.

Here are some ways you can compress your video without losing quality:

  • Shorten the length of your video. Look for any parts of your video that you can remove. Start at the beginning and the end: what’s absolutely necessary to keep and what can you do without? This type of trimming is something you can easily do with any video editing tool, including Descript.
  • Adjust the video resolution. One of the simplest ways to shrink your video’s file size is to reduce its resolution. Take a look at where the final video will live. If it’s YouTube, you can bring the higher resolution down to 1080 pixels. For social media, where the priority is the mobile view, it might be possible to bring it down to 720 pixels.
  • Export your final video using MP4. While there are other video codecs for cinema-quality files, MP4 video files are the preset of choice for YouTube and other social videos. Descript’s all-in-one editing software includes video compression, so you don’t have to download additional apps like VLC.

Descript lets you choose bitrate conversion or frame rate reduction — all without losing video resolution.

Video editing enhancement FAQ

What does it mean to enhance video quality?

Enhancing video quality refers to the process of improving various aspects of a video to enhance its visual appeal, clarity, and overall impact. This includes adjusting brightness, contrast, and color saturation, reducing noise, sharpening, and optimizing compression settings.

How can I enhance video quality without losing resolution?

To get higher quality without losing video resolution, it’s important to work with the best possible source footage. By capturing high-quality video during filming and using advanced editing tools, you can make adjustments that improve the visual elements without sacrificing resolution.

Can I enhance the quality of a low-resolution video?

While it may be challenging to significantly improve the quality of a low-resolution video, there are techniques and tools available that can enhance certain aspects, such as reducing noise or adjusting color saturation. However, it’s important to note that these enhancements have limitations and may not fully restore the quality of the original footage.

What are some techniques to enhance video quality?

Some common techniques to enhance video quality include adjusting brightness and contrast, enhancing color saturation, reducing noise and grain, sharpening the video, and optimizing compression settings. Each technique plays a specific role in improving different aspects of video quality.

Are there free tools to enhance video quality?

Yes, there are free tools available that can help enhance video quality. One such tool is Descript, which offers a range of features for video editing and enhancement. While the free version may have some limitations, it provides accessible options to improve video quality.

Vanessa Hojda
Vanessa is a freelance writer and content manager. When they're not making content, you can find them by the sea, nose pressed against a good book.
Share this article
Start creating—for free
Sign up
Join millions of others creating with Descript

How to enhance video quality using these expert tips

In movies, visual style and spectacle can captivate the audience as much as the story and characters. Online audiences are no different. And you — the creator of the videos they watch — need to keep up with those expectations by maintaining great video quality — at the very least.

Consider the fact that one report found that 36% of consumers feel production value is “somewhat important,” while 28% feel it’s “essential.” Enhancing the visual quality of your online videos is table stakes these days.

You don’t need to be a Nolan or a Spielberg to know how to visually elevate your videos. In fact, you can apply easy and accessible best practices, no matter what your budget is. In this article, we’ll show you what you can do to improve your videos using expert tips and the best video enhancer tools available on the market today.

Table of contents:

  1. How to enhance video quality with Descript
  2. Top tools for enhancing video quality
  3. Tips for enhancing video quality
  4. Video editing enhancement FAQ
Our full-featured video editing tool is as powerful as it is easy to use.
Look for our all-in-one audio & video production that’s as easy as editing a doc.

How to enhance video quality with Descript

Descript is a powerful video editing tool that can simplify the way you create your videos. Below, we’ll walk you through how you can use it to add visual flare and quality to your videos. But first, get yourself signed up so you can follow along and play around with the easy-to-use features on the platform.

Step 1: Import your video

Importing a video file from computer to Descript

You can seamlessly import your video files to Descript whether you’re working with raw footage or existing video files. Descript supports a wide range of video formats — MP4, MPEG, MOV, and Apple ProRes, specifically — making it easy to bring your content into the platform.

Step 2: Transcribe and edit your text

Editing a video file via text through Descript

Descript’s widely loved transcription feature automatically transcribes your video audio into editable text. This transcription becomes the foundation for precise video editing. You can easily make text-based edits, such as removing filler words, correcting mistakes, or rearranging sentences, and the edits will translate into your footage. 

Step 3: Edit and adjust the video clips

Editing video clips in Descript

Descript goes beyond audio editing, giving you a full suite of visual editing tools to enhance the quality of your videos. You can:

  • Trim and cut video segments
  • Apply transitions between scenes
  • Add captions or subtitles to improve accessibility
  • Use advanced color correction and grading features to adjust the brightness, contrast, and color balance of your footage

Step 4: Export and share

Once you’ve perfected everything using Descript’s editing tools, it’s time to export and share your video. While Descript only exports videos to MP4, there are numerous ways to customize your audio and video settings in the export menu. You can adjust the audio bitrate, normalize volume, or increase the dimensions of your video from 720p to 4K.

Descript also offers other output options, like publishing as a standalone page, audio, GIF, text, or subtitle file. You can also export your Timeline to continue editing in most major audio and video editing tools, or publish directly to any of its integrated publishing and distribution platforms (including YouTube).

Top tools for enhancing video quality

There are plenty of video enhancer tools to choose from — all varying in complexity, price and best use case. Below, we’ll show you five of the best tools for improving video quality.

1. Descript

Descript’s video editing software makes it easy to polish your videos before going live.

Descript has everything you need for enhancing the quality of your videos. We covered some of the features above, but here are a few more reasons to use our tool to bring your videos to the next level.

Pros and cons of using Descript

Descript’s AI-powered interface makes enhancing video quality an intuitive process. Here are a few pros of using Descript:

  • Accessible and user-friendly interface. Descript’s interface is designed with your experience in mind, making it accessible and easy to navigate for both beginners and experienced users. Its intuitive design allows for a seamless editing workflow.
  • Integrated video and audio editing: Descript offers a seamless integration of video editor and audio editor within a single platform. This integration lets you make synchronized edits to both the visual and audio components of your videos.
  • Intelligent video editing capabilities: Overdub allows you to generate synthetic voices based on your own recorded voice, which can be useful for voice overs or fixing narration. Its face detection and tracking technology also enables you to make precise edits based on facial expressions or gestures in the video. 

Still, there may be some downsides depending on your expertise level and needs. Here are a few cons of using Descript:

  • Limited advanced video editing features compared to professional-grade video editing software. While Descript offers essential video editing functionalities, it may not have the same extensive range of features as dedicated video editing software.
  • Requires an internet connection for full functionality. Descript operates as a cloud-based platform, which means that an internet connection is necessary to access and use its features. 

Descript pricing plans

For more details on what each plan includes, see the pricing page.

2. Adobe Premiere Pro

Adobe Premiere Pro is a professional-grade video editing software used by video professionals across a wide range of expertise levels. It allows for easy import options, intuitive organization, and a wide range of footage editing tools. Key features for enhancing video quality include advanced color correction and grading tools, support for various video formats, and seamless integration with other Adobe Creative Cloud applications.

Pros and cons of using Premiere Pro

In terms of being a video quality enhancer, Premiere Pro is the best fit for those who need professional-level capabilities. Here are some of the advantages it offers:

  • Advanced color correction and grading. Adobe Premiere Pro supports various color grading workflows, including the use of LUTs (look-up tables) for cinematic effects. Additionally, Premiere Pro’s compatibility with high dynamic range (HDR) and wide color gamut (WCG) footage preserves more detail in highlights and shadows, a must for professional and cinematographic projects.
  • Supports high-quality video formats. Whether it’s footage captured in 4K, 6K, or even higher resolutions, Premiere Pro can handle it, allowing editors to work with raw, uncompressed, or compressed files seamlessly. By retaining original visual fidelity, creators have the freedom to explore the full potential of their footage without compromise.

Depending on how much time, money and resources you have to learn a professional video editing tool like Premiere Pro, the software might not be right for you. Here are some drawbacks:

  • Steeper learning curve. While Adobe Premiere Pro offers powerful tools for enhancing video quality, mastering these advanced features can be challenging, especially for beginners. Users may need to invest time in learning the software thoroughly before being able to unlock a good range of video enhancement features and tools.
  • Resource-intensive processing. Working with high-resolution video files and applying intensive effects may require a computer with substantial processing power and RAM.
  • Subscription-based pricing model. Adobe Premiere Pro has no free option and follows a subscription-based pricing model, which means users need to pay regular fees to access the software. This pricing structure might not be suitable for all budgets, particularly for independent content creators or hobbyists who may prefer a one-time purchase option.

Adobe Premiere Pro pricing plans

Please note that the actual pricing may vary based on region and specific subscription options. For detailed pricing information and available plans, visit Adobe’s official website.

3. Final Cut Pro

Final Cut Pro, developed by Apple, is professional video editing software with an advanced suite of tools and features for improving video quality. It’s commonly used by filmmakers, content creators, and video enthusiasts due to its user-friendly interface and powerful features.

Pros and cons of using Final Cut Pro

Much like Premiere Pro, Final Cut Pro is a tool that offers a wide range of advanced tools and features. Here are some of the advantages of using it for elevating the quality of your videos:

  • Advanced color grading. Final Cut Pro’s precise color grading tools empower editors to fine-tune the visual aesthetics of their footage, resulting in cinematic looks and a polished final result.
  • HDR support. With support for high dynamic range (HDR) content, Final Cut Pro gives video professional and exceptional detail and contrast.
  • Large video effects library. WIth its vast library of video effects, filters, and transitions, users can add professional touches and stylize the footage.

Now, onto the cons and disadvantages of using Final Cut Pro for enhancing video quality:

  • Exclusive to macOS. Final Cut Pro’s availability being limited to macOS restricts accessibility for Windows and other operating system users. On top of that, Final Cut Pro is optimized for Apple hardware, and users might need high-performance Mac systems to fully utilize its capabilities, which could be a cost factor for some editors.
  • Steep learning curve for users migrating from other tools. Users transitioning from other video editing software may experience a steeper learning curve while adapting to Final Cut Pro’s interface and features.
  • Initial one-time purchase cost. The one-time purchase model for Final Cut Pro, though competitive, may be considered a drawback for users that are used to subscription-based pricing.

Final Cut Pro pricing plans

Final Cut Pro is available as a one-time $299 purchase on the Mac App Store.

4. DaVinci Resolve

DaVinci Resolve, developed by Australian company Blackmagic Design, offers a comprehensive range of tools for image editing, incorporating visual effects, motion graphics, and audio processing features. It’s widely used by Hollywood professionals working in film editing, television show production, and commercials.

Pros and cons of using DaVinci Resolve

DaVinci Resolve is another advanced, professional-grade tool used for video editing. Here’s how it stands apart from its competitors:

  1. Fusion visual effects integration. DaVinci Resolve seamlessly integrates with Fusion, a powerful node-based visual effects compositing software. This integration allows editors to easily create and apply complex visual effects, motion graphics, and compositing elements directly within the editing timeline.
  2. Fairlight audio integration. DaVinci Resolve comes with Fairlight, a professional audio post-production toolset, enabling users to perform sophisticated audio editing, mixing, and mastering tasks. This feature gives video creators high-quality sound design and seamless synchronization between video and audio elements, resulting in a more immersive and polished final product.

And here are some disadvantages of using DaVinci Resolve:

  • Steep learning curve. The interface may be overwhelming for newcomers, especially for those who only need a tool for improving the visual quality of their videos.
  • Demanding hardware requirements. Optimal performance of DaVinci Resolve may require demanding hardware specifications, which could be a consideration for users with less powerful systems.
  • Real-time playback limitations. Complex projects with numerous visual effects and layers may experience limitations in real-time playback.

DaVinci Resolve pricing plans

Tips for enhancing video quality

We’ve worked with thousands of experienced video experts and creators and learned a few tips and tricks that help them bring the quality of their videos from bleh to whoa.

Here are a few easy, cheap, and (relatively) time-efficient tips and best practices you can use to improve the quality of your next video project.

1. Fine-tune the brightness and contrast

Brightness and contrast in video refer to the control of light intensity and the distinction between the darkest and brightest areas of your footage. When the brightness and contrast of your settings are off, your viewers may miss important details or experience a loss of immersion.

Below, we’ll walk you through some tips and best practices for adjusting brightness and contrast effectively.

  • Experiment with exposure to strike the right balance. Overexposure can result in loss of highlights, making bright areas appear washed out and lacking in detail. Conversely, underexposure can lead to shadows with little visibility, making the video look murky. Play around with these settings to get a feel for what “balance” is.
  • Think about contrast as a way to add depth. Properly adjusting contrast can add depth and richness to your video. A well-balanced contrast setting allows for clear distinctions between light and dark areas, making your content more dynamic and engaging. High contrast can make colors pop and add visual impact, while low contrast can create a softer and more subtle mood.
  • Check your video on different screens and devices. Brightness and contrast settings can appear differently based on the device and environment your video is playing in. When editing, consider the target platform, such as mobile devices, computer screens, or television, and ensure the brightness and contrast are adjusted to suit where the video will play.

With Descript, you can use the real-time preview feature that allows you to see the impact of brightness and contrast adjustments instantly, enabling you to fine-tune these settings with precision, in real-time.

2. Adjust the color saturation

Color saturation in video refers to the intensity or richness of colors present in the footage. It affects the richness, vibrancy, and visual impact of the colors. Color saturation can be the key setting that enhances the quality of a video by highlighting your message or brand, taking attention away from something, or conveying a feeling.

Here are some best practices for when it’s time to edit the color saturation on your videos:

  • Use color saturation to convey emotions. For example, you can use bright saturation to evoke joy and excitement. Conversely, in a melancholic scene, desaturate the colors slightly to evoke a sense of nostalgia or drama. Remember, subtlety is key to creating a compelling visual impact.
  • Saturate (and desaturate) per scene, not the entire video. Each scene in your video may require different levels of color saturation to maintain a consistent visual tone. Pay attention to lighting conditions, the mood of the scene, and the overall aesthetics. By adjusting saturation per scene rather than treating your video as a whole, you can get a more cohesive look throughout your video.
  • Experiment with color palettes. To better understand the impact that color saturation has on your videos, test different palettes on your color saturation slider. Try desaturating specific colors while maintaining the vibrancy of others to see how it alters the video’s mood and visual dynamics. 

3. Play with noise and grain

Noise — not to be confused with background noise — refers to random variations in brightness or color that create unwanted artifacts on your video, while grain is a fuzzy texture caused by film or sensor imperfections. When not addressed, noise and film grain can distract your viewers, reduce the sharpness of your footage, and reduce the overall professional look of your video. 

To effectively reduce noise and grain and achieve visually appealing results, here are three best practices to follow:

  • Use proper lighting and exposure when filming. Well-lit footage captured under optimal lighting conditions minimizes the noise and grain present in your video. Use diffused lighting sources and avoid underexposure or overexposure to capture clean and high-quality footage. Descript’s video editing platform offers features like brightness and exposure adjustments, allowing you to fine-tune the lighting and exposure levels to reduce noise and grain effectively.
  • Reduce noise selectively. Instead of applying noise reduction uniformly across the entire video, consider selectively reducing noise in specific areas that are more prone to noise or grain, such as shadows or dark regions. Descript offers advanced noise reduction features that enable you to target and reduce noise in specific frequency ranges or areas, preserving more details and avoiding the over-smoothing effect that can compromise image quality.
  • Quality denoising filters. Use high-quality denoising filters during post-production to effectively reduce noise and grain without sacrificing important visual details. Descript provides access to professional-grade denoising filters that employ advanced algorithms to intelligently analyze and suppress noise, ensuring optimal noise reduction while preserving the sharpness and clarity of your video.

4. Experiment with blur and sharpness

Blur refers to reducing the clarity and sharpness of an image, while sharpness enhances fine details in the footage. Adjusting blur and sharpness allows you to guide the viewer’s attention to specific subjects or elements within the frame. A well-placed blur can draw focus to the central character in an interview, while sharpness can highlight intricate textures in product shots, elevating the overall visual impact.

  • Play with the depth of field. Use selective blur to enhance the depth of field in shots, providing a cinematic look that separates subjects from the background and brings focus to the foreground (a.k.a. a Bokeh effect).
  • Use depth staging. To create a sense of depth and dimensionality, apply blur to the background layers while keeping the foreground sharp. This technique is particularly useful in interviews or dialogue scenes, where the main subject stands out against a slightly softened backdrop, drawing the viewer’s attention to the conversation’s emotional content.
  • Use blur to highlight text on your video. You can incorporate blurry video to draw attention to on-screen text, titles, or graphics. Gradually increase sharpness on these elements, ensuring they stand out clearly against the background and support the video’s messaging and branding.

Descript’s video editing tools include a blur tool and a zoom blur. You can apply both of these effects to a visual layer from the Properties Panel.

5. Optimize your compression settings

Video compression refers to the process of reducing a video file’s size while preserving its visual integrity (no visible pixels) and audio integrity. During compression, redundant data is removed from the video file, resulting in reduced file size. However, if compression is set too high or the wrong settings are used, it can lead to a low-quality video really quickly: visible artifacts, blurriness, and a loss of detail will diminish the overall video quality.

Here are some ways you can compress your video without losing quality:

  • Shorten the length of your video. Look for any parts of your video that you can remove. Start at the beginning and the end: what’s absolutely necessary to keep and what can you do without? This type of trimming is something you can easily do with any video editing tool, including Descript.
  • Adjust the video resolution. One of the simplest ways to shrink your video’s file size is to reduce its resolution. Take a look at where the final video will live. If it’s YouTube, you can bring the higher resolution down to 1080 pixels. For social media, where the priority is the mobile view, it might be possible to bring it down to 720 pixels.
  • Export your final video using MP4. While there are other video codecs for cinema-quality files, MP4 video files are the preset of choice for YouTube and other social videos. Descript’s all-in-one editing software includes video compression, so you don’t have to download additional apps like VLC.

Descript lets you choose bitrate conversion or frame rate reduction — all without losing video resolution.

Video editing enhancement FAQ

What does it mean to enhance video quality?

Enhancing video quality refers to the process of improving various aspects of a video to enhance its visual appeal, clarity, and overall impact. This includes adjusting brightness, contrast, and color saturation, reducing noise, sharpening, and optimizing compression settings.

How can I enhance video quality without losing resolution?

To get higher quality without losing video resolution, it’s important to work with the best possible source footage. By capturing high-quality video during filming and using advanced editing tools, you can make adjustments that improve the visual elements without sacrificing resolution.

Can I enhance the quality of a low-resolution video?

While it may be challenging to significantly improve the quality of a low-resolution video, there are techniques and tools available that can enhance certain aspects, such as reducing noise or adjusting color saturation. However, it’s important to note that these enhancements have limitations and may not fully restore the quality of the original footage.

What are some techniques to enhance video quality?

Some common techniques to enhance video quality include adjusting brightness and contrast, enhancing color saturation, reducing noise and grain, sharpening the video, and optimizing compression settings. Each technique plays a specific role in improving different aspects of video quality.

Are there free tools to enhance video quality?

Yes, there are free tools available that can help enhance video quality. One such tool is Descript, which offers a range of features for video editing and enhancement. While the free version may have some limitations, it provides accessible options to improve video quality.

Featured articles:

Podcasting

6 podcast editing tips for a better interview podcast

Make your interview stand out from the pack with these tips about hooks, narrative, and other smart editing lessons.

Video

5 ways to boost audience retention on YouTube from real creators

Learn how MrBeast and other high-performing creators boost audience retention on YouTube with 5 tricks to keep viewers watching.

Product Updates

Descript Season 6: Meet Underlord

Descript's new AI editing assistant. With powerful AI tools at every step of your workflow, Underlord does all the tedious and boring work, and leaves all the creative work to you.

Articles you might find interesting

For Business

What is social media engagement and how to improve it

Successful social media marketing is about getting your audience to interact with your content, known as social media engagement. Learn more here and boost engagement.

Video

How to upload a video to Facebook, with pro tips

Whether you’re using a laptop or mobile device to upload videos, the process is pretty similar — but here’s a rundown of everything you need to know.

Video

16 TikTok video ideas for when your creative well runs dry

Whether you've just created your TikTok account and don't know where to start, or you've posted a few videos and need some inspiration, we've got TikTok video ideas for you.

Related articles:

Share this article

Get started for free →