The editing phase — or post-production phase — is the lengthiest and most challenging part of the video production process. It’s also the most rewarding. The decisions you make in the editing suite are critical, and there are a ton of options and approaches to choose from, which can be intimidating, especially if you’re new to the process.
Here’s a quick guide on how to do basic video editing, including what to consider before starting, and a few video production fundamentals to keep in mind as you piece your project together.
What to consider before you start editing videos
The editing process begins before you even fire up your computer and editing software. Think about what your edit will need while you’re shooting. Better yet, think about your edit before shooting.
Making a plan via a shot list or even just a general outline of what you want to capture will help you shoot what you need to make your vision come to life. Trust us, if you get organized before shooting you’ll thank yourself later.
Shoot enough to edit well
Getting more than enough footage for your edit is something video editors call coverage. It’s the best way to avoid trouble during the edit — or worse, having to go back to reshoot.
Here’s how you can cover your bases when shooting:
- It takes two (or more) takes. Gone are the days of running out of film; hard drives are cheap and abundant. Use the extra space to record multiple takes, or versions of a scene. That is, always shoot more takes than you think you need. This will give you more options to work with when in the editing suite. It’s always better to have too much footage than not enough.
- Let the record show. For the same reason you want more than enough takes, you also want your take to run longer than you need. Start recording a few seconds before the action, and keep shooting for a few seconds afterward. Those extra seconds will give you room to cut in and cut out at the right moment.
- Don’t stop ’til you get enough. Regardless of the shot, always shoot for at least 10 seconds. This general rule applies even if the action lasts only a couple of seconds, or if you’re recording a static shot with no actions. Even pressing the record button or stepping back from the camera can cause vibrations or sounds. Recording for 10 seconds gives your equipment enough time to stabilize and guarantees a minimum amount of usable footage.
- Read the room. Every recording environment has a certain audio quality when no one or nothing is making a sound. Professionals call it room tone — background sound, the sound of the room, or the sound of silence. Collect a bit of room tone from every location. It could be useful for filling awkward audio gaps in your edit later on.
11 basic video editing principles
There’s no one way to edit videos. Your approach will depend on your project and your creative preferences — but there are a few tried and true strategies that can streamline your video editing workflow and, hopefully, spare you from having to learn the hard way.
Here’s a step-by-step beginner’s guide to editing video footage:
1. Organize your footage
“You have to be organized,” says Tiff Bauer, former video producer at Descript. “Starting off by organizing your stuff straight out of the camera is great.”
Keeping your video clips and audio files in order will allow you to quickly find the pieces you need when you need them. Decide on a management strategy and file structure, and keep it consistent.
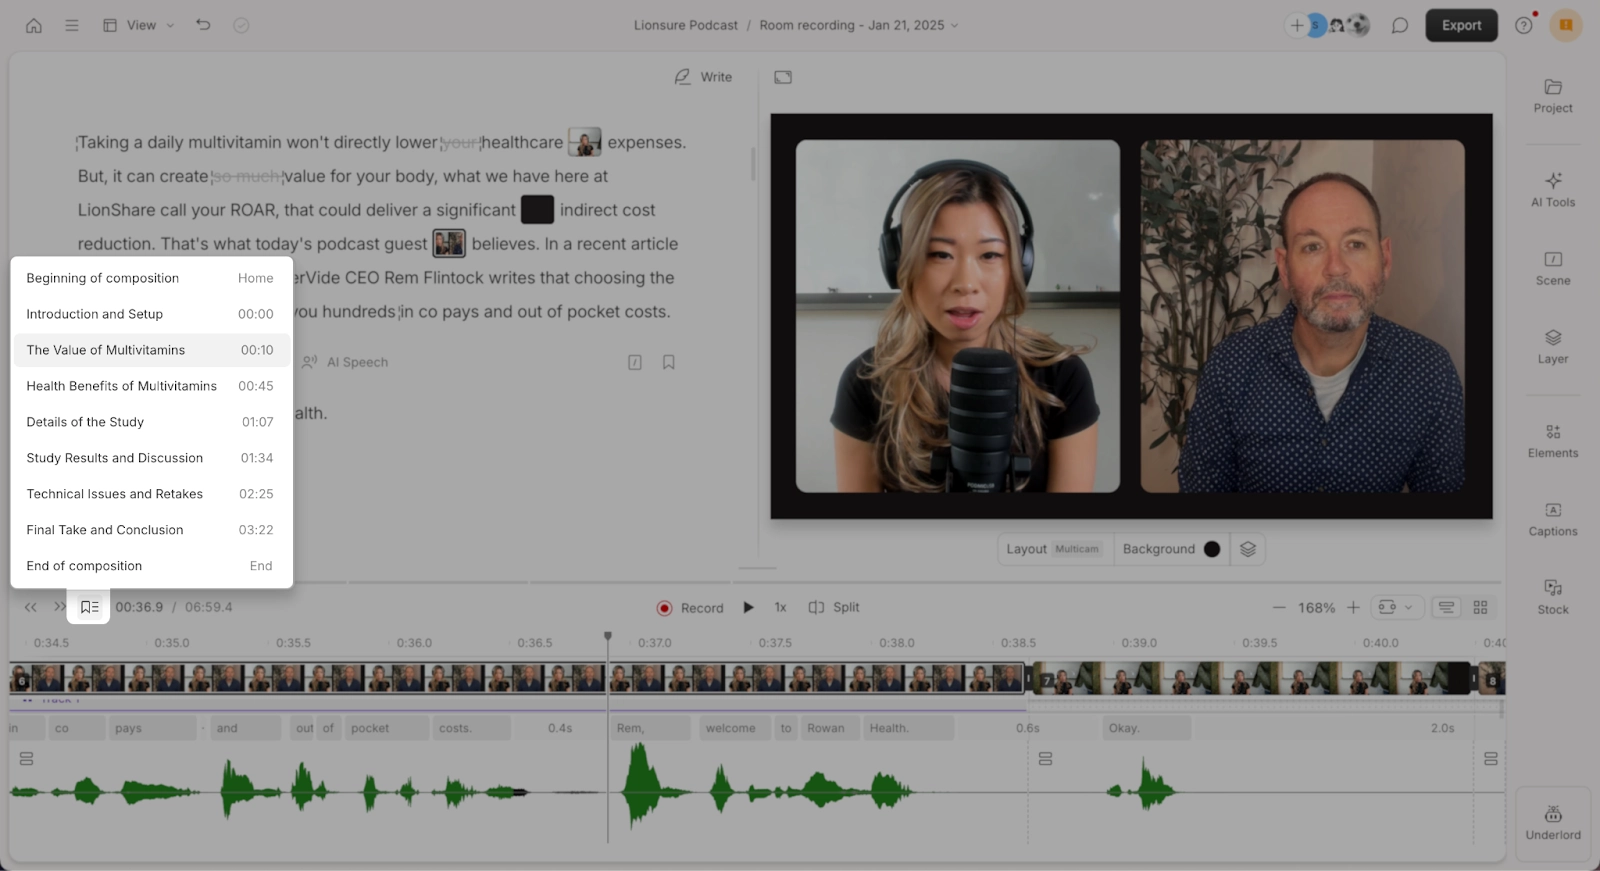
Create folders for your project on your device and create subfolders for your raw clips, organizing them by type or their intended placement in your edit. Use markers to label sections in your editing window. They show up in your timeline and make navigating through your video faster.
2. Make a plan
It doesn't have to be overly elaborate, but you should have a good idea about what your project will look and sound like. Create an outline of your vision, or better yet, make a shot list detailing the visual and the audio components of every scene.
If you want to include voiceover or narration, write a script by outlining the points you want to make, then writing them out to sound natural. Read it out, make adjustments, and repeat until it sounds right. Keep your writing concise, and make sure that whoever is reading the script practices in advance.
3. Choose clips that show important action
Trim clips to include only the parts you need. Ask yourself: What does my story require? “You don't have to keep everything,” says Tiff.
“If it's not working in the edit, feel free to drop it.” It's normal to be precious about your footage, especially if it took a lot of work to record, but a good editor can make tough choices for the sake of the overall project.
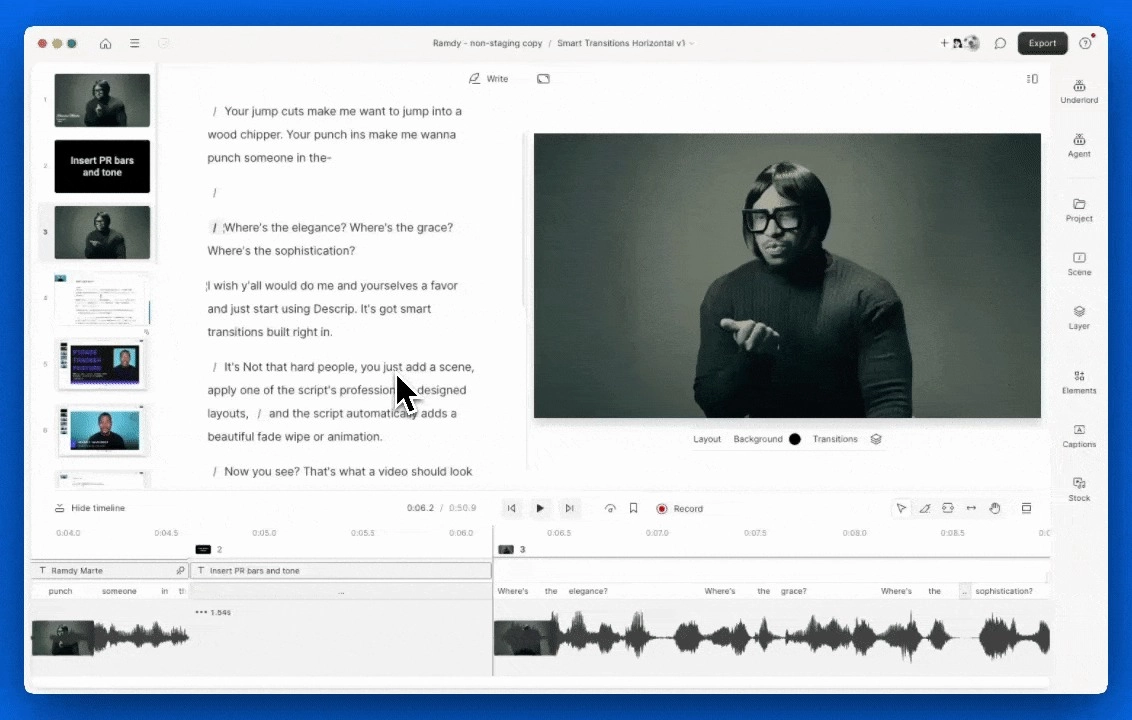
💡 Pro tip: Edit your transcript by deleting text in Descript. After an adjustment is made, the matching audio and video is removed, so edits are as fast as you can type.
4. Use establishing shots
Viewers like to feel situated. While close-up and medium shots show action up close, they often leave out the characters' (or subjects') environment. An establishing shot shows a scene's wider context, allowing your viewers to understand where everything fits, helping immerse them in the setting.
5. Use match cuts
One way to make your edits less apparent and create continuity is to use what the pros call a match cut. “A match cut is when you cut from one clip to another by matching the visual interests of the frame,” says Tiffani. “You can use similar framing, similar shapes, or similar motions to cut two clips together.”
For example, you might use a hand movement in your first clip to transition to the next clip with the same hand movement, or if your character or subject is centred in the frame, you could cut to another clip with the same or similar framing.
Although the two clips are different, they share elements that allow you to make a visual match between them. Viewers focus on this element and not the edit, creating the illusion that the action in both clips is taking place at the same time.
6. Use the right transitions — or none at all
If you're transitioning from one clip to the next within the same scene, you probably don't need to apply transitions. To cut from one clip to the next, just stick them together. If your video includes more than one scene, you might want to add graphic, smooth transitions between them.
These transitions not only join scenes but can help shape the pace of your video. Stick to crossfades or dissolves. “A lot of people use crazy transitions when they don't really need to,” says Tiff. Elaborate transitions generally don't add much to the story and can overpower your montage.
💡 Pro tip: Use Descript’s AI co-editor Underlord to add and adjust transitions for your video. Simply describe what you want:
- Can you make all transitions crossfades please - not smart transitions.
- Apply the zoom in and zoom out effects at appropriate locations.
- I want smooth and hardly noticeable transitions, like the crossfade.

7. Pay attention to pacing
Pacing describes the rhythm of a scene which is determined by varying the length of your clips. Some scenes, like action sequences, for example, use fast pacing to suggest intensity; others, like interviews or dialogue scenes, feel slower, more relaxed, and thoughtful.
Fast-paced scenes are usually made up of shorter clips, while slow-paced scenes use much longer takes, sometimes only a single continuous clip. It can be jarring for your viewers if the pacing of your video changes too abruptly or too often. Try to maintain a level of continuity within your scenes.
8. Choose a color scheme
If you need to, use color correction tools to give your footage a natural look. Many editing tools also let you color grade your footage, i.e. manipulate the color and contrast of your images for creative rather than corrective purposes.
Color grading isn't necessary, but it can denote mood and character, and help you set the tone for your story. Slight adjustments go a long way, so don't overdo it.
9. Don't neglect sound
A high-quality video includes high-quality audio. “People will watch something with poor video quality if the audio quality is good, but they won't watch something with good video quality if the audio quality and sound effects are poor,” says Tiff.
Balance the levels between your audio tracks so that dialogue stands out, and to avoid sudden changes in volume. Split edits — like J-cuts, where the sound changes before the image — are great for bridging audio between two separate clips or scenes.
Invest in a high-quality external audio recorder, such as the Zoom H1n, to enhance audio quality.
🎤 No fancy mic? No worries. Turn on Descript’s Studio Sound option to remove background noise and make your voice sound crystal clear in any video or audio recording.
10. Add music and sound effects
Your soundtrack enhances the feeling of immersion more than any other aspect of your video: design it carefully. Don't let music overpower your soundtrack, and make sure the songs you use are royalty-free or that you cleared the copyright if you plan to publish your video publically.
Be sure to use video effects to clarify your message, too. You can add text overlays or lower-thirds to introduce a speaker, use animations to highlight a key point, or apply stabilization to fix shaky footage. Like your transitions, keep effects subtle.
Silence can add suspense by drawing your viewers' attention to the screen, but it can also create noticeable (and sometimes awkward) gaps. Unless the silence is intentional, use room tone to fill in the silence.
11. Export to the right format
“Before you start editing, make sure you're starting in the right project format,” says Tiffani, including choosing the right aspect ratio. Once you're happy with your edit, export your video. Different editing platforms offer different exporting settings, including video format, and other presets, like bitrate, which determines the quality level.
The video format determines how your video file stores audio and video data as well as how that data is used for playback. Popular video formats include .webm, .mp4, .flv, .wmv, and .mov, most of which are supported by the main online platforms, like YouTube and Vimeo. Be sure the platform you're uploading to supports your export format.
Bonus tip: Branding your video content
Ever notice how your favorite channels just feel familiar? That’s branding in a nutshell. When a viewer sees your colors, intro music, and logo, it makes them feel comfortable and home-y, like a welcome mat.
Here are a few easy wins you can apply to your videos right away:
- Create a reusable intro: A 3–5 second branded intro is all you need. In Descript, you can build the intro once with your logo and audio sting, then save the scene as a Layout to drop into new projects.
- Set your brand palette: Stick to one or two brand colors and a single accent color. Use Layout packs in Descript to define scene styling, and lock in your brand color palette and fonts so every scene matches.
- Standardize your lower-thirds: Use branded fonts to create a clean look for your lower-thirds, or the text that introduces a speaker.
Time-saving video editing tips
If you’re the writer, director, and editor, saving time is always a benefit. These tips help you work faster without sacrificing your video’s message and quality.
Use templates and presets
Why rebuild titles and intros from scratch every dang time you’re editing? Style a scene once, and with Descript’s Layout pack you can apply framing, fonts, and colors to new projects.
Our AI co-editor, Underlord, can also set you up with battle-tested templates so you can create videos faster.
Batch edit your changes
Apply changes to one clip, then copy and paste its attributes to all the others at once. Descript lets you make bulk edits on speed, size and position, stroke weight, text styles, and even color adjustments in one fell swoop.
Use keyboard shortcuts
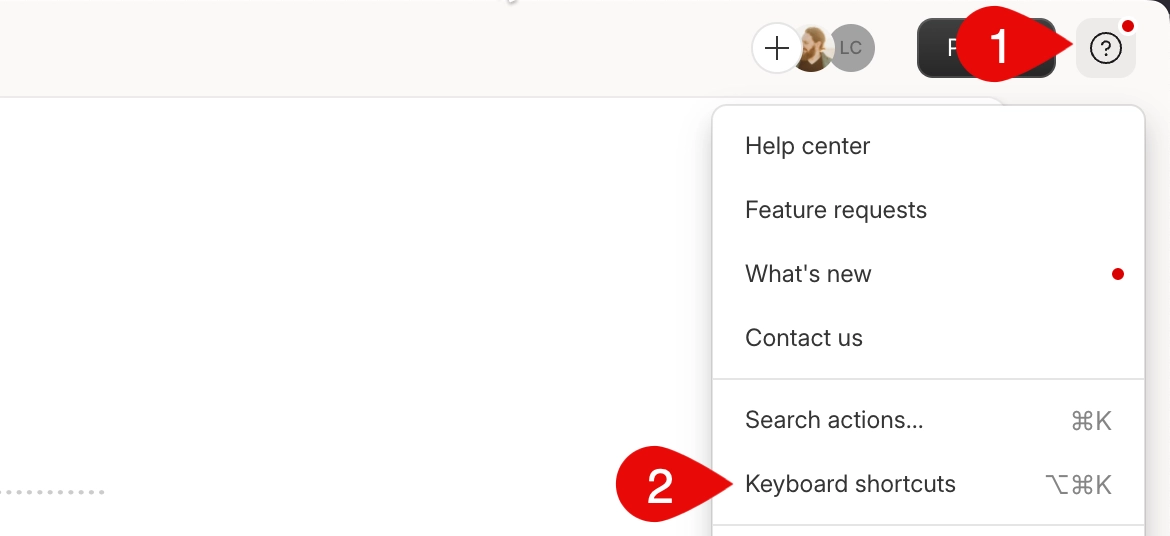
Clicking through menus is for people with way too much time on their hands. Commit a few core shortcuts to memory, like using the Black tool (B) and Split (S) for fast cuts, and zooming in or out (Cmd/Ctrl +/–). Keyboard shortcuts will dramatically trim down your editing time.
How AI can help beginners with video editing
AI is like a tireless (and totally obedient-ish) editing intern. It automates all the soul-crushing tasks beginners and veterans alike don’t enjoy—like removing filler words, fixing bad audio, and timing captions. Descript lets you skip the grunt work so you can focus on the story.
A huge advantage of our AI co-pilot, Underlord, is that it makes editing easy. To make difficult edits, you don’t have to go down the rabbit hole of help docs and tutorial videos, you can just.. Ask.
With Underlord, you type what you want. Tell it to smooth out choppy transitions, add B-roll, fix your gaze, or even create social media clips or trailers. Features like Regenerate can also fix a flubbed word and make audio edits, saving you the pain of a re-record.
Choose the best video editing software
There are countless options, some more complicated than others. Your choice should balance usability (or familiarity) with performance.
Every platform has a learning curve: the more features, the steeper the curve. Many offer a free video editing software, so you can learn the basics before committing to a purchase.
You can work through these questions to help determine which type of software is right for you.
Is this a big project?
If you're putting together a feature-length documentary with hours of raw footage, you'll need a program that can handle it. The same goes for incorporating computer-generated special effects or motion graphics.
Professional-grade software like Adobe Premiere Pro, Adobe After Effects, DaVinci Resolve, or Final Cut Pro X include these kinds of advanced features, like video proxies filters. Many of these tools offer great video editing tutorials too, if you're up for learning something new.
At the most basic level, look for editing software that allows you to edit the length of clips, turn clips into multiple shorter clips, duplicate clips, slow down or speed up clips, increase or decrease the audio of clips, as well as add transitions and background music to clips. Most programs include at least these functions.
Is it short and sweet?
These heavyweights might not be necessary for your project. Consider the software you already have; most operating systems come with pre-installed video editing software.
Apple's Mac, for example, comes with a free video editor called iMovie, which is more than enough for most simple projects. You can edit YouTube videos, social media clips, and other types of video with iMovie.
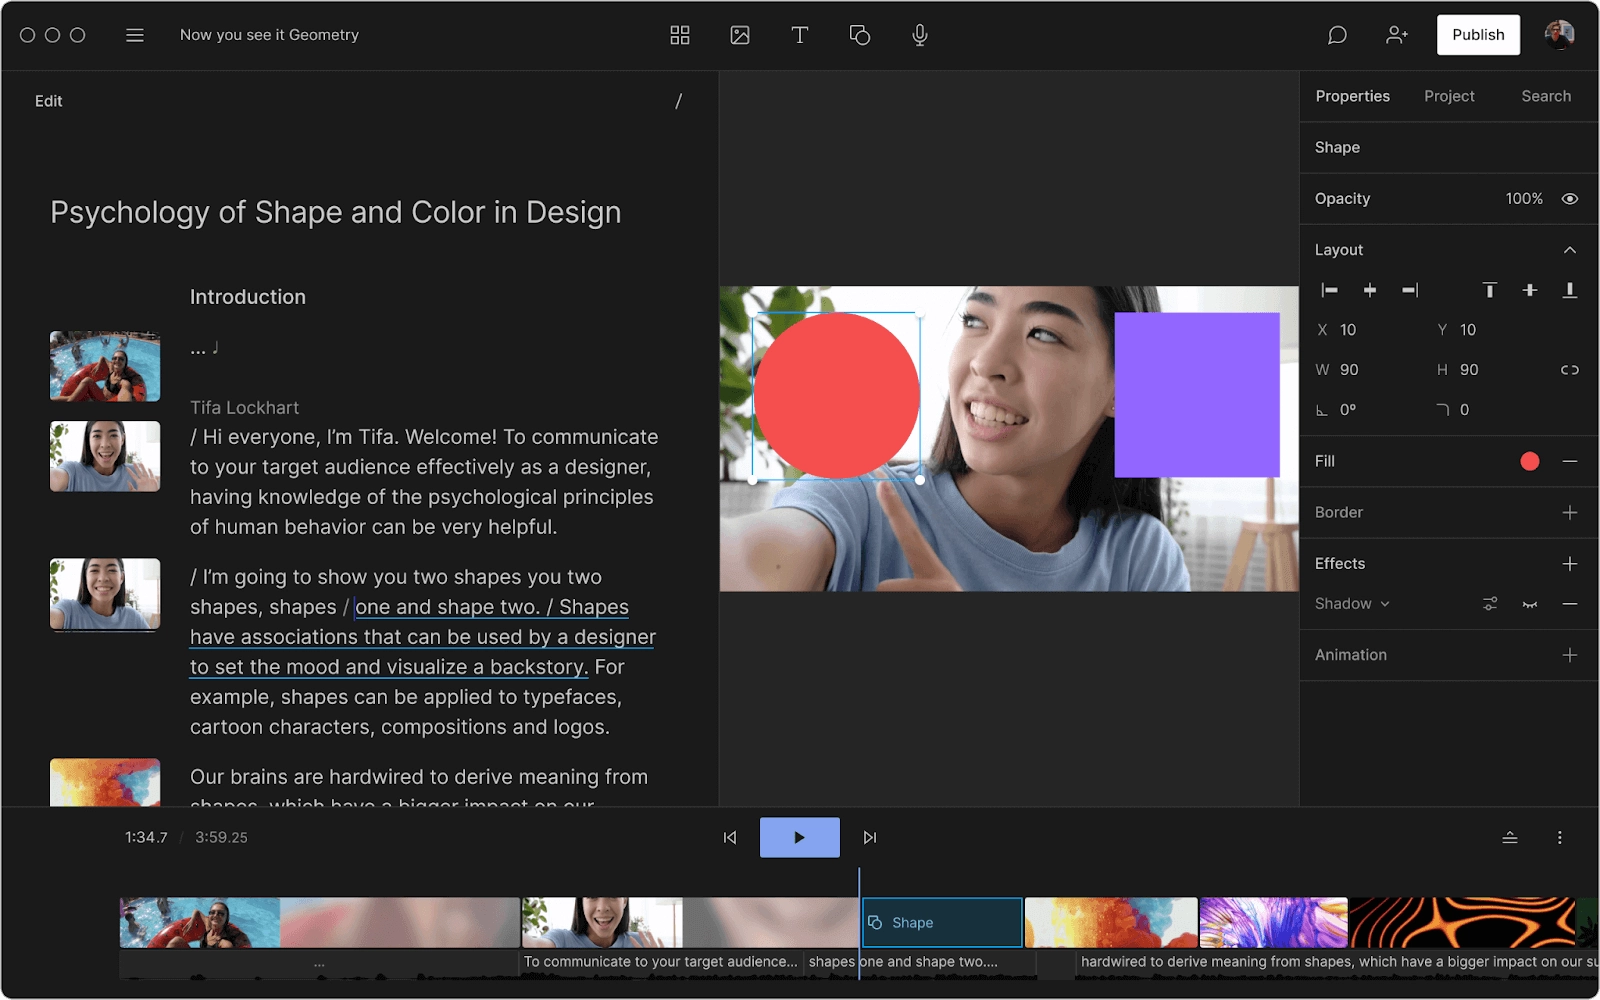
If you're making a vlog, or an instructional video with some explanatory b-roll, script-based platforms like Descript are great for narrative media. Descript helps simplify the editing process by turning your video into a transcript that you can edit just like you would text, and includes key features like multitrack, keyframe animation, and captions.
Is my computer powerful enough?
Consider the editing computer you're working on, which may not be able to support larger programs. The more complex the features, the more computing power you'll need. Some large editing programs don't work as well on smaller laptops, for example.
Make sure your device can handle the job, otherwise you risk losing your work to program crashes or other errors. Check the hardware specs required to run your program and make sure they align with what you have.
Becoming an expert filmmaker
The best way to learn video editing is by doing it. Try not to get lost in the weeds: Sometimes it helps to step back and watch your sequence in its entirety, or to take a break from your edit in order to come back fresh and make objective decisions.
Don't lose track of your vision — you're almost there.
Video editing 101 FAQ
What are the basics to video editing?
Video editing involves organizing and manipulating video clips to create a coherent final product. This includes understanding your editing software, cutting and arranging clips, adding transitions, sound editing, color grading, and exporting the final product in the desired format.
How do I teach myself video editing?
You can learn video editing through online tutorials, courses, and practicing with editing software. Start with basic editing techniques, then gradually explore more complex tasks as you become more comfortable.
What is the 3-2-1 rule in video editing?
The 3-2-1 rule is a best practice for backing up video files. It suggests that you should have 3 copies of your data, stored on 2 different types of media, and 1 copy should be stored off-site for safety.
What is the 80 20 rule in video editing?
The 80/20 rule in video production suggests that only 20% of your effort is spent capturing footage, while the other 80% is spent in the edit. That's because the edit is where you build the narrative. Viewers engage more with clean editing, clear audio, and a strong story structure you create in post-production.
What is the 3 second rule in video editing?
The 3-second rule is a pacing guideline built on the idea that viewers decide whether to keep watching within the first three seconds. In practice, it means you have to grab their attention immediately. Use a strong hook—like a compelling question, a surprising visual, or fast-paced movement—right at the very beginning to stop viewers from scrolling.




.jpg)


