There are a lot of ways to record podcast audio: you could just use the built-in mic in your computer, or plug in a budget USB microphone.
But when you’re ready to step up to a high-quality dynamic or condenser mic and get professional quality sound, you’re probably going to need a digital audio interface.
Rather than just cover the basic audio interfaces, like the Zoom H6 and the Rodecaster Pro, we took another approach to creating this guide. We chatted with Los Angeles-based producer, composer, and recording engineer Dave McKeever, who has used countless audio interfaces over his 25 years in the recording business.
Here are some models he recommends whether you’re starting a podcast or improving on an existing one. You can find most of these interfaces for sale on Amazon.
What is an audio interface for podcasts?
An audio interface is a physical device that transforms analog audio signals from a microphone or an instrument input into digital signals that can be processed by a computer. A podcast audio interface is no different than a digital audio interface you would use for recording any kind of audio.
Audio interface components
A quality audio interface typically includes the following components:
- Inputs. Most audio interfaces include ports for 3-prong XLR inputs as well as ports for 1/4-inch cables. Some may offer inputs for 1/8-inch plugs as well, but that’s less common. XLR is the gold standard for mic inputs because it has a balanced signal that cuts out background noise and hiss.
- Gain knobs. Next to each mic input, you should see a knob that controls the amount of gain you add to an audio signal. This can be great for boosting mics with high impedance, meaning they need an external source of power to produce a strong audio signal. (Some of the best microphones for podcasts, like the Shure SM7B, have high impedance and have to be driven by a powerful preamp to boost their volume and capture the full range of audio frequencies.)
- PAD. A passive attenuation device (known by the acronym PAD though usually spelled in lower-case letters as “pad”) is a mechanism that limits the signal coming through a microphone and into your audio interface. If you have an overly loud signal coming through your microphone, it will cause distortion and clip the high frequencies. To fix that, you can cut a certain number of decibels by flipping on the pad. This can improve overall podcast sound quality on ultra-high gain audio inputs.
- Phantom power. A condenser microphone requires external power to maintain a flow of electrical current. Most audio interfaces can provide this current, which flows from a power source (like your computer) through the interface and into the microphone using an XLR cable. This kind of current might be labeled as phantom power on your interface, or it might be labeled +48v. In both cases, you activate this current by pushing a button or flipping a switch.
- Digital outputs. Most digital audio interfaces are USB interfaces, which means they connect to a computer using a USB cable. There are also audio interfaces specifically designed for the Apple iPhone and iPad. Because these devices use a proprietary Lightning port, USB audio interfaces don’t natively connect to them. Fortunately, companies like Apogee make iPhone-specific digital audio interfaces, and these work with Lightning ports.
- Analog audio outputs. If you want to directly monitor your audio recordings without involving your computer’s sound card, you can use the analog audio outputs on your audio interface. This comes in handy when you want to plug in big, powerful monitor speakers instead of using small computer speakers. These output ports are usually 1/4-inch, but some audio interfaces use RCA cables or even XLR cables.
- Headphone output. Last but not least on the inputs/outputs list is a headphone output for privately monitoring podcast sound quality. Headphone outputs have their own volume control that won’t affect other outputs, whether those are USB, XLR, or 1/4 inch.
Best 10 audio interfaces, compared and reviewed
- Focusrite Scarlett 2i2
- Focusrite Vocaster One
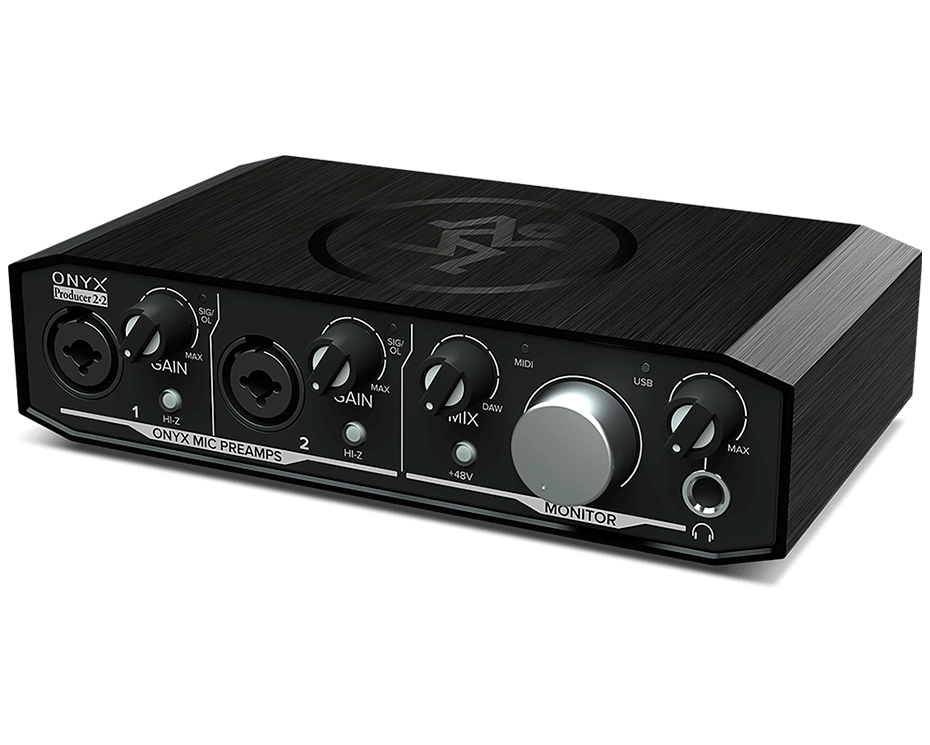
- Mackie Onyx Producer 2x2
- Apogee One
- Apogee Duet
- Universal Audio Apollo Twin X
- Sound Device MixPre 6 II
- Universal Audio Apollo x16
- M-Audio M-Track Solo
- Blue Yeti
1. Focusrite Scarlett 2i2 3rd Gen
Best value for money

There are many iterations of this distinctive red audio interface, but the 2i2 stereo interface is a classic.
The Focusrite Scarlett line is pretty affordable, its units are mostly bus powered (which means the USB cable provides the power), and its built-in preamps are solid.
This may be the best “bang for your buck” digital audio interface on the market — you can expect to pay about $180 for the 2i2. While Dave owns multiple audio interfaces, he uses his Focusrite Scarlett the most.
Features:
- High-quality audio recording: up to 24-bit/192kHz resolution, allowing you to capture clear and detailed sound for your podcast
- Dual inputs: Two combo XLR/1/4" inputs, allowing you to connect two microphones or instruments for recording
- Compatibility: Both Mac and Windows computers, and comes with a range of software including Ableton Live Lite, Pro Tools First, and more, making it easy to set up and use for your podcast
Price: $169.99
2. Focusrite Vocaster One
Best portable audio interface

The Focusrite Scarlett 2i2 was originally designed for music recording, even though it's also great at recording the spoken word.
But the Vocaster is aimed directly at podcasters: it has special features like auto gain, mute, and voice presets that really come in handy when recording an interview or solo episode. It also has the ability to connect to your phone via Bluetooth — perfect for recording phone interviews or voicemails. The Vocaster One has one XLR input, but there’s also a two-input model, aptly named the Vocaster Two.
Features:
- High-quality audio recording up to 24-bit/48kHz resolution
- Single XLR input, allowing you to connect one microphone or instrument for recording.
- Compatibility: The Vocaster One is compatible with both Mac and Windows computers. Like the Scarlett 2i2, it comes with a range of software including Ableton Live Lite, Pro Tools First, and more
- Power supply is USB only
Price: $99.99
3. Mackie Onyx Producer 2×2
Best audio interface for recording two microphones

This Mackie unit is about 40% cheaper than the Focusrite Scarlett 2i2, but it offers very similar functionality. This includes two inputs for XLR or 1/4-inch cables, gain knobs, 1/4-inch outputs, a USB digital output, a headphone jack, and phantom power. “Mackie is a really well-known brand with a long history in the audio industry,” Dave says, “so it has a lot of loyal fans.”
Features:
- High-quality audio recording capabilities with up to 24-bit/192kHz resolution
- Two combo XLR/1/4" inputs and two 1/4" TRS outputs, allowing you to connect two microphones or instruments for recording and connect to studio monitors for playback
- Compatibility with both Mac and Windows
- Additionally comes with Tracktion T7 recording software
- MIDI input and output for connecting MIDI devices
Price: $96.00
4. Apogee One
Best all-in-one portable audio interface and microphone

Apogee has long been a leading brand in professional-grade audio, and the Apogee One is among its most affordable offerings.
It has a built-in omnidirectional condenser microphone and a breakout cable for taking 1/4-inch inputs (common among instruments) or XLR inputs (common among microphones). It can handle a total of two analog inputs at a time. Dave recommends the One to podcasters who want to try out the Apogee ecosystem but have limited budgets.
Features:
- High-quality audio recording capabilities up to 24-bit/96kHz resolution
- 2 in x 2 out Audio interface with built-in omnidirectional microphone
- Power supply: USB 2.0 connection
- Compatibility with both Mac and Windows
Price: $245.00
5. Apogee Duet
Best audio interface for intermediate podcasters

The Duet is the next step up from Apogee. It uses a docking module to provide additional XLR and 1/4-inch inputs. It can also connect simultaneously to two separate devices using USB-C. This would be helpful if you want to record on two computers simultaneously. Apogee is known for its vast library of digital plugins, and a number of these come bundled with the Duet. “A lot of people swear by Apogee plugins like reverb and compression,” Dave says, “but it’s always a matter of personal taste.”
Features:
- High-quality audio recording up to 24-bit/192kHz resolution
- Dual inputs with two combo XLR/1/4" inputs, allowing you to connect two microphones or instruments for recording
- Compatibility: The Duet is compatible with both Mac and Windows computers, and comes with Apogee's Maestro software
- Power supply: USB or an included AC power adapter
Price: $549.00
6. Universal Audio Apollo Twin X
Best audio interface with no breakout cables or docks

Universal Audio has built its name by making professional-grade recording equipment that appeals to the broader consumer market. The Twin X is the latest update to its most popular model.
Feature-wise, it’s more of an all-in-one unit than its Apogee competitors because it doesn’t require any breakout cables or docks. Universal Audio has its own set of custom audio plugins.
You’ll have to experiment to decide whether you prefer UA’s plugins, Apogee’s plugins, or those of a different manufacturer. “UA and Apogee are both great,” Dave says. “If possible, check out their various plugins before you commit to buying.”
Features:
- High-quality audio recording capabilities with up to 24-bit/192kHz resolution
- Record up to 10 tracks simultaneously, including 2 analog inputs (XLR/1/4" inputs), 8 digital inputs, and 10 channels of digital playback
- Real-time UAD processing allows you to use UAD plug-ins during recording and mixing for added sonic enhancement
- Power supply: AC adapter
- Compatibility: both Mac and Windows
- Additionally comes with Universal Audio's Console 2.0 software
- Connectivity: Thunderbolt 3
Price: $658.00
7. Sound Devices MixPre 6 II
Best audio interface for high-end home recording

Running at a little over $1000, this is a pretty pricey option — but it has features that work better for a home podcaster than the brand’s other offerings.
“Unlike more expensive Sound Devices models, it can plug into USB on your computer,” Dave says. He personally keeps one in his studio for high-end audio demands like recording film scores or miking featured lead vocalists.
Features:
- 6 total analog inputs: 4 mic-line inputs, 2 Aux In
- Record up to 8 tracks
- SD card recording option
- Power supply: AA Battery, MX-PSU AC Power Supply, and USB-C to USB-C cable
- Customizable with plugins from Sound Devices plugin store
Price: $1,060.00
8. Universal Audio Apollo x16
Best audio interface for multitrack recording; ideal for large studios

If you’re running a commercial podcast studio and have money to spare, you may find yourself drooling over the UA Apollo x16. This device features 16 channels of analog audio, multiple USB-C connectors using the Thunderbolt 3 standard, and the heft to handle 7.1 Surround Sound mixing.
While it’s not for those on a tight budget, this device comes brimming with power. “This power will come in handy if you’re recording an entire live band all at once,” Dave says, “but if you’re tracking one instrument at a time, you don’t actually need all those inputs.”
Features:
- High-quality audio recording capabilities with up to 24-bit/192kHz resolution
- Multiple inputs with 16 analog inputs and 16 analog outputs, allowing you to connect multiple microphones or instruments for recording
- Real-time UAD processing, allowing you to use UAD plug-ins during recording and mixing for added sonic enhancement
- Compatible with both Mac and Windows
- Additional software: Universal Audio's Console 2.0
- External power supply
- Connectivity: Thunderbolt 3
Price: $3,861.41
9. M-Audio M-Track Solo
Best budget audio interface for solo podcast production

For a hyper-affordable recording option, check out the M-Audio M-Track Solo, which usually retails for around $50.
This device has one single input, but it can support XLR and provide phantom power. It can also output audio through a 1/4-inch cable or send a digital signal via USB (but you can only choose one at a time). It’s a super affordable interface from a reliable brand.
Features:
- High-quality audio recording capabilities with up to 24-bit/48kHz resolution
- Single XLR/1/4" combo input
- Compatibility: both Mac and Windows
- Additional software: Pro Tools First, Ableton Live Lite, and more
- Power supply and connectivity via USB
Price: $49.00
10. Blue Yeti
Best for beginner podcasters

This final recommendation from Dave isn’t an interface — instead, it’s a single microphone that plugs directly into the USB port on your computer. Very popular and very easy to use, this is a great budget pick for podcasters who just need to record their own voice and nothing else.
Features:
- Omnidirectional microphone
- Connectivity and power supply: USB port only
- Compatibility: Mac, Windows, and Chromebook
Price: Starts at $99.99
Do I need an audio interface for podcasting?
You don’t need an audio interface for podcasting, but it’s recommended by the pros. A digital audio interface is the link between your podcast microphone and your audio recorder. In most cases that audio recorder will be a computer running digital recording software.
Digital audio interfaces translate analog audio, like your spoken voice, into the digital language of computing. Without it, you have no way to get high-quality sound onto your computer for editing.
Technically you can avoid buying a digital audio interface if you have a microphone with a USB output, which can plug directly into a computer, or a Lightning output, which can plug directly into an iPhone or iPad. Most of the best-quality microphones use XLR outputs, however, and these won’t plug directly into a computer; you need an interface to use them.
Things to look out for before buying an audio interface
Here are Dave’s top 5 criteria to consider when shopping for an audio interface.
- Connectivity. Make sure your audio interface can connect to all your digital devices. USB is the standard, but some audio interfaces connect to Apple’s proprietary Lightning plug for iPhone and iPad.
- Number of inputs. Depending on your recording needs, you might only need one single input. Dave suggests you future-proof by picking a device with at least two inputs — you never know when your solo podcast will need a cohost.
- Power needs. Can you power your interface using bus power and a USB cable? Or do you need to plug it into a wall socket, which will provide more gain but also make the device less portable?
- Sample rates. “Higher sampling rates equal better resolution,” Dave says. “As long as your interface does 48k, you’re probably pretty good. Recording in 48k is the industry standard. You can get into higher sampling rates, but your file size increases.”
- Bit depth. “Higher bit depth gives you more flexibility down the line,” Dave says. “Bit depth means that you have a little more ability to turn up the volume later and not add a bunch of noise and distortion. 24-bit/192 kHz is the industry standard and all new audio interfaces will record at this level.”
7 accessories to complete your podcast setup
Here’s a podcast equipment checklist to consult as you build your podcast recording setup.
- Microphone. Whether you choose a dynamic microphone or a condenser microphone, pick a unit that does well with the human voice. The other components of your podcast won’t matter if your audio isn’t clear, articulate, and free from unwanted distortion.
- Microphone stand. A good mic stand frees up your hands and keeps the mic steady throughout the recording, which reduces unwanted noise.
- Microphone cable. A mic cable (typically an XLR cable) connects the microphone to the audio interface.
- Pop filter. A pop filter is a thin membrane of fabric that sits in front of the microphone and prevents plosives (like the letter “p”) from creating popping sounds in the recording.
- Audio interface. Choose an audio interface based on the criteria we’ve laid out above.
- Headphones and speakers. Headphones and speakers let you monitor your recordings while they happen. You’ll also use them to listen back as you edit the recording.
- Computer with your choice of DAW. Last, but certainly not least, you need a place to edit your recorded audio. For nearly all podcasters, that will be a computer running a digital audio workstation (DAW). Popular DAW brands include ProTools, Adobe Audition, Logic Pro, Ableton Live, and, of course, Descript.


