Recording a multi-person podcast sounds simple until you're drowning in a sea of cables and mysterious audio issues. While there's no shortage of advice on what microphones to buy or how to soundproof your closet, what these guides often gloss over is the special kind of chaos that happens when multiple mics occupy the same space. It's like nobody wants to talk about the elephant-sized technical headache in the room. Here's what you need to know about picking out mics, headphones, and setting up your sound-dampened recording space.
The truth is, you can't just think about each piece of gear in isolation—they need to work together as a system. Multiple microphones in one room create technical complexities that can make your editing process a nightmare if you don't plan ahead. Your perfect mic setup might sound terrible if you don't account for how those mics interact with each other.
This guide cuts through the confusion and shows you exactly how to record high-quality audio with multiple mics—from choosing the right equipment to configuring your setup before hitting record. No unnecessary complexity, just practical solutions that actually work.
3 setup options for recording a podcast with multiple mics
If you have two or more podcast hosts or guests, the key is to minimize background noise. When you edit your podcast in post-production, ensure each voice is isolated with no bleedover. Using directional microphones and proper mic placement can help reduce unwanted audio interference.
To record clean audio files, focus on three key factors: proper microphone selection, optimal recording environment, and effective post-production editing.
Option 1: using a USB audio interface for multiple mics
Many beginner podcasters choose USB microphones because they plug directly into a computer and work with digital audio workstations like Reaper, without requiring additional podcasting equipment. If you have a newer Mac with only USB-C inputs, you may need a USB hub or adapter. This is a cost-effective way to start podcasting, but USB microphones have limitations when recording multiple voices.
A common challenge with USB microphones is that most computers can only recognize one USB mic at a time. This can result in your mic picking up your co-host’s voice and vice versa, leading to audio bleed and quality issues.
For podcast recording with multiple microphones, the best approach is to use XLR mics instead of USB mics. While XLR microphones require an audio interface, they provide superior sound control and eliminate many technical issues that arise with multiple USB microphones. Investing in an XLR setup saves time in post-production and improves overall audio quality.
An XLR setup offers more control over your podcast’s sound.
A high-quality XLR condenser microphone paired with a reliable audio interface like the Focusrite Scarlett can deliver professional-grade audio, even with mid-range recording software. This setup enhances clarity and reduces background noise, making editing easier.
🎧 Explore: The best 7 Bluetooth microphones, ranked and reviewed (2023)
Option 2: recording with a digital audio recorder
If you need a mobile podcasting setup, a digital recorder is a great option. With just microphones and an audio recorder, you can capture high-quality audio without relying on a computer. A mid-level audio mixer or recorder supports multiple XLR mics and records separate audio tracks for better editing flexibility.
Rode offers an audio mixer designed specifically for podcasting, the RodeCaster Duo. This mixer includes multiple mic inputs, seven channels, faders, and customizable buttons for sound effects. You can connect it to your computer via USB or store recordings on an SD card, making it a versatile choice for podcasters.
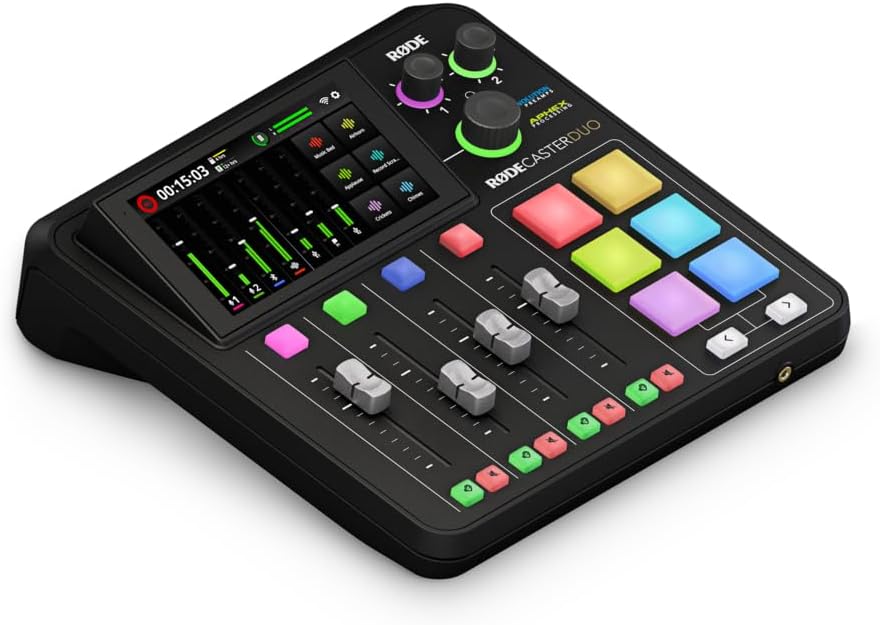
If you're a podcaster that is on the go and prefers not to be trapped in a studio or tethered to one place, a digital recorder or audio mixer may be the best option for you.
Option 3: using remote recording software
The most budget-friendly way to record a podcast with multiple microphones is to do so remotely. Each speaker uses their own setup, eliminating concerns about mic compatibility and background noise. This method is particularly useful for co-hosts or guests in different locations.
For remote podcast recording, a reliable platform is essential to ensure audio sync and prevent technical issues. If you've experienced lag or dropouts in video calls, you understand the importance of a stable recording solution.
With Descript's remote recording tool, you can create a virtual studio that locally saves audio and video for each participant. This ensures high-quality recordings without the glitches often associated with remote sessions. Plus, recordings can be seamlessly imported into Descript for instant editing.
Descript's remote recording feature also helps you:
- Capture high-fidelity podcast audio to ensure that your voice is as clear as possible.
- Record Each participant on separate tracks, so post-production editing is easier.
- Automatically backup files to prevent data loss and provide an extra layer of security.
- Continuously save recordings throughout the session, so you never lose a recording.
The best part? Remote recording is included in Descript's podcast editing software at no extra cost.
Recording a podcast with both in-person and remote guests
To set up a hybrid podcast recording, you'll need a reliable audio interface for in-person guests and a remote recording platform like Descript that allows local recording and seamless syncing. Clear communication protocols are essential to manage latency and audio delays. This setup also allows you to record each participant on separate tracks, ensuring easier post-production editing.
Why you need a multi-channel mixer for podcasting
A multi-channel mixer is essential for podcasts with multiple microphones because it allows you to adjust levels, EQ, and compression for each speaker independently, ensuring a balanced mix. This setup provides professional-grade sound control and better isolation of individual tracks, which is crucial for podcasts with multiple speakers. Investing in a high-quality mixer can significantly enhance your podcast's audio quality.
How to record a podcast with multiple microphones
The most common way to record a podcast is with a computer. This gives you more control over the sound quality than with a phone, or even a digital recorder.
Below are tutorials to get you started whether you're using Windows or a Mac.
Recording with two mics simultaneously on Windows
Step 1: connect the USB/XLR microphones
First, connect your microphones to your computer. The setup process differs depending on whether you're using USB or XLR microphones, so follow the appropriate steps for your equipment.
USB microphones are usually easy to set up — you just connect the microphone's USB cable to an available USB port on your computer. These microphones often come with built-in preamps and digital converters.
When using two USB microphones on one computer, the simplest solution is to connect each mic to a separate laptop. This way, both speakers can record their own track independently, ensuring better audio isolation.
If you don't have multiple computers, you can still make it work, but it might get a little complicated. Plan on spending extra time configuring your setup so both mics record smoothly.
How to use two USB microphones with a PC:
- Download and install the free app Voicemeeter. This is an online mixer that allows you to record inputs from both of your microphones — though be forewarned that it records both onto a single track, instead of separate ones.
- Set the levels before you start recording to make sure both voices are at the same loudness level.
- With Voicemeeter open, go to Hardware Inputs and select each microphone as an individual input. Having two different brands of microphone will make your life much easier here.
- Follow steps 2–4 below.
Want separate tracks for each mic? You can install a free audio driver called ASIO4ALL and use a DAW that supports it. This approach is a bit more advanced, but it lets you route each USB mic to its own track for easier editing.
How to use two XLR microphones with a PC:
XLR microphones are usually more complicated to use than USB microphones, unless you're comparing using two XLRs to two USBs. In that case, the process is much more straightforward for XLR microphones.
XLR microphones have a three-pin XLR connector and don't plug directly into a computer, so they require an audio mixer or audio interface. As a bridge between the microphone and the computer, the audio mixer receives analog signals from an XLR microphone, amplifies them (if necessary), and converts them into digital data. As long as your mixer has two XLR inputs, it's as simple as plugging both microphones into the mixer and plugging the mixer into your computer.
Step 2: Choose a Recording Software
You'll need recording software after you've set up your microphone. Sometimes referred to as a Digital Audio Workstation (DAW), it lets you record, edit, mix, and produce audio recordings in one place. The platform also tracks, processes, and manipulates all the audio inputs from your mics.
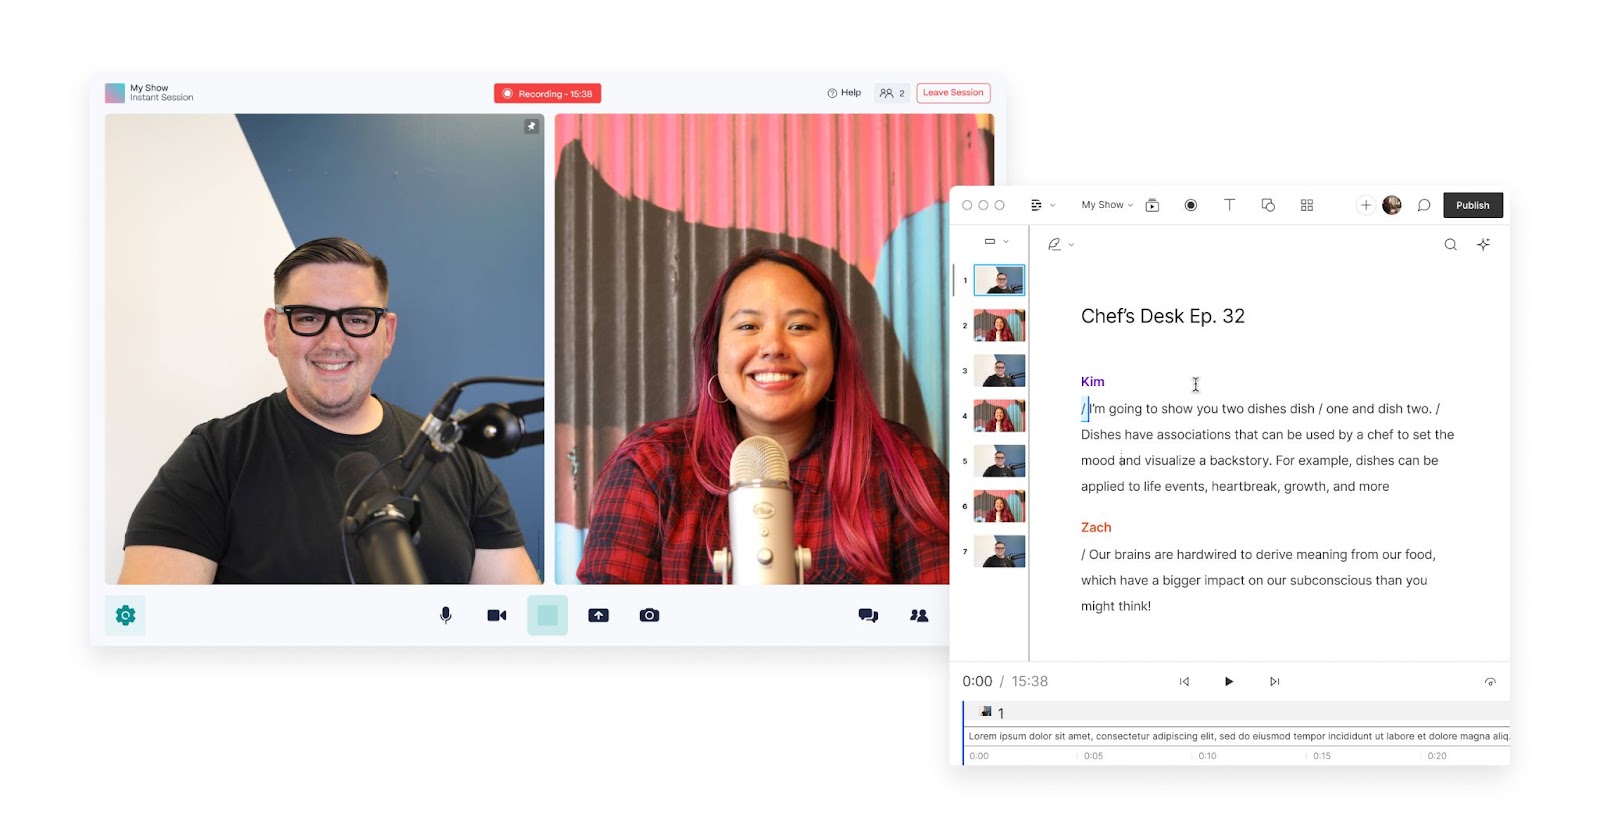
Descript is an all-in-one recording and editing software specially designed for podcasters and video creators. As noted, you can set up Descript for remote or in-person recording, then cut, trim, and rearrange your recordings with a text-based editor.
Step 3: configure your audio input
Before you start recording, you have to select your microphones as audio inputs. This is easy in Descript. Once you're in the app, open the recording panel by selecting the Record button.
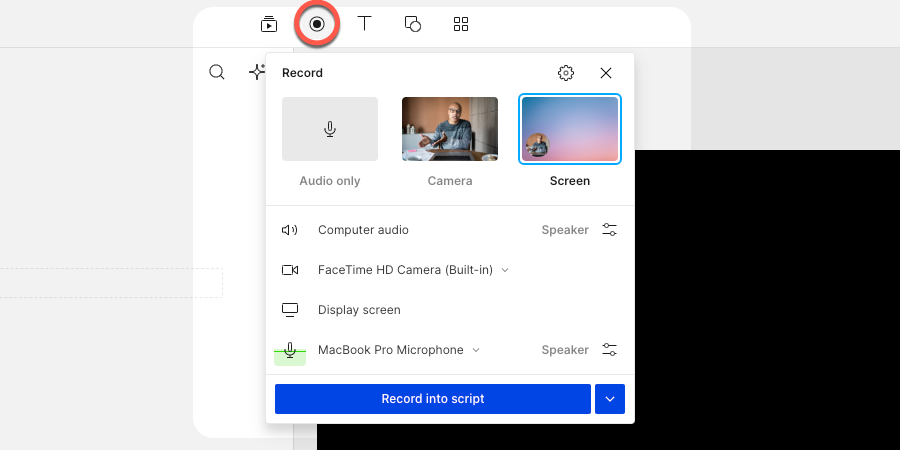
Select your camera and microphone from the dropdown menus. You can also enable Studio Sound and transcription during the recording. If you're using more than one microphone, you can add and remove up to 8 inputs in the speaker panel.
Choose your first audio input from the microphone dropdown menu. Then select + Add input at the button of the recorder panel.

Step 4: start recording
Now you just have to hit the record button and capture all your wit and knowledge on tape.
💡PRO TIP: Make sure you set your levels correctly before you start recording! You'll want to make sure that both voices are at about the same loudness level. Otherwise, you'll have to go in and turn each person's audio up and down throughout the recording to make them match up nicely for the listener.
Recording with two mics simultaneously on Mac
Step 1: connect the USB/XLR microphones
Mac users can create an Aggregate Device to record multiple USB microphones simultaneously. To do this, connect both mics, open 'Audio MIDI Setup,' click the + icon, and create an aggregate device. Select both microphones, match input/output channels, and enable Drift Correction to keep them in sync.
That + icon should then offer you a list of all available audio inputs; just click the two (or more) you want to use. You'll have to click each one twice — once to grab its input, and once for its output. Make sure that the input and output channels for each mic are matched up — so if microphone number #1 is input channels 1 and 2, it should also be output channels 1 and 2. Then make sure to turn on Drift Correction, which keeps the two mics in sync with one another!
If you're using XLR mics, connect your microphones to your audio interface. Then hook the interface up to your Mac. Some audio interfaces may require a driver to function correctly or unleash their full features. So, read up on the manufacturer's website to see if there are any drivers you must install on your Mac.
Step 2: open your recording software
Open your Descript app. Click + New and then select video project or audio project if you're recording in person. It's self-explanatory, but if you're creating a video podcast, choose the video project option.
Step 3: configure your audio input
Recording in Descript is as easy as selecting your microphones as audio inputs. Select the Record button to open the recording panel.
Choose your camera and microphone from the drop-down menus.
If you're using more than one microphone, you can add and remove up to eight inputs. Select your first audio input from the microphone dropdown menu. Then select + Add input at the button of the recorder panel.
Step 4: start recording
Once you're all set up to record, hit the Record into script button and you are ready to roll!
Best practices for recording a podcast with 2 mics
Now that you know how to configure your recording setup, let's go over some best practices that will level up the audio quality of your recordings and generally make your life easier.
Choose quality microphones and headphones
Don't skimp on the microphone and headphones you use. The difference in sound quality between a Blue Yeti and a Shure Dynamic condenser mic is like night and day. Remember, podcasting is a purely audio medium, so you want to choose tools that make you sound the best.
The same goes for podcast headphones. Even if you have a great mic, if your headphones can't faithfully convey the full aspects of your recordings, you'll miss things like the hum of your refrigerator or sirens in the background. Then all of that will get broadcast on Spotify or wherever you post your podcast and you'll lose listeners. Some good options include the Audio Technica ATH-M30x and the Sony MDR-7506.
Take the time to go through Amazon, read some reviews, and do some research to find a good mic and headphones for your budget.
Test your equipment before recording
Do a few test runs before recording your first podcast episode. A lot of this gear and software can be new, so it's a good idea to experiment and test out what configurations and settings work best for your gear, your voice, and your space.
Record each speaker on separate audio tracks
This will save you a lot of headaches when you're editing your podcast. It's much easier to edit a word or phrase when one voice is on its own track. Rather than trying to single out a voice on a track with multiple voices on it.
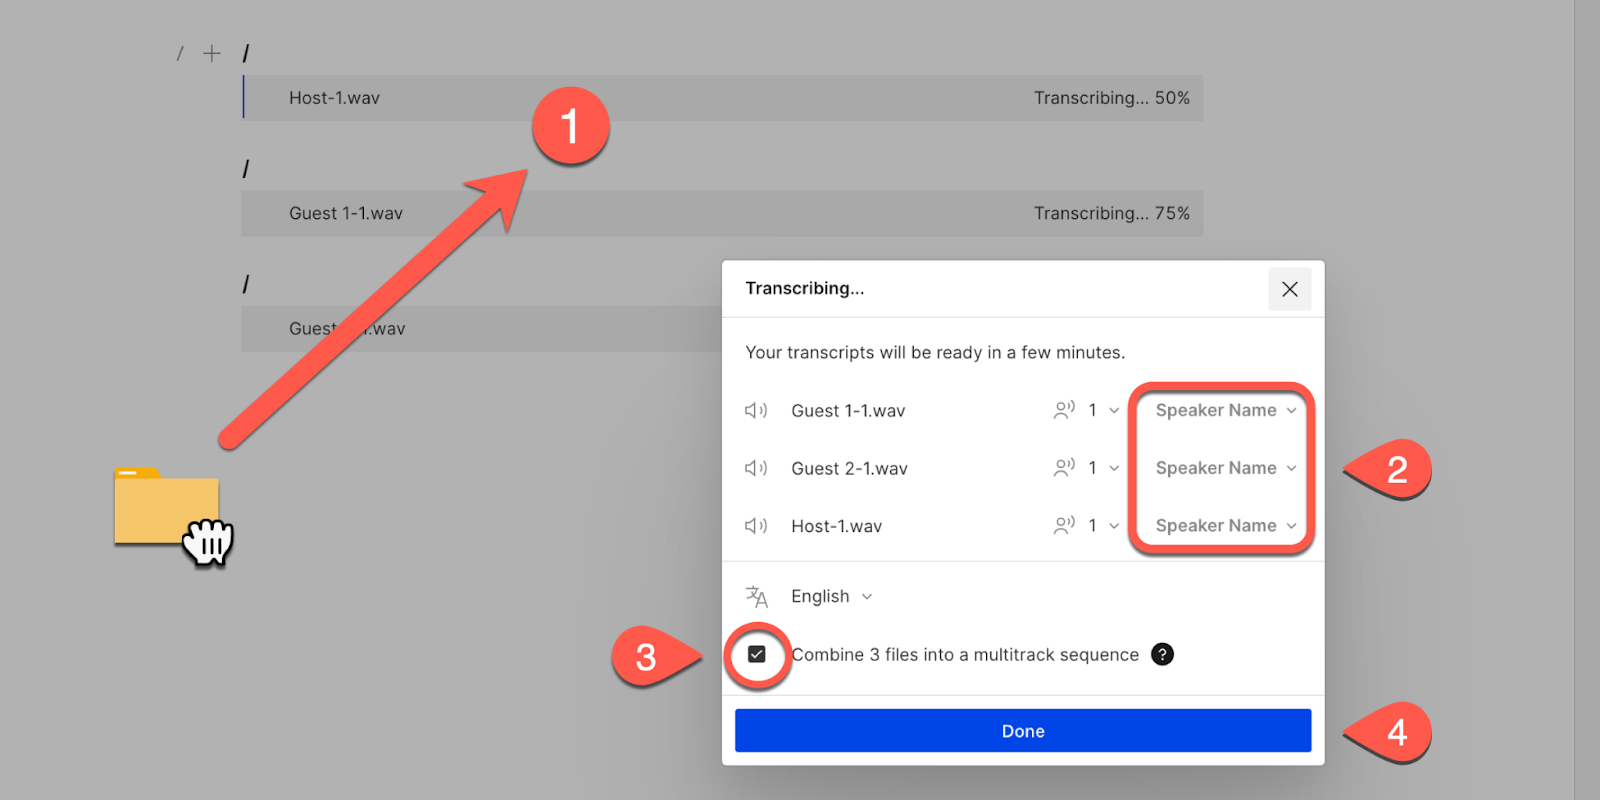
Descript lets you record multiple tracks remotely or in-person with multiple microphones. In either case, it will generate a transcript where you can edit each track or work on them individually in Sequences.
Create a clear recording workflow
Podcasting involves multiple stages like planning, recording, editing, and publishing. Effective organization keeps these stages on track and ensures episodes are released on time. It also makes your life less stressful and podcasting more enjoyable.
With Descript you can record, edit, transcribe, and manipulate sound all on one platform. This simplifies your workflow because you don't need to switch between a bunch of different tools. Descript also offers non-destructive editing, so you can experiment with edits without losing original content.
Plus, AI-driven tools like filler word removal and automated leveling speeds up the editing process, so you can focus more on content and less on technical details.
Want to join the thousands of podcasters already using Descript's audio editing app? Take a tour of the dashboard today.
FAQs about recording a podcast with multiple microphones
How do I set up a multi-mic podcast?
Start by deciding whether you’ll use USB or XLR microphones. With multiple USB mics, each person can record on a separate computer or, on Mac, create an Aggregate Device in Audio MIDI Setup. For XLR mics, you’ll need an audio interface or digital recorder that can accommodate every mic. Then, set clear mic placement—ideally a few feet apart—to minimize crosstalk. Do some test recordings to check sound levels, and record on separate tracks whenever possible so editing is easier in post-production. Finally, consider using a platform like Descript for recording and editing to manage everything in one place.
How do I record multiple USB mics for podcasts?
Using two USB mics at the same time is complicated, but doable. On PC, you'll want to use a free app called Voicemeeter, which will allow you to record inputs from multiple USB microphones. On Mac, you'll go to Audio MIDI Setup, click on the + icon to create an aggregate device, and choose the microphones you want to use. You can also check if your mic brand offers specialized software — for instance, Rode Connect works with up to four NT-USB Mini mics and records them on separate tracks.
A more efficient solution for recording multiple mics is to use XLR microphones with an audio interface like the Focusrite Scarlett 2i2. This eliminates USB mic compatibility issues and provides superior sound quality with individual track control.
A more efficient solution for recording multiple mics is to use XLR microphones with an audio interface like the Focusrite Scarlett 2i2. This eliminates USB mic compatibility issues and provides superior sound quality with individual track control.
How do I record a podcast with people in different locations?
Recording a podcast remotely is simple with the right platform. Descript offers an all-in-one solution for recording, editing, and publishing high-quality remote podcasts. Plus, you can import Riverside recordings directly into Descript for a seamless workflow.
How do you record a 4-person podcast?
Make sure you have an interface that has four mic inputs. Your best bet is XLR, but you can also use USB with the right configuration. Just make sure you have the ability to put each person on a different track in your editing software.
What is the best way to manage latency in a hybrid podcast setup?
Managing latency in a hybrid podcast setup involves using a reliable recording platform like Descript that offers local recording and syncing features. Clear communication protocols among participants can also help mitigate latency issues.
How can I ensure microphone compatibility with my audio interface?
Before purchasing equipment, check the specifications of both your microphones and audio interface to ensure compatibility. Consider factors like connector types and required power supply. Using different brands of microphones can sometimes help mitigate compatibility issues.
How can I prevent mic bleed or crosstalk when recording multiple microphones in the same room?
Use directional microphones, like dynamic mics, to focus on each speaker’s voice and reduce surrounding sound. Position each mic so that it’s aimed away from other speakers, and sit as far apart as possible. Have everyone wear headphones to avoid speaker feedback. Finally, record each mic on its own track. That way, you can easily reduce any remaining bleed in post-production with a tool like Descript.